children's table
Welcome! / Forums / General Woodworking Discussions / Projects / children's table
- This topic has 12 replies, 10 voices, and was last updated 9 years, 7 months ago by
 Marilyn Moreno.
-
AuthorPosts
-

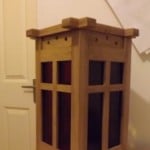
I made a small table for one of our kids. The top is 70x40cm. I started the construction myself until I noticed the plan was very similar to the table in @paul-sellers’s book and kept close to those directions.
A few making-of pictures and lessons learned will follow.
Attachments:
You must be logged in to view attached files.
Since this is my first table I dropped a few bricks, but I figure that’s okay in order to learn something.
I chopped one of the turn-button mortises in the vise (see attached picture) which was not a good idea. Especially with a soft wood, breaking through is nearly inevitable with the unsupported, thin portion of wood.
I used the stop cut method for the arches and went one cut too far at one point, which caused a split. I thinned a bit of glue with water which helps it to go all the way in and it looks okay now. The arches are not perfectly round, I hope this is a matter of exercise.
For the mortises in the legs I used a mortise guide jig, which helped a lot, I think they turned out quite nice.
The finish is a parquet floor lacquer and some wax polish. For a children’s table I didn’t want to use shellac for the top and I had some unused bin I wanted to give a try.
Overall, I’m happy with the result, it’s sturdy and straight and the kids like it.
Attachments:
You must be logged in to view attached files. 31 August 2014 at 4:27 pm #63078
That is VERY nice. For a first its great
The mortists are clean. it should hold up well.Frankj
 31 August 2014 at 5:02 pm #63079
Very nice little table David. Clean work throughout. I think everyone of us has blown through a workpiece when chopping mortises. It’s a right of passage I think.
Again, well done on the table.
 31 August 2014 at 11:23 pm #63103
very nice work i’m sure your little one will love it, but you do know now there is no excuse for not making the full size one good luck
 1 September 2014 at 1:23 am #63109
looks great David. quick question did you use a standard bevel edge chisel or a mortise chisel ,i ask because i find it hard to get good results with Pauls method of using a bevel edge and prefer the weight of a mortise chisel. just curious as your mortise holes look very clean and crisp. thanks regards David
1 September 2014 at 2:48 am #63110Fine job, well done.
After finishing such a project, one is filled with pure joy. 🙂 1 September 2014 at 8:48 pm #63145
looks great David , It is a great table design that can be easily adjusted to any size.
 2 September 2014 at 8:56 am #63157
Well done! very good work David. Thanks for the pictures, I always learn from them.
Thank you all for your encouraging words. It really is great to finish a piece.
[quote quote=63109]quick question did you use a standard bevel edge chisel or a mortise chisel ,i ask because i find it hard to get good results with Pauls method of using a bevel edge and prefer the weight of a mortise chisel. just curious as your mortise holes look very clean and crisp. thanks regards David[/quote]
I used bevel edged chisels by Faithfull. Very basic, but worked well with Paul’s mortise jig. It really pays to take the time making one, metal plated would be even better and make sure it’s wide enough, mine wasn’t so I had to shift to and fro.
David
 2 September 2014 at 6:44 pm #63198
That’s a nice looking table. I’m sure it’ll last a long time…
It always feels good to finish a project.MM
-
AuthorPosts
- You must be logged in to reply to this topic.