Drawbore Mortice & Tenon: Round Pegs (Method 1)
Posted 15 June 2015
This is a free video, want to watch it? Just log into the site, and you can enjoy this video and many more!
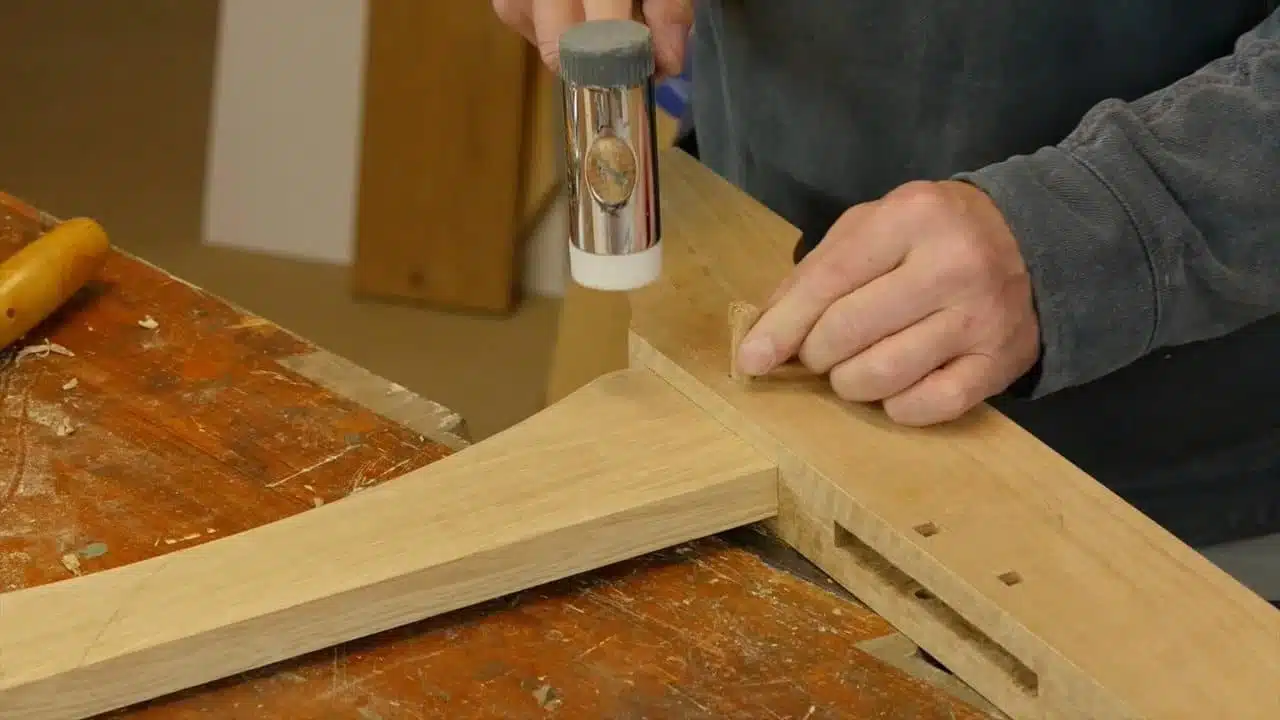
Paul shows how you can use a drawbore with an offset hole in the mortice and tenon to pull the joint together. Drawbores are a feature that have been used for centuries, so link past techniques with present day woodworking.
For part 2 (square pegs) click here.
So, so, beautyfull to see you work!! So inspired by your way of working. Tx
The square peg draw bore installation has produced an unacceptable shoulder gap on the show side of the table. This occasionally happens and I do not know why. The real question, however, is what is the best method to remedy this condition?
I’ve viewed the video a few more times and what I think I saw was that after several impacts of the hammer the tenon shoulder started to open slightly rather than being drawn in more tightly. I can propose only one explanation for this. The force of the pin being pounded into the offset hole caused the section of the tenon between the hole and the bottom of the mortise to fail placing that failed section between the bottom of the mortise and the pin. This would unseat the shoulder of the tenon by about the offset of hole (unless the mortise was deeper than the tenon was long).
While this sounds like an unlikely occurrence, take notice at 12:47 min in the video and you will see that the portion of the tenon in question has already been quite compromised, perhaps by the drilling operation, diminishing its ability to sustain the stress from the pin. Anyway, that’s the best I can offer as an explanation. My original question remains : can the unseated shoulder be somehow fixed?
Yes, at the bench, in front of a camera and trying to get a point across without sticking your head in between the camera and the project to check progress leads to added implications not normally present in the day to day of life at the bench. Obviously I can’t sometimes take care of such things at the time as I might on my own in the shop.
Secondly, I know that draw-bore methods generally work every time and so I am confident the method taught and the way it was taught will not present a problem.
Third, I would most likely use clamps in combination with the draw bore system.
Hope this helps, best for now,
Paul
Would you ever feel the need to use a drawbore pin to help ease the path of the peg?
I was lucky enough to pick one up at a car boot sale recently – seemed worth a gamble for a pound! Quite how a Goodell Pratt, Greenfield Mass. drawbore pin found its way to Kent, England would be a fascinating story, but I guess I’ll never know.
Martin,
Generally they are not necessary in today’s woodworking as we have screw-thread clamps that were not so available in the early centuries of the draw-bore methods. So, for general work today woodworkers have no need of them unless they are in some reenactment phase of life or trying to establish how and why things were done and trying to prove the efficacy of their usage. I would use them in places where clamps simply might be impractical or impossible–long distances too long for clamps for instance.
I own three sets but usually my joints seat fully when tapped home and I always use clamps too. The bending of draw-bore pins through the offset holes simply locks everything for me.
Also, re a US-made pin here in the UK is not so unusual when it comes t tools. Yanks brought tools over during World War II and many tools were swapped between Brits and yanks.
thank uncle Paul
paul , i am in asian country , wooden funiture is very very beatiful ,you can search google image with this key word : ” đồ gỗ mỹ nghệ “
It appears you are giving no consideration to expansion and contraction of wood with glue joints of opposing grains at major joints. Clamps did not erase hundreds of years of quality joint construction. But they do magnify the use of glue.
I’m blessed to live in the age I live in where I can benefit from your knowledge and craftsmanship while in my living room on the other side of the world. There are three things working wonderfully for you and the team Paul: 1) you have the skill and knowledge of a master craftsman 2) you are an excellent teacher 3) your team is able to translate that through wonderful quality video and camerawork and website skill. Please continue what you are doing as long as you can. What I am learning from you was lost to my father and his father, but I will teach it to my sons . . . or maybe we’ll just watch your videos together. When the time comes, categorize, write to DVD and store all the valuable work you’re doing and get a copy to the national library. No website lives forever, but the skills you are passing on should never be lost. Also, do you have people translating and subtitling the videos into other languages?
Thanks Paul for yet another great video.
I have a question regarding dismantling one of these joints for a restoration project. Ideally, I’d like to keep as much of the original as possible. I guess it would mean destroying the pins to loosen the joint but can the other two pieces usually be salvaged? Would you have any pointers to maximise my chances of successfully salvaging the pieces?
If anyone has any other suggestions, I’m all ears. Thanks
Yes, use a slightly smaller pin, metal or dense-grained wood and drive out the old pin if possible reversing it and so driving it back out. I doubt whether glue exists but it could. Depending on the glue type, and it’s most likely and animal glue, the joint can most likely be separated by hammer as the glues usually have broken down to some degree through expansion and contraction and atmospheric influences such as dampness and dryness. If not, steam can be used too.
Thank You for another great teaching video!
Paul- You are a wonder! When I was young I remember wishing that an amateur such as myself could apprentice to a Master woodworker and knowing that I never could learn these techniques, except poorly in print. Thank you so much for making a (no longer) young man’s dream come true by sharing your knowledge in an accessible way! Tim
It is not working with square pegs and square holes? Why rounding in case of square pegs? If you do square holes you could have true squares on both sides
The square peg is a feature without losing the advantage of the round aspect of draw bore making. Square pegs were just decorative and to add what you cannot get with a round one. All true draw bore pegging shows a gap because the pin or peg compresses on entry so if there is a gap it doesn’t technically matter. Often the wood compresses on entry through the offset hole and then remains compressed. Sometimes it swells back up if the atmosphere is humid and the problem then closes too.
I love the simplicity of your approach to wood working Mr. Sellers. So much that I have started to change mine, I’ll reach for a hand tool some times over one I have plugged in and ready to go,
thank you
Dear Paul
Another great video.
A couple of questions, please, if I may.
Does the peg have to be the same wood as the joint?
Can you please give us some guidance for the diameter of the peg relative to the size of the joint?
Many thanks
Chris
Hi Chris,
Pauls says:
It does not have to be the same wood as the joint. We choose the wood for the peg according to its springiness and resilience to breaking, don’t use brittle wood.
Kind Regards,
Izzy