Rocking Chair: Episode 1
Posted 5 October 2016
This is an episode in a paid series. Want to watch it? You just need to sign up as a paid member, and you can enjoy this video and many other videos we think you will love.
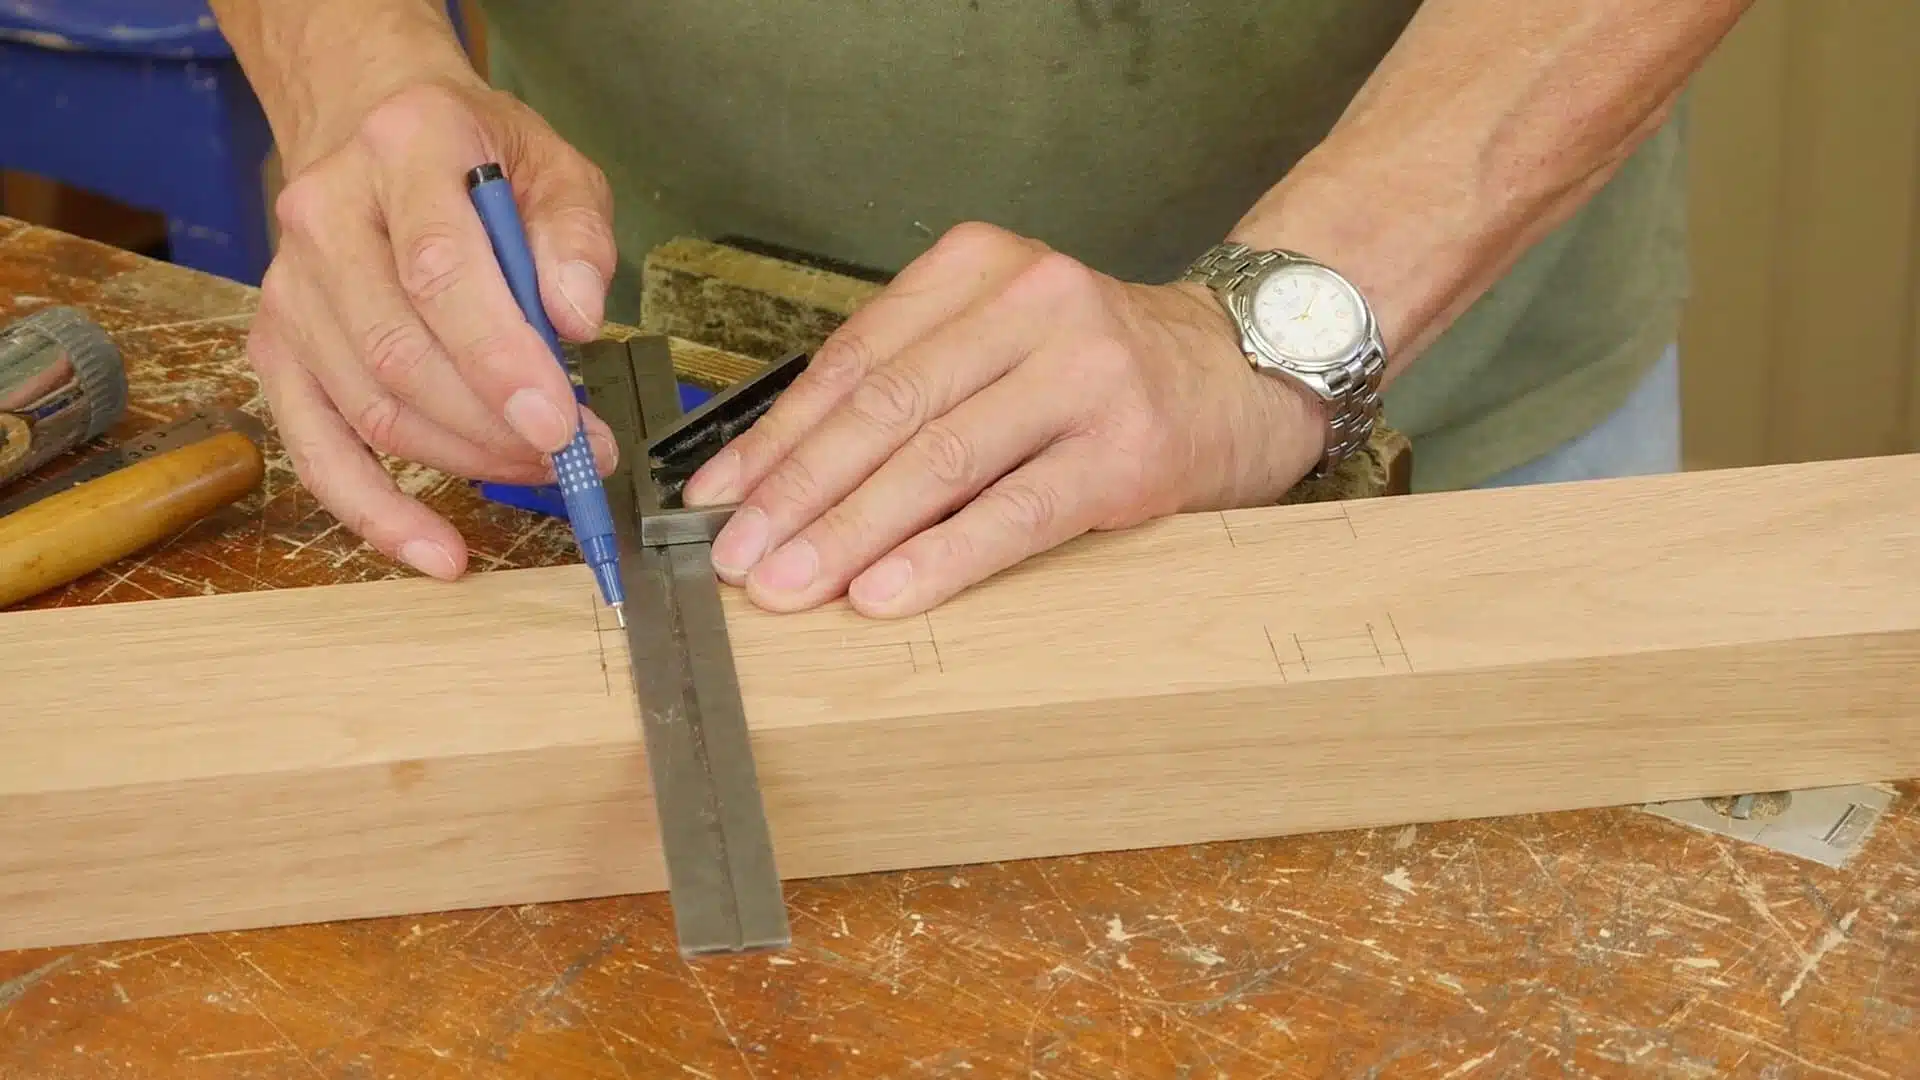
Paul starts this project with the preparation of stock and by discussing how to make best use of the material to minimise waste. With the stock for the front frame ripped and cut to size, the front frame is laid out, making sure to mark the mortises on the correct faces. The mortise jig is used to align the chisel for chopping the mortises parallel. Then the leg top tenons are laid out and cut, which will be mortised into the arms.
I like the time lapse effect 🙂
Not a big fan of it myself. I prefer to watch without the time lapse so it feels as though I’m actually there. Watching something as simple as cutting a piece of wood can provide valuable feedback.
I have to agree with Troy. I actually like to watch the whole proceedings in regular time. It kind of goes with the mind set of concentrating on the methods of work vice hurrying to completion.
Just my opinion though.
In the past, I think Paul has done the other pieces away from the camera (‘I’ll finish the other pieces and we’ll get back together after that’), so we didn’t see any of the repeat cuts. So, yeah, I like the time lapse showing the other pieces coming together too. Cutting all four in real time would greatly extend the video, so seeing the other pieces being worked, even in time lapse, is a treat.
I thought the time lapse was Paul’s real time not teaching/talking work speed…
I agree with troyl and others. I am a beginner, so every second with Mr. Sellers is a learning experience, even if it is something that he has explained before; there are always nuances, and, if nothing else, going over it is reinforcement. They speed it up, I assume, because they think that most people have the attention span of five-year-old. For someone like myself, when they speed it up it just feels like I am getting gypped of my money. It’s unfortunate really.
I need two arm chairs for our dining room. Would it be appropriate to leave off the rockers and make this a straight chair?
I am sure between this chair and the dinning chair you will be able to come up with something you are happy with.
Maybe, but I know that chair design is complex. I am particularly taken by the rocking chair design but not confident that I could adapt it to a dining room chair unless it is quite straightforward to do so.
I had the same question. It would be great to see a modification of this to arm chairs.
They both have upholstered seats on them. It might be as easy as making the height of the seat from the floor the same as the dining chair height and level all around.
The dining chair is very similar except that it doesn’t have arms and the back legs have two angles (knees) one above the seat and one below. the rocker only has one. You could easily use the dining chair measurements and extend the front legs up to put arms on and then use the rocker design for the chair back rest. One of the reasons I love the craftsman style furniture, it can be easily adapted.
Hello Andrew and others,
This is one of the questions that we will address in the first Rocking Chair Q&A session.
Many thanks,
Phil
Paul,
Is the timber you purchased a quarter-sawn board or have you selected a board that allows you to orient the grain in a certain way?
For example, have you arranged the grain for the legs to go from corner to corner diagonally across the leg (i.e. “bastard grain”) to give balance in the grain between the front and outside faces?
Thanks, Stephen.
Hello Stephen,
Paul will address in the first Rocking Chair Q&A session.
Thanks
I”ve got a silly question regarding the mortise jig. I”m assuming its facing the camera for our visual benefit, I’m curious if Paul uses it in this orientation all of the time ? It seems like it would be easier for me as a beginner to use it the opposite way so I can see more clearly as opposed to scooting up and looking down over the top of the piece ? I just want to make sure I’m doing it correctly.
I use it the opposite way from how Paul does in the video. I believe you are right, he uses it like that to show us. Works fine for me. I’m not as talented as Paul, so I would have a hard time doing it as he does.
I often use it the way that Paul has it set up. It is a matter of personal preference.
Paul will address in the first Rocking Chair Q&A session.
Thanks
The jig looks simple enough, but the dimensions must be critical. Is there a separate tutorial on how to make one to the right size? Thanks!
Hi Danno,
Paul says the jig is 3” wide, 3” tall 3
⅜ “ deep from the face of the guide to the face of the inside. The top section is 1 ¼ “ long.
Kind Regards,
Izzy
I have enough stock to make this chair from Maple. Does anyone think that is a good wood choice for this chair? This would by far be the most demanding and challenging project I have ever considered…
I have made 2 of the tool chests, and basically every other project here on WWMC, except wall hanging tool cabinet.
Nick – what type of maple are you thinking about here? The reason I ask is that there are huge differences between the species of “hard” and “soft” maples.
For instance, hard maple is about the same Janka hardness as white oak. Soft maple is significantly less hard, comparable with American cherry. Soft maple is also significantly less dense than hard maple. And hard maple is even stiffer than white oak, while soft maple is about the same stiffness as black walnut. (these figures are from Chris Schwarz’ Workbench book)
Personally, I find maple to be harder to work than oak, walnut or cherry – my main local hardwoods. It can be a bit brittle and if it is highly figured, it can be a pain to plane smooth. Not my cup of tea, I guess – but it would certainly be acceptable for a rocker.
Hello Nick,
Paul will address in the first Rocking Chair Q&A session.
Thanks
My question is similar to Andrew M’s. Would a rocking chair from this new series be feasible with no chair arms, like the earlier (armless) Dining Chair project? Or would removing the arms make the chair unstable or perhaps a different problem?
I play guitar and it’s a challenge to find a good playing position when sitting on a couch. Likewise it’s hard to find an around the house chair with no arms. For clarity, the right hand chair arm makes it impossible to hold and play a guitar for the right handed player. The instrument overhangs one’s right leg a good bit. The arm on the left is no problem, but 2 arms is a package deal!
The only issue I would see with an armless rocker would be getting in and out of it. Most people put their hands on the edge of the arm rest to steady the chair while sitting or standing. either in his video or blog Paul mentions that the dining chair is very similar to the rocker and you could put arms on the dining chair by simply extending the front legs. I assume the opposite would be true to remove the arms from the rocker.
In the past, many women had what were called sewing rockers that didn’t have arms. Do an image search and you will see them. I think they just rocked it forward and go up they way you would from a dining chair but I don’t remember for sure. In any case, they were very common. Almost every farmhouse had one.
Rocking Chair build is a great idea. Thank you for including the sped-up repeated content. Looking forward to numerous techniques you’ll teach in this wonderful project.
I agree with Anthony. There have been probably hundreds of mortise and tenons cut on woodworking masterclasses and it’s really not necessary to show them all at regular speed. Thanks for speeding it up.
Does anyone know what type of oak Paul is using. Red or white etc.?
Allowing for camera/lighting effects etc., it looks very much like White Oak to me, which is readily available as an import in the UK.
It is often cheaper to buy here than European Oak, which often originates in France….. at least most of mine was…..
Otherwise, you could use any straight-grained furniture-quality timber….. it doesn’t have to be Oak unless you have a preference for it.
Going back to the days of the Arts and Crafts movement, much of this type of furniture would have been made in Oak, then fumed to give a darker appearance.
Hope this helps
Thanks A Joyner. I have used red oak for some of the other projects as it is cheaper than white at my location in Idaho. I think that I remember one of Paul’s blogs stating that both are fine to work with but that white is better grained. I might give the white a try.
From my own – admittedly limited – experience of American Oaks, I note that the White Oak in general has a clearer colour and more homogenous grain, (at least the stuff we get here has), but that Red Oak is not considered durable. This is immaterial if you are making indoor furniture. Both work well and finish well.
This stuff is mostly kiln-dried and stable, but I’m always careful to allow the dimensioned bits to sit in a stable atmosphere for a few weeks; the thicker portions of wood can hide internal stresses that are released when you cut it, especially after re-sawing.
Good luck. I started one of these chairs a few months ago and it is at the glue-up stage.
Hey Paul,
Love the videos as always. Watching this first episode before i go off to college where i am Studying Bench Joinery. Its nice to see the college putting emphasis on the use of hand tools before moving on to machinery. Looking forward to the next episode! 🙂
I wanted to build the chess board with a table next, but dog gone it, this has to be my next project. I think it maybe more than I should attempt at my level, but I got to try it.
Thank you for the lesson.
Paul/Phil/Joseph – will we be able to get the whole chair out of that 8′ x 6″ x 2″? I suspect not, but I’m not sure. If I’m going to need more oak, I’d rather get it all at the same time. I’m going to make this chair again, having made it the first time on the one month course at Penrhyn Castle. In fact I’m sitting on it now, as I type. It’s been a daily delight to me, a constant reminder that I ‘can do’. But this time completely by hand, without hands-on help from Paul.
The PDF on the rocking chair info page includes a cutting list of all the stock required. We don’t give out the number of board feet required as it depends on the dimension of the stock you can get hold of, such as the length and width. Due to this, we don’t calculate the number of board feet for our own reference either.
Sorry not to be more helpful.
Best, Phil
Does anyone have a shopping list to take to a timber merchant for the right number and sizes of planks to cut down?
Cheers
I took the cut list on the drawing and mapped the pieces out to create my own “purchase list”. Here’s what I’m going to go shopping for, which turns out to be around 19 bf of lumber:
2x, 6 foot x 7 inch 8/4
2x, 6 foot x 6 inch 4/4
This doesn’t include material for the seat pan, which isn’t on the drawing at this point. We’ll need to wait for the video to get instructions on that – but I assume it will be made from lower-cost stock or sheet goods.
Hi Ted – a 6ft 8/4 board will leave you a bit short… In the video Paul had an 8ft 8/4 board by 7in wide from which he showed getting two back legs 45″(+)long, two 20″ (19.25″) for Top and Lower Support Back Rails, and two 24″ pieces for Front legs equals about 8feet. Also allow a little for working around any defects in the wood. Also in the video Paul had another 8/4 piece for the 30″ (2.5ft) for Rockers. The total is closer 11 feet of 8/4 (8ft plus 2.5ft)
Do the same layout on the 4/4 boards 6inches wide and you will find you need closer to 12 feet of 4/4 lumber. 2 arms 4-5/8″x24″, 1 each Top front (3.25) and lower front (1.25) rails 21.75″, 1 each Top rear (3.25″) and lower rear (1.25″) rails x 19.25″, and two each Top side rail (3.25″) and Lower Side rail (1.25″) x 18.75″
Hope this helps. – Al
Hi all, this is the first project that I’ve watched from Paul, can anyone tell me if he puts up any drawings / plans regarding the shaped elements of the work i.e. the back legs, arm rests etc. Thanks all, and like so many others have said….thanks for the inspiration Paul.
Go to the introduction page and there is a link to a jpeg cile in the text
Thanks doesn’t cover it, i’m eternally grateful for all i have learned and continue to learn.
Brilliant stuff, heart felt gratitude to all concerned.
Hello Paul, I was making a pattern for the back Post (leg) from page 3 and after I completed it I saw that the dimensions where different from page 1. Page 3 shows the length of the knee to be 11 3/4″ but page 1 totals 12 3/4″. Please let me know which is correct or if I am not totaling correctly.
I have made many of your projects and enjoyed making them.
Sincerely
Karey
Hello @kpreeseaol-com,
I have just worked through all the measurement corrections, and it should indeed be 12 3/4″. Thanks for pointing it out.
Best,
Phil
Hello Phillip – I found the same discrepancy. 12.75″ is the total on page one is the width of the two rails (3.25+1.25) and the two spaces in between (4.5+3.75) The total is 12.75″ (82.5mm+114.5mm+32.0mm+95.0mm = 324mm = 12.76″) Clearly a one inch difference in the dimension shown on page 1 and page 3.
i figure that Paul will cover this in the video when he gets to cutting the tenons on the ends and fitting the legs. He commented on leaving them long for now when he was showing us how to lay out the back legs in the video.
Best,
Al
Hi all, the biggest difficulty I have when starting a project is finding good quality timber. Where in the UK are people sourcing their stock?
Cheers,
Ewan
Started laying out mortises for the front legs this afternoon, but I ran into a measurement discrepancy between the PDF plans and this video.
– Page 2 of the plans says 8 3/4″ to the top of the top front rail mortise, Paul says 8 1/2″ at 15:25 in the video.
– Page 2 of the plans says 3 3/4″ to the top of the top of the lower front rail mortise from the bottom of the front rail mortise, Paul says 3 1/4″ at 16:35 in the video. (This one is also 3 3/4″ on page 3, but I have not watched that far ahead in the videos yet.)
Not the biggest discrepancies, I know, but I’d like to not waste wood and time if things don’t match up with the rear post down the road.
Anybody else work thru this?
Cheers!
I thought the same thing initially, but the distance on the plans is between the edges of the mortises. The shorter distance is between the rails. The difference is the 1/4″ you cut off the edge of each tenon. Hope this helps.
Also he marks the rear posts directly from the front so they align perfectly.
Thanks! I was just looking over the plans and see that is what he did. Makes sense to me now!
I was just recently asked by my Granddaughter, “Smarty” she said (that’s what she calls me “Smarty Pants”) can you make me a rocking chair for my bedroom? ” she is seven years old and wants to help me. I was wondering does this design lend itself to scaling? I was thinking of maybe half size or at the most 3/4 size.
Thanks for all the inspiration your channel provides me with
All the best
Geoff Butler
Hi Geoff,
Paul says without going through all the details, I believe it would work. Personally I think ¾ would be better as children grow very rapidly.
Kind Regards,
Izzy
I’ve built this chair (full scale) and, as I recall, the rockers screw on. My suggestion is to examine your modified chair carefully for whether it can tip over backwards, especially when intended for a child. If so, adjust the rocker length as needed for stability.
Forgot to say…if you build full size, she can keep it for life and, in the interim, there’s lots of room for stuffed animals to sit with her. There’s also room for grandpa, stuffed animals, a blanket, and the cat, so she can sit in his lap while he reads a book to her.
I’m sure this has been asked and I have looked but cannot find the answer. The thickest pieces need to be 1 3/4 inches and I have some rough sawn stock that is 2 inches thick, if after surfacing and straightening out the rough sawn stock it’s a little under the 1 3/4 would I still be ok to use it? I’m thinking maybe an 8th under.
Hi Rob,
Paul says absolutely.
Kind Regards,
Izzy
Thanks Izzy
Hi, where can I find the Q and A’s mentioned here? — Thanks!
Hello Dan,
The first Q&A episode appears between episodes 10 and 11. Here’s a link to it: https://woodworkingmasterclasses.com/videos/rocking-chair-info-page/rocking-chair-qa-episode-1/
The second one appears at the very end of the project: https://woodworkingmasterclasses.com/videos/rocking-chair-info-page/rocking-chair-qa-episode-2/
All the best,
Mark
Thank you!
How do you get to episode 2 ? It seems like this site is much harder to use than it was previously. I hope you can change it back. Sincerely David Collier
I’ve just gotten signed up as I just need to do this project!
As quite a beginner, what would really help is, with each episode, to mention the tools used in it, as well as linking out to other relevant lessons. For example, for this episode, link to Paul’s mortise jig instruction and list that the mortise chisel, ripsaw, etc. are used.
This would be helpful because not only am I building out a repertoire of skills along the way, I’m also adding to my tools. In lieu of just getting everything ahead of time, or purchasing/making as they come up, I could plan better for what is a longer process and that’d be excellent!
Hi Charlie,
I’m guessing that you are referring to the Seller’s Home Rocker. The original rocking chair video has a list of tools needed so they probably would be the same or nearly so. It was in 2016 I believe that the video for the rocker was introduced. All of the older video lessons included a list of tools and joints used but got discontinued along the way. I never paid much attention to the list because I already had a full set of tools. I hope that this helps out.
Charlie,
Benoit has given you some sound advice on watching all videos first. I agree a rocker is a very ambitious project for a beginner that you might want to work up to. Build a few of the easier projects first and have that success to build on before attempting the rocker. I think that Paul Sellers would tell you the same.
Charlie,
I would recommend to look at all the episodes of a given project before you start. I will give you a general idea of what is going on and why something is done because it might be a necessary step for something in a further episode.
(then you can also take note of the tools used).
Then look at each episode a number (1 or more) of times before doing it yourself.
Did you do the exercise of the “common woodworking” site before embarking on (what seems to me) an ambitious project?
This is actually in reference to Charlie Dibble, Jim Allen, and Benoit Van Noten:
First, Mr. Van Noten is dead on. Get the whole thing in your head by watching to the end.
But I would recommend not only watching all the way through a project, but watch them over again. I get so much out of my re-visits. Almost inevitably I see something I didn’t catch. I think woodworking is a way I find out things about myself — what frustrates me, what excites me, what makes my back hurt, how I discipline myself in more effective ways to get past a problem, or a difficult technique.
You say you have to do the rocker. If you ignored the advice (no one is keeping notes to add to your permanent record!) and started working on the rocker — something I’ve had my eye on, but still hold off because my very small shop would add additional frustration to working the larger pieces– you may very well find it too much. It might take you a couple of years to finish it, rather than a few weeks. This might be more than you plan on. But waiting because something is challenging is like waiting to get married or have children until a time you are “ready.”
But – there is always a but — there is something to be said for a half-way decent box. That box might lead to another box, with better dovetails and a panel lid, a few details in the top from the screw-in-a-block tool, too…..
As a side note, I’ve had the Cornhole virus (that’s what my 92 year old father calls Covid) and re-watching favorite project series has helped me keep my sanity, and put up with the profound weakness that I’ve experienced. Just sayin’.
Whatever you choose, have a grand time, Charlie. Love to see pictures.
ETA
Writing the above made me see something — reading these comments is a heartening experience. You have folks separated by distance, age, nationality, etc., all pitching in to help each other. Mr. Sellers has created something, along with the wonderful staff, that is quite wonderful. I have a fantasy about getting all the various political groups signed up and learning from the interaction here how one goes about achieving something without getting sucked into hatred. Maybe another reason to bet my $2 on Powerball!