Another workbench w.i.p
Welcome! / Forums / General Woodworking Discussions / Projects / Another workbench w.i.p
- This topic has 64 replies, 19 voices, and was last updated 9 years, 3 months ago by
arod49.
-
AuthorPosts
-

So I actually made it this week to get startet on the workbench. First half week of this holiday was spent on other errands, but thursday I could begin. I followed the directions in Paul’s book.
First I went to the lumberyard. Since I’m in Germany, I had to shuffle dimensions a bit to match the available wood. I ended up with three 8x10x150cm for the top, six 4x10x150cm for the aprons, four 8x10x90 for the legs and two 4x10x120cm for the four rails. Didn’t remember to have 1″ surplus, so either I won’t cut and plane it or it will be a bit shorter than 5ft/150cm. I have some smaller boards as bearers and still have to decide on the wood for the well. Since I will have to see how the final dimensions will be, that will be left for towards the end of the project. The pretty thick chamfer of the wood is a bit of an issue, but I think I will only plane the top completely flat.
Second step was to plane the boards for laminating. Tried a vintage Record no 4 I just got, but it will need some adjustments. The ECE wooden smoothing plane was okayish, but I wound up using the contemporary Stanley no 4, probably because I am most accustomed to it, and it worked very well. Laminated the top on thursday and left it overnight.
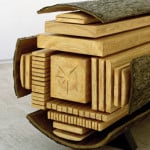
Yesterday, I laminated the aprons. I noticed, that two pairs of boards are bookmatched, so I integrated that little visual feature. After planing the legs (already using the top) I went to the layout of the legs and chopped two of the mortises.
Today, the remaining mortises are cut. Have you ever noticed the shavings look like wooden blinds if the growth rings follow the mortise? I like that.
I cut the rails to oversize (60cm) but had not time to cut the tenons. I still have to decide on how wide I want the leg frames to be, but I figured since the well board will be made to fit, it isn’t as critical.
For a vice, I ordered the 53ED from fine-tools.de which I hope will perform as good as an old record.
I hope I will be able to complete the workbench within the next weeks, depending on how much I get done in the evenings and saturdays.
Thanks for reading.
David
Attachments:
You must be logged in to view attached files.
Good work David. I too am following Paul’s book, and am also tailoring the dimensions to suit my own needs. How many times during the build have you thought, “…wish I had a bench to build this on…”? I lost count myself. 🙂
Look forward to seeing the finished article.

David: yes, I was surprised myself. I am still a bit anxious about how it will all fit together, and whether I have overlooked something important.
Franco: I do have a workbench, which I used today, since it was too cold outside, but I had seen Paul’s video on the large workbench he built in his garden, which is also build from scratch. After the top with a few clamps you can do most work with not too much extra effort.
Denise: The order of the pictures is reversed, but I guess this is obvious from the reading.
Thanks for your comments.
David
 1 February 2014 at 9:11 pm #27000
Thank you very much for posting, David. Very solid legs. Are you using spruce?
I’m starting my new workbench too (next week, I think).
I’ve found 4 @ 90mm x 90mm for the legs and 4 @ 70mm x 70mm for the rails; actually I have some doubts about the dimensions of the top cross rails: are 70mm enough for the haunched tenons (~20mm for the haunch)? The thickness of the tenons will be ~25mm.

Looking pretty good there David. I’m building my own workbench at the moment so I fully appreciate the problems you’re facing even though I already have a cobbled together workbench to work on. I don’t know about you but I’m finding that making this bench is a really fun project.
It is indeed fun and I encourage everyone to give it a try, even if you are early in your woodworking career. I started only about four months ago.
One thing I would like you opinion on is whether I could peg the rails to the legs instead or in addition to glueing. I am not absolutely confident my mortises are good enough. There was noticeable deviation on some after breaking through from both sides.
I also consider wedging the aprons like Paul did in the workbench video, though I am not sure I would do it right.
David
 2 February 2014 at 2:04 am #27022
It’s looking really good so far David. I think you will be surprised at how well your tenons will fit up to your mortises. I remember worrying about the same thing. After working very hard to pull the first dry fit apart, I realized that glue would be plenty strong enough. It has been rock solid so far.
 2 February 2014 at 1:38 pm #27045
David looks a grand effort Mortises look fine to me.
Remember you can always make your tenons a bit fat.
-
AuthorPosts
- You must be logged in to reply to this topic.