Chopping Mortises in Doug Fir
Welcome! / Forums / General Woodworking Discussions / Woodworking Methods and Techniques / Chopping Mortises in Doug Fir
Tagged: mortise practise mistake
- This topic has 10 replies, 7 voices, and was last updated 5 years, 3 months ago by
sanford.
-
AuthorPosts
-
11 January 2019 at 5:05 am #554428
Hello folks,
I’m having a bit of a time with mortises. I have been practicing on scraps but rather than being clean they come out looking like something from Arbys.
Pretty sure that my chisels are sharp, I use the DMT diamond plates from coarse to xfine and then onto a piece of 2000 grit sandpaper before the strop. The chisels themselves seem more than decent. A set of old Footprints with the Beech handles. Right now they have a 30° bevel and I am wondering if a 25° would be better.
Any thoughts?
 11 January 2019 at 6:03 am #554429
How about some pictures? Or at least an explanation of what you thing is going wrong? I’m sure there’s plenty of folks here glad to help, but they’ll likely need more info.
Best Regards,
-T11 January 2019 at 8:27 am #554437A few random thoughts:
I think it’s helpful if you’ve scribed the mortises with a gauge so the pins have scratched the surface in the same way as a knife wall.
It also seems important that the width of the scribe lines is a gnats whisker *wider* than the width of your chisel, so the edges of your chisel are within the scribe lines.
It’s important not to bash the chisel too hard, especially when forming the edges of the mortise hole.
It could be the edges are a little more prone to splintering if the grain is really diagonal.
it’s really important to keep the chisel vertical in the lateral plane.
I built my workbench from Doug fir and had no problems cutting the mortises, so I don’t think it’s a problem particular to this species.
As Ted says, if you put up more info and a picture of the issue there’s heaps of folk here who can help you. But otherwise it’s just guesswork!
Cheers, Andy

[quote quote=554437]
It also seems important that the width of the scribe lines is a gnats whisker *wider* than the width of your chisel, so the edges of your chisel are within the scribe lines.[/quote]
As a beginner (and several… not so good mortises) I tend to make a small elephant out of that gnat, because
[quote quote=554437]
it’s really important to keep the chisel vertical in the lateral plane.[/quote]
As a beginner I have much more deviation in several tasks than (very) experienced woodworkers like Mr. Sellers – think of his words about “muscle memory”.
The thicker whisker makes it easier to stay between the scribed lines from the gauge.Another two opportunities to muddle mortises are out of square sharpened chisels (they tend to dig in the direction of the smaller angle between the edge and the side of the chisel) and changing chisels (I Thought: Having a 20mm Narex chisel and a 20mm Kirschen chisel, the Narex is dull now, but the Kirschen is sharp – what can go wrong there? You guess it: a slight deviation in width, and of course I made the “chisel plus gnats whisker” setting with the narrower chisel.)
Hope that helps,
E.
11 January 2019 at 3:36 pm #554450Dont wellie on the chisel , dont twist it in the mortise , dont lever on the sides or ends , use a smaller chisle to clean out , and clean sides with a wide chisel. Lightly
Chayne, as Ted suggests, a picture would help, or must more information — maybe because I have not eaten at Arby’s for 40 years or so! Is the problem that the rim of the mortise are bad, which is a problem for barefaced tenons since that raggedness shows on the finished M & T? Or are the walls of the mortise all the way down ragged? Those are slightly different problems.
As to the bevel, lots of folk actually prefer 30 degrees for a lot of their work, and even if you start with 25 degrees, if you sharpen as Paul does, the slight “macrocamber,” as I think he calls it, will bring the tip to 30 degrees or so. If you keep it 25 degrees all the way to the tip, the tip could dull quickly chopping a mortise.
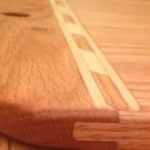
14 January 2019 at 11:22 pm #554501Sorry it took awhile to get back. This photo is of my earlier attempts. Since then I have varied the technique a bit and they are getting cleaner.
[attachment file=”20190110_123344.jpg”]
[attachment file=554502]

That’s really not bad. I used doug fir also for the legs. It will splinter around the mortise opening when you twist the chisel or otherwise lever sideways. Also, make sure you used a marking gauge to deeply score the sides of the opening. The gauge lines should be just a touch wider that the chisel. And keep the chisel sharp. I think you will have less tearout overall since it will cut fibers instead of crush. In the end, no one will ever see those mortise holes. 🙂
Ragged mortises: welcome to the club! Three things can go wrong when chopping a mortise that give the “arby’s” effect you are talking about. First, the outer edges of the mortise, at the opening, can be chipped and ragged. Second, the walls of the mortise can be ragged. And third, the ends can be ragged. I have had all three problems, and have gotten better with all of them. As to the first, the outer edges at the opening seem to get ragged because the chisel does not go straight in and out. Any variation from the vertical when driving the chisel in or pulling it out, leaning it side to side, will damage those outer edges. I guess that is just practice. I know some folk start by chopping the full length of the mortise to only a mil or so, and I have found this helps me preserve the edges of the mortise. As to the second problem, any chopping will produce some tear in the walls. But the walls of the mortise can be torn too much, again, if the chisel leans this way and that as you chop. So keeping it vertical is crucial. Also, in some of the first videos I saw from Paul on chopping a mortise, he ended by dragging the chisel back and forth in the mortise to smooth it a bit. That can work if the mortise is tight on the chisel. It will not work very well if you end with a mortise more than a hair wider than the chisel. In later videos, he pares the walls down after the mortise is chopped. He uses a jig to help keep the paring chisel nice and straight. On this approach, you plan for the mortise to be a bit wider than your chisel right from the start. There is one other approach to smoother walls. When you drive your chisel in, you can level out the chips. As you lever, the edges of the chisel can smooth the walls a good bit, as long as the mortise is nice and tight on the chisel. In my (limited) experience, this works best if you use a real mortise chisel which is made for levering waste. When I chop mortises, as Paul often does in his videos, using a bevel edged chisel, I do not level very much since I am concerned about breaking the chisel, or at least damaging its edge. Some of my cleanest mortises have been done with old “pig sticker” mortise chisels I picked up since I can lever aggressively with them. Also, I found that with a bevel edged chisel, I got decent results with oak and even pine, and rather nasty results with Doug Fir. As to the final problem, the ragged ends, that is a bummer, and it is especially a problem in woods like Doug Fir. It is a difficult combination of very soft wood and very hard grain. Sometimes, though not always, the grain is ridiculously hard. Chisels dull fast when chopping a mortise, and doubly fast when chopping through some of the harder grain. So those dull chisels tear the wood as you try to chop straight down. One solution is frequent honing of your chisel when doing the ends of the mortise. My preferred approach is denial.
-
AuthorPosts
- You must be logged in to reply to this topic.