Geometric inlay cutting board
Welcome! / Forums / Project Series / Breadboard-end Cutting Board / Geometric inlay cutting board
- This topic has 9 replies, 3 voices, and was last updated 5 years, 7 months ago by
 btyreman.
-
AuthorPosts
-
 21 July 2018 at 5:19 pm #549530
My first WWMC project. Red oak, with poplar + red oak inlay. Being a beginner, I struggled somewhat. But I’m happy enough in the end. I’m making a couple of these as practice for a breadboard-end table top, a la Paul’s.
I made one pretty dumb mistake in particular. I took a bowl of water with a rag in it to my shop one day, but ended up not using it yet. I was going to wipe the board with the wet rag (old T-shirt, really) to raise the grain as Paul did. Well, I let it sit out a couple days, all the water evaporated. The rag, or course, smelled a bit moldy. When finally ready for that stage, I got fresh water in the bowl — and the now-smelly rag — and wiped down the board. Went back an hour later as per Paul, and … mold was all over my board!
I got it all off, but it wasn’t easy. I planed, and scraped, and planed and scraped … and sandpapered … eventually, I ended up pulling out my random-orbit sander (one of my *very* few electric tools) and was able to remove all visible signs of mold. Then I cleaned the entire board with bleach water, hydrogen peroxide, baking soda + vinegar. When it all dried, all was good. But I’ll never make that mistake again.
I also struggled with the shoulders, as you can see in the pictures. This is despite owning a shoulder plane, which obviously I’m still learning to use properly. I simply wasn’t able to maintain and line up my knifewalls very well. The ends and shoulders met nicely over a large part of the joints, but some not so much. And one place in particular is pretty dang bad — that’s where I let myself get frustrated and in a hurry with a chisel. I even re-cut half of the shoulder lines at one point. In the end, and since this is largely just a learning project, I decided to place Paul’s geometric inlay over the shoulder lines on the top of the board.
I cut the pins with washers. I considered buying a dowel template — and may still at some point if I end up making a lot of dowels — but for $0.50 (or whatever it was), I simply had to try the washers. Used 2 washers, 1/2″ and 3/8″ ID.
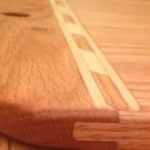
The first picture is the top before inlay. The top shoulder has gaps, don’t think they show very well in the picture, but you can definitely see it in the bottom shoulder — that’s my worst.
The second picture shows one of the tongues after starting the inlay housing cuts.
Attachments:
You must be logged in to view attached files.
21 July 2018 at 5:31 pm #549533Some pictures through the inlay process.
I finished with that Butcher Block conditioner, it’s mineral oil + bees wax + carnauba wax. 4 coats, and even that didn’t use too much out of the bottle. 2 coats with just the mineral oil one, then 2 coats that included the waxes.
Attachments:
You must be logged in to view attached files.
21 July 2018 at 5:44 pm #549538You may notice that the bottom end piece has some pretty gnarly grain. It looks pretty, but it taught me to be even more careful about selection and placement of pieces.
In the picture of the bottom you can see the shoulder lines certainly aren’t ideal, but good enough I guess — again, this is my first, and a learning project.
In the picture of the tenons, the one on the right is still a little wet in the corner, that’s not a gap. You can see I have lots of gaps, but that’s not one of them 🙂
The other tenon shot is the top.
Attachments:
You must be logged in to view attached files.
21 July 2018 at 5:54 pm #549542Some of the tongues look pretty good, some not as much, but I’m fine with the way it turned out.
You can see in “16” that I had to plug a hole. I let myself go too fast again, and had a blow out with the router; after that I went from both sides like I knew I should anyway.
Again, being a new woodworker, it didn’t even occur to me beforehand that the inlay housing would be about half across the grain and about half with the grain. You can see the plugged hole came from chipping out a piece going with the grain. I’m learning things that will seem obvious with experience 🙂 …
Attachments:
You must be logged in to view attached files.
21 July 2018 at 6:00 pm #549547I realize the number of posts, pictures, and description aren’t in proportion with the weightiness or interestingness of the project, but I hope you don’t mind. A couple of final pictures of the tongues.
Thanks to Paul and crew for all of your products. I feel very lucky to have found Paul before I got too deep into the often misguided advice you find from non-Masters out there on the internet.
Attachments:
You must be logged in to view attached files.I don’t know if you tried this, but if you find that you need to adjust a shoulder, it can be very helpful to freshly sharpen your knife, get a straight edge onto the shoulder, and then knife a new line. This gives you something that is dead straight that you can register your chisel in. You’ll be surprised just how close you can get to your edge and still knife a line. Usually, when knifing a correction, there will be places where the knife line goes to nothing and places where there is more to cut away.
How you get the straight edge on there depends upon what/why you are correcting, but usually you are trying to get both straight and square, so you’ll use a square from a reference edge. You can do this to get shoulders on two sides to match up again.
You did a nice job on this. Thank you for posting the photos.

it will be interesting to see how your board copes with movement over time, there’s a chance that the inlay could crack or come loose, if it was me I’d have lived with the gap and just started another project and learn from the mistake, but at least you got to learn inlaying, it makes the board unique.
22 July 2018 at 5:34 am #549552@ed thank you for your kind words. I did indeed use a knife to mark a new line at the lowest point, and the 2nd shoulder was better than the first, just still not what I’d hoped for … still learning
@btyreman at first I wondered if the inlay would weaken the joint, and I guess it does at least some, I just don’t know how much. I didn’t even think about the inlay cracking or coming loose, I’ll have to watch for that. Like you say, at least it was fun to try Paul’s geometric inlay on a real project.
20 September 2018 at 5:54 am #551938@btyreman I can say 2 months later after almost daily use, washing and drying, that the inlay is holding up very well. Maybe I’ll respond at 12 months if I remember. The glue-to-wood ratio of the inlay itself is very high, so maybe that’s a factor. I will say, though, that I got a couple of cracks not related to the inlay. One is from where I didn’t fit the haunch of the tenon carefully enough and it splayed out the groove on the end piece a bit; the second is also on one of the end pieces, and I’m not sure why it formed. Neither is very serious, and both appear to be stable (i.e. not growing or reducing the functionality of the piece).
-
This reply was modified 5 years, 7 months ago by
 ted clawton.
-
This reply was modified 5 years, 7 months ago by
-
AuthorPosts
- You must be logged in to reply to this topic.