Green cherry for cane?
Welcome! / Forums / Project Series / Walking Cane / Green cherry for cane?
- This topic has 8 replies, 5 voices, and was last updated 10 years, 2 months ago by
 bertd.
-
AuthorPosts
-
 8 January 2014 at 10:17 am #25509
Hi everyone,
I got a bunch of cherry for free, trimmings from a majestic 75 year old cherry tree.
Most of it are short branches and they will become spoons and spatula’s mostly, but there are a couple of longer pieces that I’d like to turn into canes. I’m very green at woodworking, so I have a few questions I hope you guys can help me with.
First off: is cherry going to be strong enough to make a cane? I’m thinking of making something like Paul’s hiking cane for my brother in law. It will likely be used for long hikes in the woods while carrying a heavy backpack.
How do I best approach this? Would it be best to let the log dry first and then make the cane or should I rough out the pieces and let them dry and then finish the cane when the pieces have dried?
Thanks a lot in advance for any help. 8 January 2014 at 2:54 pm #25527
IMHO: I would rough out the pieces, then let them dry. I would guess that smaller pieces would dry quicker than a log would.
You might even be able to build it in all green wood like green wood chair builders do. The idea being the joints in the drying process become lock tight together. Then sand and finish after the wood dries.
I am hoping someone with much more green wood experience can chime in on this and set the facts straight.
 9 January 2014 at 10:26 pm #25632
Green cherry will likely check too much left in larger sections. My suggestion is dimension down to sizes you can resaw later on the bandsaw. go to a candle supplier and buy some wax, heat the wax in a double burner and wax the ends. other than that paint the ends and up six inches or so. that way it will dry with less checking and leave you with more useable wood.
9 January 2014 at 10:28 pm #25635Cherry will make a nice cane, make the sections 20% larger for extra support as it is a little more brittle than other woods. It will make a good cane.
20 January 2014 at 10:58 pm #26278Sorry to reply so late to this, I must have set my email notifications wrong for this forum.
Thanks a lot for the input, especially from Paul himself of course.
On a another -Dutch- forum I also got the advice to seal the ends with candle wax to dry the wood. I have graciously chosen to ignore such good advice and just followed my own stubborn mind. After cutting a few spoons from the green wood and drying the rough pieces before finishing them, I decided to use the same procedure for the cane. The one branch that was long enough for Paul’s hiking staff (I believe that’s what he called it) was very crooked and had a distinct bow shape to it. I split the wood to about four times the thickness I want and then axed, chiseled and planed it so that the bow was minimised as much as possible thinking that a slight curve is going to be a good thing while an overly pronounced curve would be cumbersome on the trail. I’m a proud veteran of Hadrian’s Wall and the Pennine Way, so I think I can follow my intuition when it comes to walking canes.
I sort of squared the piece of wood, without wasting time on removing any twist. The end result will be more or less round, so who cares about twist? The squaring does help in gauging the thickness and the overall shape. And I will want to have a flat reference face for the tenon of the handle of course. I a few weeks when everything is dry I’ll try joining the staff to the handle. My brother in law doesn’t know I’m making this for him, so if it all goes pear shaped I lose nothing and gain a bit of fire wood.
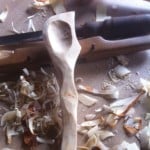
Here is a picture of the wood half way split and roughly shaped for drying:Attachments:
You must be logged in to view attached files.
20 January 2014 at 11:13 pm #26281Oh, about that band saw: I found this site while looking for a better way to get into woodworking rather than spending €6K+ on loud, bulky and dangerous machines, but from what I’m learning here a band saw might be the one stationary machine worth buying. But for now I’m still looking to expand my arsenal of important tools like handsaws, a spokeshave, a gouge etc. I did get an eclipse coping saw and some scrapers from amazon recently, and I really enjoyed shaping the scraper to the curve I wanted. Turns out a screwdriver works great as a burnisher.
Any progress on the staff will be reported here, ofcourse.
1 February 2014 at 4:06 pm #26980Just a quick update for whoever might be interested or is thinking about doing something similar:
I roughed out the staff and left it to dry in the garage. When it felt dry to the touch I took it inside to dry further (it’s cold and wet outside and my garage is detached from the house and unheated) and that’s when disaster struck. I have some very deep and rather wide cracks, all around knots which are plentiful in this piece of wood. This wasn’t going to be a nice and straight cane anyway so I decided to leave the cracks and just hope the wood is strong enough despite them. I made the mortise and tenon for the handle before shaping and I must admit it’s far from perfect. But it fits snugly, so combined with a wedge in the tenon it should be solid.
Lessons learned:
1: don’t get impatient when drying wood
2: buy a marking gauge and practice M&T’s
Hi Arnoud,
Two winters ago I got a walnut try for free that I’ve got resawn into board into 1″ boards and I’ve got the advice that it needed to be stickered outside.
I’ve put it under my carport, in a part that was not that windy and after a year, I’ve moved it to my attic (where I do my woodworking) and it’s already very dry. Also waiting to make something out of it.Regarding the marking gauge, check Greg’s plans of check this one from the literary woodworker
-
AuthorPosts
- You must be logged in to reply to this topic.