Half-Blind Dovetails
Welcome! / Forums / General Woodworking Discussions / Woodworking Methods and Techniques / Half-Blind Dovetails
Tagged: dovetails
- This topic has 20 replies, 7 voices, and was last updated 5 years, 5 months ago by
 btyreman.
-
AuthorPosts
-
 28 October 2018 at 11:04 pm #552873
I’m having trouble with half-blinds.
1. I have a gap at the top of the dovetails.
2. I have a gap at the base of the dovetails. 28 October 2018 at 11:21 pm #552874
Paul gives some recent tips in the workbench drawer video. Good views as he goes through the process
29 October 2018 at 12:09 am #552875Sounds like they are too short and too tight. Like you didnt get the inside corner all the way to the other inside corner
29 October 2018 at 12:17 am #552876Anthony
I got much better results when this happened to me when i sawed well away from the line and pared close to the knife wall and test fitted and adjusted rather than try to achieve it off the saw. (maybe Paul can do that but not me)
PhilI would like to see a picture to get a better feel. @deanbecker’s comments sounds plausible.

sounds like the back edge or the pins might not be flat and square, I always check everything with a square and small ruler to make sure everything is right before attempting to drive in the pins, it may be that your stock wasn’t quite four square or has moved since marking it out. How big is the gap?
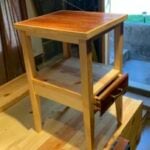
It looks like you actually put substantial filler patches in at the end of your pins. I do not know the thickness of the stock, but if it is 1/2 inch stock, the patch looks to be over 1/8 of an inch! And the unpatched gap at the other end seems a bit less. But why the patches? I assume that without the patches, the whole thing did not fit properly. Hence the need for patches.
From my experience cutting a number of very bad half blind dovetails before I got decent ones, I think that these gaps are much too large for just being the result of inaccurate sawing and chiseling. So I bet this is a layout problem. Here is a thought. I look at the closest edge in your picture The depth of the tail (from edge of the tail board to the shoulder line of your tail) seems the same as the thickness of your stock. If your stock is 1/2 inch, then your tail seems to be 1/2 inch. (I held a ruler up to my screen to confirm this.) If so, that tail board would be right for a through dovetail, not a half-blind dovetail. So you need to review how to setup the tail board from Paul’s videos on half-blind dovtails.
One other thought. Try practicing with a single half-blind dovetail on a narrower board. There are fewer variables and it is easier to figure out what goes wrong.
Would you post a photo looking at the inside of the joint, too, please? Did you use the method that starts with a rebate?
This looks like a layout error, but I’m not sure what exactly. Perhaps the photo of the inside corner will tell us more. The tailboard should have had a slight, 1/8″ deep rebate in it. The width of the rebate should be the thickness of the pin board minus a bit, maybe 1/8 to 3/16. You cut the tails so they end on the shoulder of the rebate. You then put the tailboard onto the pin board nestled tightly into the rebate. You then trace the tails and remember to cut leaving the line.
Ah! The other thing that could have done this would be tracing the tails with a dull pencil plus cutting on the wrong side of the pencil line for the height of the tails. From the size of the gap, it would have had to be a really dull pencil though, so I don’t think this is it.
29 October 2018 at 7:49 pm #552888Thanks for the reply. I used Paul’s method. I rebated the back of the tail board by 1/8 which left the tails at 5/8 thickness. The pins are 1/2 inch wide. Too wide? I cut some on a narrower board with better results. Again, thank you.
How wide was the rebate on the tail board and did you use the rebate to trace onto the pin board? I think these are the two critical things with regard to layout. It looks like somehow you laid out the tails offset from where they are supposed to be on the pin board.
Is the other side of the drawer okay, or are both sides like this?
29 October 2018 at 10:06 pm #552890Rebate on tail board is 5/8 wide. Yes, rebate was used to trace. Both sides are like this. I remember both tail and pin board being bowed. This could lead to an out of square end on both boards and therefore an offset issue. I’ll clamp a piece of wood to each board when squaring the ends with my #4 Stanley. I’ll do the same when sawing the tails and pins. Not sure if this would matter.
I’m a little confused by your numbers, so I’m going to just make up new numbers as an example. Suppose the front of your drawer (the pin board) is 3/4″ thick and your sides (tail boards) are 1/2″ thick. With such a thick front, I’d subtract 3/16 from 3/4, which is 9/16, and this is how wide the rebate would be. I’d make a rebate on the sides 9/16″ wide and 1/16 to 1/8 deep. Next, I’d cut tails into the side boards. Their length would be exactly the width of the rebate. Now, with the tails cut, I’d put the drawer front in the vise and hold the tails up to it, seating firmly in the rebate, and then trace the tails onto the front of the drawer to define the pins.
Is that what you did? I have the feeling that your rebate width wasn’t properly related to your layout on the front of the drawer.
30 October 2018 at 1:50 am #552896Correct. Instead of 9/16, my rebate was 10/16 or 5/8. Yes, I agree with the width of the rebate not matching the layout of the front of the drawer. Since the drawer front was bowed, I remember having to rock the tail board from one side of the pin board to the other when laying the pins out. This could have caused an alignment error since the tail board was not fully seated against the pin board. I’m thinking the scrap piece of wood clamped to the pin board to take the bow out will result in the tail board being fully seated and maybe reveal discrepancies.
This has greatly helped Ed. I appreciate your time. I would not have come to these ideas without our responses. I have at least 4 more half blind corners to make. I’ll post more pics hopefully with better results. I’ll be sure to incorporate our ideas.
Hope it helps!
There are times when flatness doesn’t matter, but this is one of the times when it really does. You do need to have things flat and twist free for drawers. The better you can achieve this, the better your drawer will be. I would probably make a final check and correction for flatness just before starting the joinery and I’d keep my materials in a plastic bag thereafter until glued up. If there was a tendency for things to move, I’d not leave things on my bench but take them in and out of the plastic bag as needed.
-
AuthorPosts
- You must be logged in to reply to this topic.