Hand sawing
Welcome! / Forums / General Woodworking Discussions / Woodworking Methods and Techniques / Hand sawing
- This topic has 18 replies, 9 voices, and was last updated 7 years, 6 months ago by
 oltexasboy.
-
AuthorPosts
-

I am new to working with traditional hand tools. I’m good with modern tools but reall want to prefect traditional Woodworking. Can anyone help me with what I’m doing wrong with the hand saw.
[attachment file=”IMG_2227.JPG”]
[attachment file=140894]
Attachments:
You must be logged in to view attached files.Are you asking about why the edge of the cut is ragged and chipped? You need to mark the cut with a knife and then cut on the waste side of the knife line. The knife line needs to be deep enough too- Make a very light pass with the knife, then two or three progressively harder passes to deepen the knife line. Bring the knife line all the way around all four sides. When the fibers try to break out from the cross cut, the knife line stops them from going into the good piece you are trying to retain. Only the waste will have a ragged edge. If you are cutting a board into a series of pieces and you need each to have good edges, then you knife two lines all the way around separated by a distance equal to a bit more than the kerf of the saw, usually around 1/16 to 3/32.
I’m asking about cutting straight. I did the knife wall and my saw stayed straight about 2″ in and then strayed right. I couldn’t correct it so I kept sawing just to see how bad it was going to be. I’m practicing the sawing on some glued up 2X4 pine framing lumber for a bench top.
[attachment file=140900]
Attachments:
You must be logged in to view attached files.
Many things could be at play. Your stance, the way you arm comes away from your body on the push stroke, your aim, poorly set saw i suppose could cause ‘pull’ to one side, too aggresive tooth? My first thought is your alignment. Paul goes over stances and mechanics in some of the videos, i think on the tool and technique ones. If i remember i will post link.
Dont give up, try and slow it down and take less aggressive strokes.
BrianJ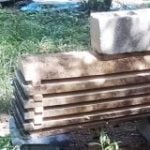
Are you sawing from both sides? Paul has a couple videos where he counts his strokes, following the knife wall, saw handle angling down further with each stroke and then switches to the other side and repeats the same task. It allows you to cut to the line on each side. Just a thought…
That is a fair bit of curve. Since the cut is so long and given the way it looks, I’m guessing this is not a tenon saw / back saw? Oil the blade on both sides, just like you would a plane sole, to eliminate any binding, loosen your grip, relax, and be absolutely sure you are not twisting the saw blade. If the saw curves when you are relaxed and not twisting it, then it is an issue with the saw, probably the set. Tell us about the saw.
You might also try a cut along the grain of a piece of thinner material like a 1×4, even if it is a cross cut saw, and post a picture of that, but take a photo of the cut after three or four inches rather than cut through so that we can see the kerf and the wood on either side of the cut.
If the saw isn’t binding now and has plenty of set, you can try peening the teeth moderately between two hammer faces or on an anvil like Paul demonstrates, hoping that taking out some of the set will come from the side that is too heavy. If that does not work, you can also try stoning the saw. If it is curving to the right because the set is too heavy on that side, you just run a stone gently along the right side of the saw from heel to toe. A single pass does a lot. But, if the problem is you instead of the saw, stoning the saw will put in a problem, so you need to decide. This is a time when borrowing a good saw would help, even if it is a modern, unsharpenable, throwaway hardware store saw. Such a saw, if undamaged, should at least be set properly as sold. If that one curves, it is a matter of technique.
-
This reply was modified 7 years, 6 months ago by
Ed.
I was using a Disston #5 rip saw. I tried my Disston #10 rip saw and noticed that my technique is all wrong. Thank y’all for answering me. I am in for a lot of practicing. I have to get used to what Paul says and that is to slow down. With power tools there is not a lot of technique involved. That’s the reason in learning traditional ways.

Hi,
Looking at the photo the cut looks pretty straight until the last three boards, then it curves off.
By straight, I mean that it looks like you started sawing at the wrong angle and then followed that angle pretty much most of the way down.
In some of his videos Paul will start off with a tenon / back saw to get the angle right, then move to a rip saw.
I wonder if part of the problem is that you are not getting the angle right from the get go?
HTH
Darren.
 27 September 2016 at 6:12 pm #140915
Hi, if the cut you’re making is across the grain, then a rip saw is not the best type of saw to use. Rip saws are best parallel to the grain. That’s probably one of the issues here. Crosscut saw, back saws which have a different tooth configuration are best for across the grain.
I’ve followed all other suggestions above and have helped tremendously in my sawing techniques. And of course, practice.Keep at it…. 🙂
28 September 2016 at 1:13 pm #140960Glad to hear it’s working out better. I’m still not perfect sawing close to the line, but have gotten so much better over time. I make my knife wall and stay about 1/8″ – 3/16″ away for long pieces, and flip the board sawing from both sides I can stay really close. You then have the knife wall to plane down to.
This is a good short video on sawing…
steps to better sawingKeep practicing.
This is a nice video, and I agree that keeping your body out of the way of your arm is a requirement, but he goes too far saying that you will then get plumb, square cuts. Yes, a well tuned saw will just follow the path you set it on, but setting that path is a second, separate skill, I think. This is where you learn tricks like concentrating on starting against a knife wall to get square across and then sinking the heel once the toe is registered just enough to be stable and thereby getting plumb. Another example is cutting tenons corner to corner and then leveling across so that at no time are you needing to worry about more than one line at a time. When he says “you get your line without looking” really can’t be right if you think about it. Sometimes we don’t want to cut plumb or square, e.g., tails and pins or various other off-angle cuts. Sawing to follow lines when scribing one piece to another requires cuts in all kinds of crazy directions and, if you are working on a chair clamped in your vice, your body is going to be in a whacky position. Watch Paul saw his little “plane curved in two dimensions.” But, he’s right that in that whacky position your body will be clear of your elbow, you will be relaxed in your cutting shoulder, arm, and wrist, and you will be feeling a loose, swinging flow with your arm, even though the rest of your body may be straining to get your shoulder and eye to where they need to be. I’m not trying to be disagreeable, but I’m afraid that someone watching this will end up with false expectations and, when they don’t get cuts on their line automatically will think they are doing something wrong, when they may have it exactly right mechanically, but just have a second set of skills to develop. Still, the key message in the video of keeping your body clear of your arm is dead on and it really, truly is the cornerstone, at least in my experience. One final comment- That is one seriously sharp saw in that video! I wish I could sharpen like that! And, that is a big deal. A sharp saw will take to your intention on a single pass and this will set your course, but a dull saw will tend to swim about on the surface for a few passes before settling in, and that tends to give you a blurry start, for lack of a better word. Getting to cut with a saw sharpened by Paul was a real eye opener for me. Some day I’ll achieve that level of sharpness…
29 September 2016 at 7:18 pm #141046Hi,
@ed, you’re not being disagreeable. And you actually added some additional info that makes total sense.
You are correct in your statements about plumb and setting the path. The idea is to follow your line, to line up with your cut and have an unobstructed motion in sawing.And as you say “sharp” will make a big difference every time. I haven’t gotten there either…
3 October 2016 at 10:17 pm #141152“a straight saw cut depends on your skill, your saw and the individual piece of wood”. I can’t remember who said something like this, but I think, he is right.
Paul Sellers often points out that he only follows his line and adjusts later, usually by plane. Of course 1″ is a lot to be corrected by plane, even more so when crosscutting.
Most saws allow to you drive it in one or the other direction. Therefore, we have to learn to saw straight, but it also gives us the possibility to correct a cut before it goes to far out.
You can back up a little and try to get the direction right from there. If you have waste-wood on one side, you can cut off the part above your saw-curve, clean up the cut, if necessary, and start sawing straight from there.
I have a heavy frame saw to resaw logs, teeth about 12mm long (roughly 2 tpi), blade almost 2mm (3/32″) wide. When making a vertical cut, I can bend the blade to one side to make it move that way. Of course I have to watch the other side too, because this is a frame saw, and pulling one side will also move the other side. This saw is great for learning, because it cuts slowly (1/2″ in 5 minutes) and so I can see exactly, what it does.
Happy sawing!
Dieter
PS: I have seen people using smaller frame saws with narrow blades, and they put one finger on top of the blade to prevent it from jumping aobut before entering the wood. It obviously doesn’t work with wider blades.
-
This reply was modified 7 years, 6 months ago by
-
AuthorPosts
- You must be logged in to reply to this topic.