Knock down Shaker Desk
Welcome! / Forums / General Woodworking Discussions / Projects / Knock down Shaker Desk
- This topic has 16 replies, 9 voices, and was last updated 5 years, 2 months ago by
Brian A.
-
AuthorPosts
-
My daughter needed a desk for school, so here’s a knock-down version of the Shaker Harvard trestle table. The top is made from scrap kitchen cabinet doors. The rest is made from construction 2×12 that has been kicking around for a decade that has been used as temporary post & beam during some repairs, scaffold for painting stairs, and to run wheelbarrows over. This is a desk from garbage. A couple bits, like the wedges, are from oak for no good reason, but I liked the subtly contrasting wood. The finish is a brew of water based dye left over from the blanket chest in the background.
Attachments:
You must be logged in to view attached files.The key design spec’s from my daughter where A) Keep the legs as far apart as possible so that her task chair can slide left and right to work under different portions of the table B) Make sure we can carry it through the door and up the stairs, and C) No knee whacking on underparts of the desk, including when she sits cross-legged. This is why the trestle is up high.
If you look closely, you should see something that disturbs you about the construction, something that will make you think the desk will tear itself apart over time, but there’s subtlety that doesn’t show up in the photo (and cannot show up in the photo). A puzzle for you. : – ).
Attachments:
You must be logged in to view attached files.Thanks for the positive feedback. This thing is a prototype. I don’t know if it is going to work and was concerned about rigidity. There isn’t any wobbliness or looseness, but it is springy. If you whack it from the side, it oscillates for a moment. We’ll have to see if it works. My only concern is a big erasing job on a drawing. The original Shaker table had braces, which I left off. My wedged through joints are probably stronger than the original bridle joints, so I’m hoping the braces aren’t needed, but maybe they weren’t for static strength, but were used to keep it from jiggling. I’ve seen tables that are far wobblier, so I’m hoping it is fine for the intended purpose.
Off to school, now.
Attachments:
You must be logged in to view attached files.28 September 2017 at 3:11 pm #324977Very nice solution.
I’m intrigued with the orientation of the boards to make the desktop, I usually see breadboard ends on the left/right ends of a panel/desktop. I’m guessing the glue-up allows for movement left and right. What led to your approach?
And timely for me, having committed last night to coming up with an easy set-up/knock-down service station for larger gatherings.
I’m intrigued with the orientation of the boards to make the desktop
@jamestrang you’ve picked up on the dirty secret that is hiding in this project. As mentioned, the table top is made from recycled kitchen cabinet doors laminated together. When I started, I thought they were solid maple. In fact, they are frame and panel or, more accurately, frame and veneer. At first glance, it looks like the grain is running in the short dimension of the top and, so, there should be big expansion and contraction along the approximately 5-foot length. Moreover, it looks like the joint between the edging along the front and back ought to fail, partly from movement and partly from being end grain to long grain gluing. In fact, the top is glued up from 4 or 5 panels each of which has an invisible long-grain frame hidden under the maple veneer. Thus, neither the length nor width of each panel will vary by much with swings in moisture. Thus, the edging on the front and back should be fine: They are long grain to long grain glue joints plus the length should be stable.The veneer is 3/32″ by caliper. I never knew that panels could be made in this way. I guess the glue and long-grain frame win out over the movement of the 3/32″ veneer, even though it is 15 to 18 inches wide, to give a stable door that can be hung on a cabinet. There was a rabbet running around the door, so it’s not an overlay door…it really must be stable in dimension.
If you look at the photo, you’ll see a number of plugs that I had to put into the doors to fill the holes from the old door pull hardware. Two are dark, but the others are subtle in the photo. Putting in those plugs was problematic because there’s so little for them to grab. I drilled the front veneer to pass the plug, but left the rear veneer as it was. Thus, the plug rests against the back veneer (glued), has no support in the middle, and is held in the front veneer at the lip. Yes, this worries me. The can of Bondo stands ready.
I would never build from scratch in this way. I was working with what I had, improvising. The nice thing is that the end result is incredibly light, which is good for a knockdown desk.
My daughter has been using the desk for a few weeks now. So far, so good, but only time will tell if it is sturdy enough. As I mentioned before, it is somewhat bouncy/springy side to side. I don’t think I’d want to use this as a service station for large gatherings. It’s not a good table to lean a hip against. The original Shaker table had struts, which I skipped because the overriding design criterion was to have free-space end-to-end with no knee bumping. You could add the struts in your application. The original Shaker table had legs that are 1 1/8″ thick, which is what I used, but in pine. I wonder if it would be more rigid in a hardwood.
This table taught me that quiet little Shakers were really woodworking heavy-metal rock-n-rollers. They pushed the envelope in a number of places, e.g., the leg thickness and the width and length of the through tenons between the feet and legs. Notice that the grain runs vertically in the leg columns but horizontally in the feet and the beams under the table top. Fairing the curve across the change in grain direction between the post and the foot was a significant pain in the butt because of that grain change.
Let me know what you come up with for your project.
ps. Did you know that the Shakers used legs shaped like this so that the person that sits at the end of the table can slip their feet under the arch in the leg? The Shakers avoided ornamentation, so I’d really like to know why the little toes are on the legs.
Here’s a photo of the hollow core “frame and veneer” doors. In the background, on the bench, you can see the rabbet that was around the door. You can also see some white paint that was on some of the doors. That stuff was really hard to remove. It took the burr off my scraper in just a couple passes. In the end, I had to use abrasive paper to attack the paint, but then could switch to a scraper.
The door isn’t completely hollow. There were one or two cross pieces to stiffen the veneer. You can see one (it is subtle) in the photo hiding in the shadow inside the cut-open panel. It was clear they just shoved cut off material from the framing work into the panels.
Attachments:
You must be logged in to view attached files.By the way, the color in the photos is the original color of the cabinet doors. My daughter liked the color, so when it came time to finish the desk, I tried to get something like it. By sheer dumb luck, a little trickery plus the leftover water based dye from the blanket chest gave a pretty good match.
These two photos show the change in direction in grain where the post meets the foot. In the photo with the shave, you need to pull towards you away from the joint along the foot, but push away from the joint up the post, yet somehow get a fair transition. I got close with the shave (round bottom), but ultimately needed some abrasives. Rasps were a problem in this junk construction pine. I used them, but they left gouge marks (from the teeth) that were hard to remove with files and abrasives.
If you flip the template over, it is bright yellow and says, “Cheerios.”
Attachments:
You must be logged in to view attached files.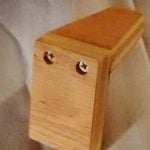

 27 January 2019 at 7:17 am #554724
Nice project. Having been a pencilCAD drafter in high school, I like a nice drafting table.
To fill the hardware holes in the doors, maybe if you’d used plug cutters in a contrasting or same species of wood, you’d had long grain exposed instead of end grain. But I like character.
Nice blanket chest as well! 👍
Lynn
-
AuthorPosts
- You must be logged in to reply to this topic.