Stanley #4 1/2 type 19 restoration or junk?
Welcome! / Forums / General Woodworking Discussions / Tools and Tool Maintenance/Restoration / Stanley #4 1/2 type 19 restoration or junk?
- This topic has 17 replies, 8 voices, and was last updated 4 years, 2 months ago by
 Darren.
-
AuthorPosts
-

Hi all,
I’ve had this ole inherited Stanley plane sitting around for maybe 15 years in its box collecting dust and I’ve only just discovered Paul Sellers and his wood working Jedi ways!
So on with the restoration, but I soon found that the sides of the plane are bent and not square to the plane face. The plane face itself seems ok but is it worth restoring or a boat anchor? I assume I can plane flat but if I used a shot board then the un-square plane sides would cause grief?Cheers
Paul 31 December 2019 at 8:20 am #641348
Hi Paul
Without seeing it I would say it is absolutely worth restoring. The sides quite often aren’t square especially on older planes. As Paul always says you use the lateral adjuster to get a square cut on the shooting board so the cheeks being out of square do not really matter.
Good luck with the restoration, post some pictures up when you’re done!
Cheers
Craig
Agreed.
The sides of small smoothing planes don’t need to be square to the sole, though it may help if it does if you use it on a shooting-board. Even so, its main function is not to reference a cut from the sides as with a shoulder-plane or the like, but to flatten boards.
What is important is that the sole is flat and that the frog assembly is seated properly in relation to the mouth aperture and the seat of the blade. Frequently the cap-iron needs some attention at the seating line on the back of the blade, but all these are standard fettling-issues that would be carried out on any new plane.
There’s lots of information scattered about in the usual reference points online about how to do all this. Much of the techniques can be opinion-led, but if you aggregate the main points you’ll get there.
Thanks for the advise guys, good to know that this is not an issue and can be “normal” for a plane of this type.
The sole seems ok and all the other parts are looking ok. The tote was cracked through so for now I have pinned and glued it back together, not sure if this will last but I’ll give it a go. I can see why they crack so easily as the shaft of the securing bolt tends to put a shearing force through the tote when it’s tightened.Pictures will follow when it’s finished, it’ll be it’s first planing in probably 20years 🙂
Just an update with pictures…..
The tote has been pinned and glued, stained and vanishing.
The parts that need it have had a quick 120 grit sand but more to do.
On one of the pictures you can see un-square sides, in fact its obvious by eye that its out.Is it worth sanding down the sole any more to get the marks out, or is this just aesthetics?
Amazing its not more rusted as it had spent some/most of its life on a small island.
-
This reply was modified 4 years, 3 months ago by
 Paul.
Paul.
Attachments:
You must be logged in to view attached files.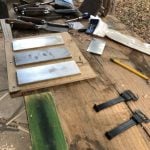 6 January 2020 at 2:39 pm #643359
Paul; All I can say is, wow I’m glad you came to the forum to get advise. This plane looks great and I bet you will get many years of use from it. Best wishes, John
 6 January 2020 at 3:42 pm #643372
On the sole photo there seems to be a low spot across the front side of the mouth.
If you want to use a plane as a smoother you should possibly keep on with the sole flattening until you eliminate that low spot.
You need the plane sole to press firmly the wood fibers right up to the mouth opening in order to reduce the possibility of tear out.
I’ve been reading this with some interest. The accepted theory is that plane soles need to be absolutely dead flat, end to end. That’s the ideal, anyway.
In reality, hand-made woodwork seldom needs engineering tolerances to be good or effective and there are many old wooden planes that defy that edict of sole-flatness and work well.
What in fact makes an appreciable difference to a planes’ effective working is that the area surrounding the mouth aperture, say about ¼ to 3/8 inch wide each side is flat and in full contact with the wood both sides of the blade tip. Small differences in level on the remainder of the sole can often be flattened out little-by-little over time, but a blade tip that has the mouth of its sole somewhere in mid air will seldom give acceptable results….. mostly it will chatter and vibrate.
All that is true for ‘European-type’- planes which we work on the push stroke.
Go East – particularly to Japan – and their planes work on the pull stroke – toward the user. Traditional Japanese planes are invariably wooden and adjusted by wedges. Set, sharpened and tuned, they can produce staggeringly, accurate results. Turn the plane over and you’ll see that, rather than to flatten all the sole, end to end, they will ensure a clean, flat area surrounding the mouth, plus about ½ inch at each end that is in contact with the work at the nose and at the toe. A small amount of the surface of the sole in between these points is relieved, scraped away, only a fraction of a millimetre but that is all you need. Effectively, the plane sole is in contact at only three points.
The easiest comparison is to compare this to an uneven floor. Sit on a four-legged chair and it rocks on the two dominant points, then transfer to a three-legged chair – the difference will be immediate – all three points in positive contact.
Good luck with it.
@Dionysios, Using your advise I worked a bit more on the sole but that low spot on the front of the mouth is just too low and I ran out of sandpaper before getting it out, it would need a lot more full sole flattening to get it out is my guess. So I have left it at that and put some time into the iron getting it down to 400 grit for now just so I can test it. It did break out a bit on the pine I used for testing but overall it worked ok.
Happy day.Edit: Looking at the picture now I think I should have moved the frog forward to get the knife edge of the iron closer to the front of the mouth – is that correct?
[postquote quote=643372][/postquote]
-
This reply was modified 4 years, 3 months ago by Paul.
-
This reply was modified 4 years, 3 months ago by Paul.
Attachments:
You must be logged in to view attached files.It will definitely help with the tear out if you close the throat up some. You may want to experiment some with positioning the chip breaker closer to the edge. It needs to be good and sharp, if it won’t easily shave hairs off the back of your arm it isn’t sharp enough.
Also, are you sure that square is actually square? No offense but your plane looks a lot better than your square.

Yes moving the frog forward will help but also, you need to get your sandpaper down to about 1000K or finer and then strop it. Question for you…. looking at the picture with the square on the soul… have you checked your square to make sure it is square? That’s a lot to be out and I would think there would be some visible damage. Keep working on it. Looks like a nice plane and you will be proud of it when you get it finished.
13 January 2020 at 12:33 am #644455@Paul, You may move the frog forward to close the mouth opening or move the cap iron very very close to the cutting edge (don’t do both at the same time because the plane will clog).
Sharpen your iron a give the plane a go with the sole as it is.
Personally I prefer to set the cap iron close to the cutting edge. With a properly sharpened iron I can plane my piece without worrying about any wild grain around knots etc.
Richard Maguire has uploaded this video in regards of reducing the tearout by moving the cap iron close to the cutting edge: https://www.youtube.com/watch?v=1bhh6kxXZOQ
@dionysios – so much to learn but some good stuff there. Although his accent made me laugh 😉
-
This reply was modified 4 years, 3 months ago by
-
AuthorPosts
- You must be logged in to reply to this topic.