Starting projects of an absolute beginner
Welcome! / Forums / General Woodworking Discussions / Projects / Starting projects of an absolute beginner
- This topic has 76 replies, 14 voices, and was last updated 5 years, 6 months ago by
 Debra J.
-
AuthorPosts
-
17 June 2017 at 6:51 pm #313022
I haven’t read the whole thread/all the pages, but I was reading through (and looking at the awesome pics!) the first few posts, and this is just a fantastic topic/thread thingy! What a great, courageous way to document your first efforts at working wood! I’ve been pondering how to do that, myself, (document my first “real” efforts at working wood) because I thought 1: I’d appreciate the record some day in the future, and 2: maybe someone could learn from my example/inevitable screw-ups etc…
But I’d been thinking that I needed to figure out some kind of video set-up or something, which adds yet another layer of difficulty/stress to the whole thing, y’know? Because then, not only do I need tools for working wood, but I need a camera, a way to hold the camera, editing software, learning how to *use* editing software, a mic, etc, etc, etc…
*stops rambling* *sheepish expression*ANYway, what I’m getting at is, this format (pictures and a written description) seems like a much less stressful way of documenting my early, crude efforts than trying to make sure I have a camera set up to capture every step of the process, start to finish. I suppose it’s kind of obvious, but until I saw this post my brain was stubbornly stuck on a “you need to make videos” mode. So, thank you for helping me change that! 🙂
Oh, and *thank you* for being so open about you missteps and so on! I haven’t even tried to cut a dovetail (or edge-glue boards) yet, but I hope my first ones look even half (or a quarter) as good as yours did/do! Awesome.
-Luca
17 June 2017 at 8:31 pm #313024I am glad that you like my first steps. I had the same thoughts about starting out here, about not being good enough, about people not caring, about the pictures, etc.
At one point, I thought what the heck… I am new to this, I am going to make mistakes, I am going to have a million questions,…. but if I just don’t start, the mental roadblock gets bigger and bigger up to the point that I will never start out.
Or with the words of Yoda:” Do! Or do not! There is no try!”
The idea was to present my first steps and getting some advice along the way and maybe to give other beginners a little nudge 🙂
PS: All pictures so far were made with my smart phone camera. I have a DSL, but it is way too much hassle. So you don’t feed fancy camera equipment.
18 June 2017 at 7:01 pm #313036Since I had no luck in getting the wood for the adirondack chair, I decided to build something with materials I have here. The weather was so nice on the balcony and I got a really nice sunburn, because I did not notice, that the sun crept up on me from behind. It was so hot that I went shirtless. Lesson learned!
I was “in the zone” and totally forgot lunch.The first box
A box looks basic enough and I need projects to experiment with finishes, so I had a go at it.
Since I did not have material in the proper thickness that I wanted, I had to go all the way with ripping and splitting boards to thickness, the whole stock preparation. The initial board was around 3cm/ ~ 1 3/16″, the final thickness is 1cm / ~ 3/8. The wood is pine from a cheap construction board.
The the whole stock preparation and build up took me like 8 1/2 hours, which is laughably long. It is very interesting, that you can spend a lot of time on dovetails and still “mess” up.
I will get faster with practice and once I have some more experience and learned how to use the tools properly and with confidence.A whole lot’a shavings:
(Ain’t there a rock song with that name?)
(Not all the shavings are from today).Here I “clamped” the pieces together, so I could plane them to the same width/ height.

Glue up:

I messed up a few times:


Other parts look really nice:


The box will hold my “marking stuff”. I have to admit, the marking gauge did roll from my bench the other day, I was lucky that only the knive broke. Now it has a proper place, and since i need to carry my stuff to and from the balcony, a box is quite handy.

I am a bit unsure, if I should keep the few little gaps as a reminder of my first dovetails, or if I should make the box “pretty” and maybe use a little bit of woodfiller to close the gaps.
What do you think? Does using woodfiller also mean turning over to the dark side?I would like to try out shellac and wax for the finish, I have to figure out where to get the stuff though. I am also open for other suggestions.

You made really nice box. Well done!
And: good to know that other people also have to struggle with some mistakes and that I’m not the only one where the shoulders of the tails are out of square or so…
Could you please go a bit more into detail, eg. how did you rip to thickness: which saw did you use, difficulties you ran into, eg. how to clamp that long stock etc. etc.
Thank you very much!
E.
18 June 2017 at 9:31 pm #313039The initial board was 3cm thick and 12cm wide. The length was like 50cm, I think.
My “problem” is, that I have to work along the long side of the bench, with one end propped against the wall. It is just not heavy enough to compensate for forces coming from the side.
I have tried to two ways for ripping to width/ resawing one piece into two, depending on how lazy I am to go back into the appartment to get more stuff onto the balcony.
One way is to turn the benchhook sideways and clamp it down. I would need two clamps to fix the bench hook to the bench. Then I can clamp the board to the “apron” of the bench hook:
(Sorry, it is getting dark outside already)
I needed four clamps to make everything rock solid and prevent everything from shifting. Two for the bench hook, two for the board.
I had to turn around front and backside of the board a few times, setting it higher a few times and at one point, I had to turn it upside down to continue sawing from the other end and meeting in the middle.
I had marked both sides of the board with the gauge and pencil line, just make sure, to mark both sides from the same Surface and to stay on the right/ proper side of the line with every turn of the board.The other way for me is to use a hand screw clamp, which can substitute for a poor mans vise:

I used a 25cm / 10″ japanese ryoba saw, allthough the ripping side is only 20cm /8″ long. It is faster than the frame saw, which I have to sharpen again und practice properly.
Japanese saws work on the pull stroke, so I angled it downwards pretty much, nearly pulling down vertically. I took my time, taking care not to stray from my line.
With that short saw, it took quite a bit of time with that “wide” board, but the saw kerf nicely thin.
I had two boards then, roughly 1,3cm thick, which was enough to plane down flat and to the final thickness.
After the boards were flat, they cupped a little again after a while, but I did not have any more wiggle room left for planing, so I had to use them as they were, hoping for the best.
One half was then ripped to rough width, with the bench hook turned 90° and fixed to the front of the bench and the board clamped to the apron. The sides of the box are 5cm high, so I had to loose 2cm by planing them down. Those two narrower pieces were then cut to length for one long and one short side of the box each then, This was helping a bit with the cupping.The other half was used for the bottom of the box, bending the “thin” board and clamping when I glued it into place also worked with the cupped piece.
I just hope, that there is not too much tension in the bottom.Here is a rough drawing of the cuts of the board:


Pepperpot,
Each time you edit your post it appears as a new post and doesn’t replace the previous one.
You should delete the old for each edit, otherwise there appears multiple almost identical posts.
I don’t know why the forum software doesn’t replace the previous one automatically, but it doesn’t.
Thanks,
Craig[quote quote=313040]Pepperpot,
Each time you edit your post it appears as a new post and doesn’t replace the previous one.
You should delete the old for each edit, otherwise there appears multiple almost identical posts.
I don’t know why the forum software doesn’t replace the previous one automatically, but it doesn’t.
Thanks,
Craig[/quote]
@craig — Is it possible you are confusing the log of the edits to the post? As you can see in this thread, pepper pot has no duplicate posts. I think what you’re seeing is the log of pepper pot’s post editing activity in the forum activity feed.Nope, I’m wrong, the forum software is logging every edit, regardless of the checkbox. Sigh.
19 June 2017 at 8:03 am #313044I am really sorry that my editing of my postings is logged as a new post and spams the activity log. It is not an attempt to raise attention or to spam you in any way.
I do edit my post quite often, as I am not a native english speaker. While I uderstand and read english pretty good, using the language activly by speaking or writing is something completly different. On top of that, my pc is, of course, set for german. That is spell and grammar checking and the auto correction of the browser.
What is a nice feature, if your a writing in your own language, becomes a nuiscance if you are writing in a different language if words written properly get changed into something else, just because the system tries to improve your text for the set language.I also do change the layout, shift or rephrase paragraphs for better understanding, add a picture here and there and I am trying to improve the layout, which cannot be done in an editor, wordpad, or any other word processing program,, as this cms/ forum displays stuff very differently.
I do uncheck the box for keeping a log of my editing, but the activitiy page seems to track it anyway.
I will send a note to the staff, too. Maybe something can be done about this.
Thanks for your very detailed explanation.
Knowing the constraints of your workbench in general and the clamping restrictions in particular makes the result of your work even more admirable.E.
PS: Thank you for editing your posts to reduce spelling and similar mistakes. That makes the result better readable for the rest (knowing that because I work as a technical editor and author – quality control is one part of my job).
I am already thinking about a next project, an “Adirondack”-chair for a friend. It seems easy enough. I found an old online article from august 2005 from popular woodworking.
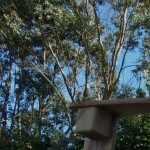
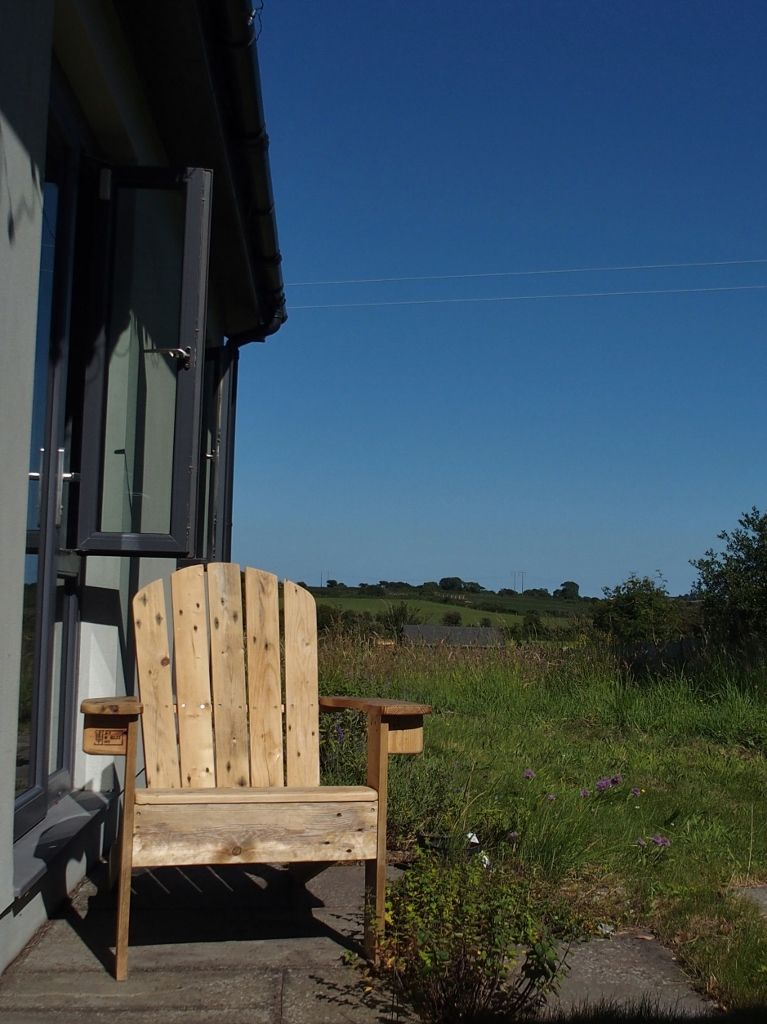
Plans can be found here: Norm Abram’s Adirondack chairWie geht’s Pepperpot? This is cool. I’m also a beginner (for a long time!) and don’t have a proper bench and for most of my time didn’t have much space either. I just recently made this very same chair for my wife. She loved the type since visiting the east coast of north America but the type of chair is expensive and hard to find here. It’s very comfortable, my wife loves it and I had a great time making it, learning so much especially “reading the grain”.
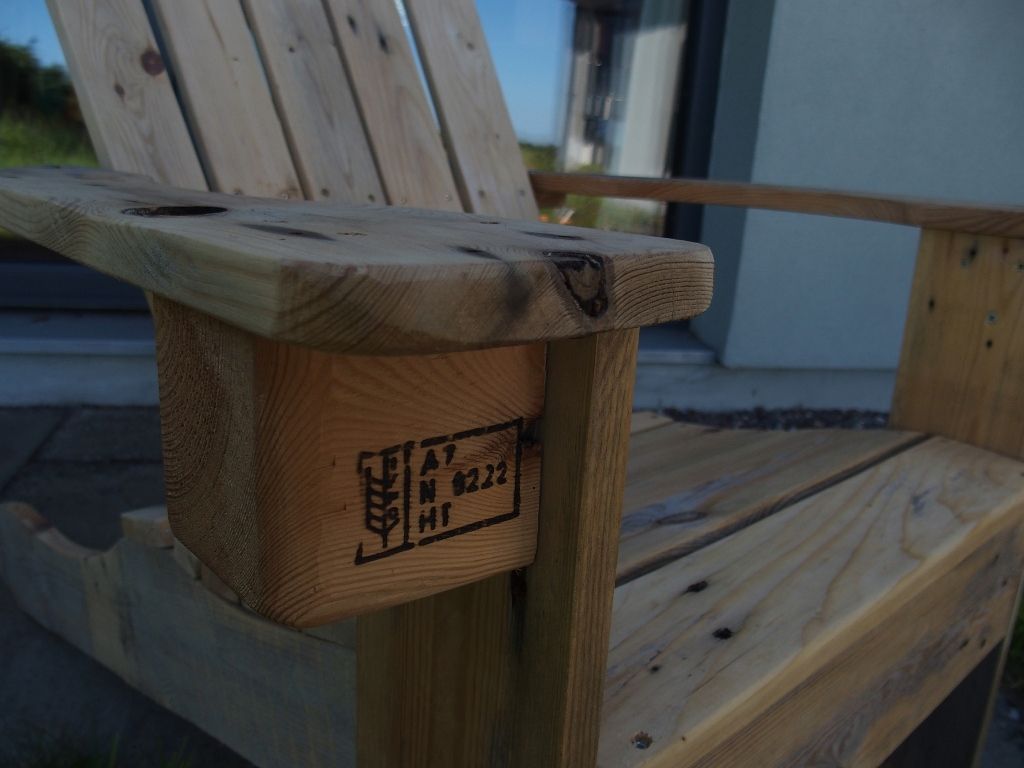
The cost of materials was some sand paper and screws and roofing bolts, maybe 3€. The pallet wood I got for free. I decided not to try and disguise that it is an old pallet. You can seen the old nail holes and I only fully planed it where it needed to be. I even made a point of showing the pallet stamp where I used the blocks as arm brackets.
I used a power sander but otherwise laughed at all the power tools “needed” in the article. A few years ago I would have been intimidated and thought it wouldn’t be possible without a room full of appliances but since finding Paul Sellers I have a confidence that I can do (and learn) far more than I previously thought I could with a limited set of tools, space and skills.
I finished the scallops (inside curves) with a spokeshave after cutting cross grain to the depth of the cut (at the deepest part) and chopping out with an axe. A mallet and chisel would be fine too if you can secure the wood. Cutting with a coping saw sounds a bit slow; there’s about 4 metres of scallops. Paul show how to do an inside arc in the bookshelf series: https://woodworkingmasterclasses.com/2014/02/bookshelves-episode-5/
You might notice that the boards for the seat are wider than the plan because I was not inclined to rip down my boards to size but it would make a more contoured seat if they were narrower. I also made the back legs longer to make the seat more level.
If I could offer advice it would be to lay out your side pieces on the floor to get your angles worked out. The article doesn’t state that the front legs are vertical but it helps if you know that.
Coincidentally I have just bought an Ece frame saw with a rip, cross, turning and “farmer” blade and I love it. I’m not used to it yet but it doesn’t seem to bind as much as my panel saws.
Your projects so far are great. Keep your mistakes, it’ll be wonderful to see how much you’ve improved in a couple of years. When I started first I used a saw bench/stool that had a tool box under it. I would sit on it with the work! It had an oval hole in the top that a clamp could fit through which was very useful for example if you wanted the whole edge to over hang the top.
Good luck with your learning.
24 June 2017 at 11:43 am #313215Thank you for your nice words and the insight into your Adirondack-chair-project.
For pictures I use an external hoster which is free and without ads,
you can upload your pictures there and you get a link, which you can use with the “IMG”-tags here. Just make sure you use the pure http-link, without any other bracket-stuff for various other forum types.
Did you use a spokeshave with a flat or rounded sole? A rounded makes more sense to me, but I have some problems to use and handle it properly.
I wanted to use fir or larch for the chair, but I cannot find nice wood. The wood, that comes in the right, thin thickness, is either full of dead knots or full of resindrops. The nicer wood is lots thicker and I hesitate to rip everything to the right thickness.
Maybe I just use pine or spruce and use some outdoor finish/ paint to keep it from rotting too fast.
Pallet wood here in Germany is mostly made from spruce, so that might work, if it worked out good with your chair. It is nice, if you can get pallet wood for free.
They also sell pallets in those DIY markets for around 16€ to 18€ a piece, which would be way to expensive if you compare it with the price of regular spruce.I hope, that I can “finish” my box this weekend. I got some shellac flakes, alcohol and furniture wax. I am lacking a proper brush still though.
 24 June 2017 at 8:58 pm #313219
Something that always kept me away from Pallet wood is just the fact that you have no idea of knowing about what kinda substances and chemicals the Pallet may have come into contact with, I’m maybe a bit to cautious though.
For 16 to 18 € you can already buy some Spruce Boards from a Sawmill.Outdoor stuff you really wanna go the extra mile and use the proper wood in my opinion, in Europe thats either Larch or Robinia/Locust/False Acacia which ever name you prefer. The latter being pretty much the most durable wood we have here however its not easy to work with and bloody hard, which is why id highly recommend you go with Larch.
If you cant find the right thickness you can either if you buy directly from a Sawmill just tell them to cut it up for you or you go to your local Carpenter/Cabinetmaker and let them cut it up for you, either roughsawn or planed down to thickness depending on what you prefer. If you know some of them it might cost you a couple of beers or 10 to 20€.As for Outdoor finishes in my experience a few coats of paint seem hold the longest. Before you apply any finish though make damn sure you put at least a 3mm radius on every single edge and corner you have, reason being on sharp corners the thickness of the finish will be almost not existant, a radius will circumvent that.
As for Paints themselves i made good experiences with Scandinavian paints, first theres a coat of oil then Primer and then the actual Paint. I have that on a Wooden Gate with only one coat of paint that thing looks after 6 years still as if it was painted a couple months ago.
 Photos?
I used a flat spokeshave, I’ve never tried a round one but the flat one seems to work ok. I do have to adjust the cut quite deep on tight inside curves and of course there is a limit.
@kamikazekrieger: I’m jealous of the Americans’ and the mainland Europeans’ access to relatively cheap and varied timber but here in Ireland almost all of the wood available is imported and consequently quite expensive. Even for something like spruce. A few euro soon adds up especially when I’m not sure if my projects are going to turn out ok. I’m enthusiastic about “finding” wood in whatever way I can. However I am fussy about the pallets I use. I only pick clean fresh new ones and only HT marked (see picture).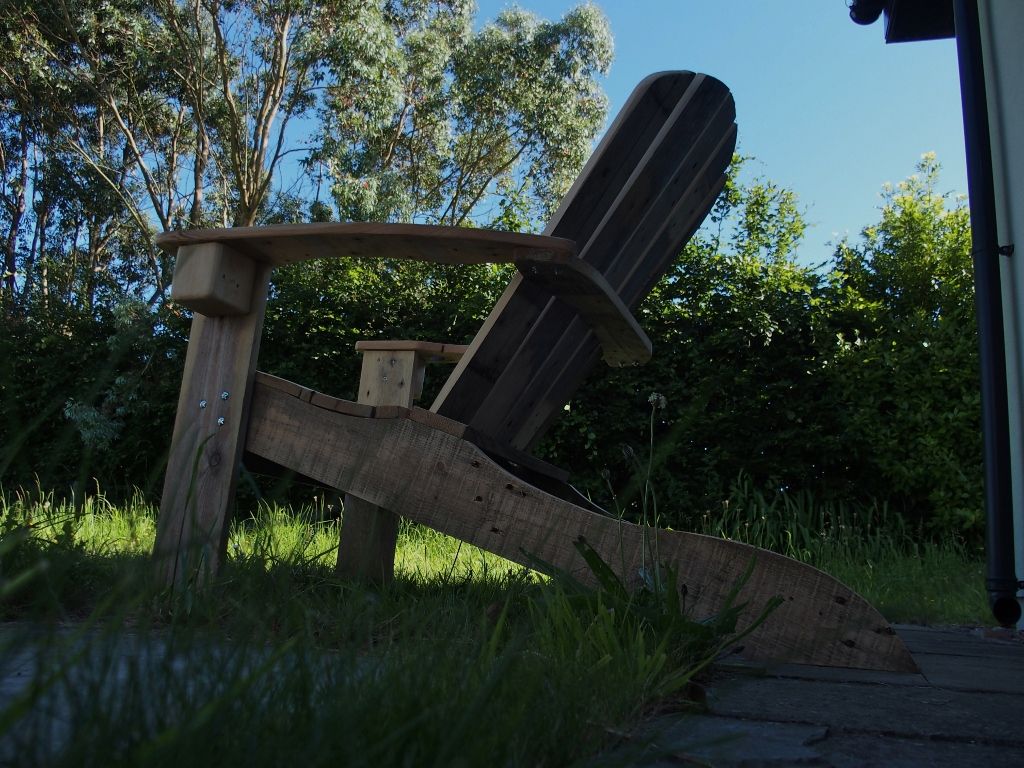
-
This reply was modified 6 years, 9 months ago by
 cobhhive.
-
This reply was modified 6 years, 9 months ago by cobhhive.
-
This reply was modified 6 years, 9 months ago by cobhhive.
-
This reply was modified 6 years, 9 months ago by cobhhive.
-
This reply was modified 6 years, 9 months ago by
-
AuthorPosts
- You must be logged in to reply to this topic.