Thanks Paul! – A Year of Humble Projects
Welcome! / Forums / General Woodworking Discussions / Projects / Thanks Paul! – A Year of Humble Projects
- This topic has 10 replies, 7 voices, and was last updated 8 years, 2 months ago by
elvishefer.
-
AuthorPosts
-
29 January 2016 at 2:03 pm #134299
I’ve been reading Paul’s Facebook posts lately and I feel he seems a bit down about his recent move. I wanted to take a moment to thank him for his teaching and his inspiration.
I do not claim to be a great hand-tool woodworker. I feel I am a woodworker in progress, and every project I do still feels like a skill building exercise. But recently, I am finding that I am getting better at visualizing a concept and making it happen. Very exciting!
I flat-out could not have done any of these projects without learning the guiding techniques from Paul. I owe him a lot, which is funny because I’ve never met him and I’m a complete stranger to him. Regardless, a thousand thanks for giving me the skills and ability to realize my creative goals!
From most recent:
A serving tray made from a single scrap piece of rough cut cherry and a bubinga offcut from a previous saw handle restoration project:

A cabinet to store teas, made entirely from scrap pieces of pine leftover from other projects, scrap 1/8th inch birch ply, and scrap cherry for the pulls. Wood thickness (except the drawer fronts, moulding and base frame) is 1cm or less – otherwise I would not have had enough scrap to finish.

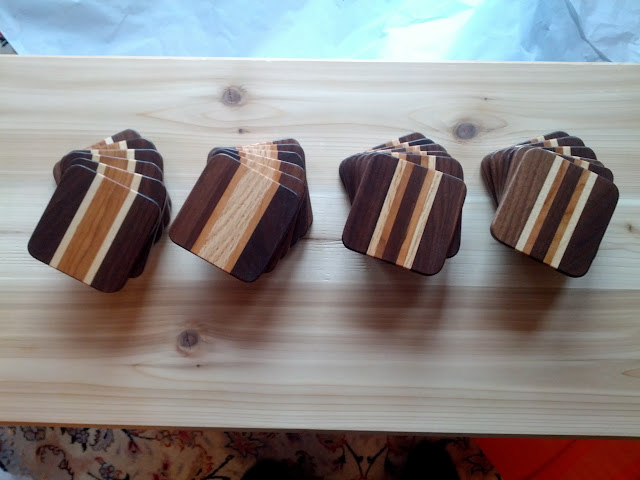
Coasters for last year’s Christmas presents. Made from scrap walnut, maple, cherry and oak, mostly offcuts from end grain cutting boards.
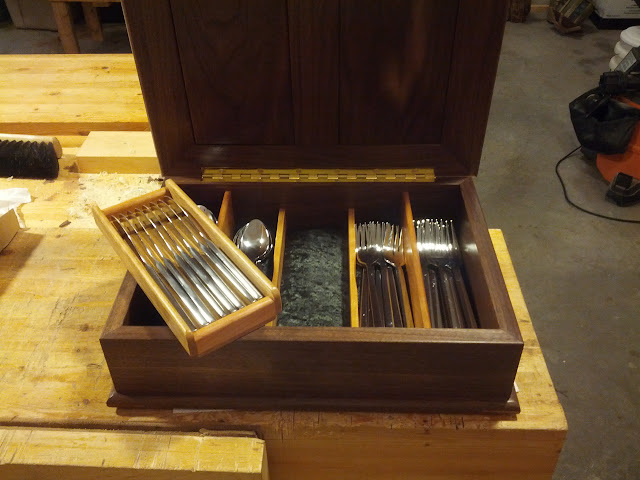
Cutlery box. A commissioned project made from walnut and cherry. The knife tray lifts out to reveal additional storage underneath.

Large end grain cutting board. Walnut, maple, cherry.

Small bird feeder, made from scrap cedar. I didn’t take a photo of the finished feeder, but I added a mitered and hinged roof, some stops to prevent seed from falling off the edges, a perch and a cross piece that goes through the square holes for hanging. Birds like it, squirrels LOVE it. 😉

Thin-wall clutter box in scrap pine. Something I made to organize my desk, later stollen by my wife for hers.

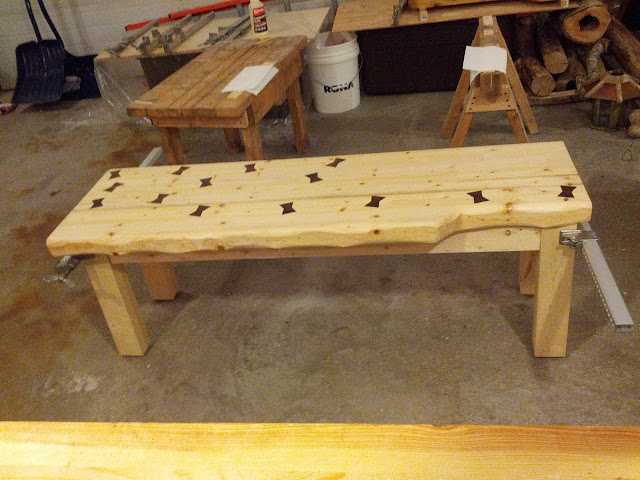
Rustic bench in fir, with walnut butterflies. The bench top is made from trees I cut down and shaped by hand. Cracking during the drying process led to the butterflies and a better design. Photo is not of the finished bench; the notch in one corner was requested to accommodate a door.
So, while none of these is going to win me any awards, they certainly made me and those I love happy.
Thanks Paul!
Here’s to another year of fun woodworking.
Thanks,
Jeremy
-
This topic was modified 8 years, 2 months ago by
 29 January 2016 at 2:36 pm #134301
What an inspirational post. Is it your first year in woodworking if it is you have achieved more than most hobbyists have achieved in a life time. These projects you have done are advanced and they look stunning. Give yourself a pat on the back because it is you who has achieved this because books, videos and classes are only to serve as a guide but the real learning is in practice, in doing, you know getting your hands dirty which is why an apprentice works in a shop fulltime and doesn’t sit glued to a monitor watching someone else work. Teachers are only a guide but it is your effort, your determination, your will that will elevate you in life.
Well done
29 January 2016 at 2:38 pm #134302Beautiful projects!
I really love the coasters. How did you make those?Korneel
29 January 2016 at 3:19 pm #134304Thanks Salko for your kind words!
I discovered Paul’s workbench build videos on YouTube about 3 years ago and the bench was my first project. I’ve been learning ever since.
-
This reply was modified 8 years, 2 months ago by
-
This reply was modified 8 years, 2 months ago by
-
This reply was modified 8 years, 2 months ago by
29 January 2016 at 3:42 pm #134308“Beautiful projects!
I really love the coasters. How did you make those?Korneel”
1) Figure out the color pattern you want and the woods to make it. I started with .75 inch thick pieces of scrap about 11 inches long. The pieces can be as long as you like, I wanted to make six coasters of each pattern (3.5 inches x 3 = 10.5 inches + .5 inch for kerf)
2) Target dimensions of a single coaster is 3.5 inches square, but can vary slightly
3) Plane wood strips down to desired width. I used three widths: 1 inch, .5 inch and .25 inch.
4) Glue the strips together in the desired pattern. The result should be a 3.5 inch x 11 inch x .75 inch thick patterned piece.
5) Plane flat on both sides.
6) Resaw the piece in the middle and plane the cut faces parallel with the existing flat face. Goal is two pieces 3.5 inches x 11 inches x .25-ish inches
7) Crosscut each piece twice so you end up with six 3.5 inch x 3.5-ish inch coasters.
8) Plane the end grain clean on a shooting board. Each coaster should be close to 3.5 inch x 3.5 inch.
9) Mark out the rounded corners and use a chisel, rasp, files, etc. to round them over.
10) Round the edges with sandpaper.
11) Sand with 220.
12) I used one coat of Tung oil and three coats of rub on Polyurethane for color and protection against booze spills 🙂-
This reply was modified 8 years, 2 months ago by
 29 January 2016 at 8:18 pm #134313
Nice work! Yea, I’m in the same boat I would have never been able to do this with out these masterclasses.

 30 January 2016 at 5:49 am #134327
Very nice, Elvis. I especially like the silverware box – beautiful. We have all learned so much from Paul. And it gives such a feeling of satisfaction knowing you’ve made these beautiful things from sticks of wood.
1 February 2016 at 6:22 pm #134395Thanks Matt!
Thank you Martyn! The handles get a lot of positive attention, and they make the tray easier to carry, too. I like it when form and functionality come together.
-
This topic was modified 8 years, 2 months ago by
-
AuthorPosts
- You must be logged in to reply to this topic.