Workbench Dimensions
Welcome! / Forums / General Woodworking Discussions / Projects / Workbench Dimensions
Tagged: modern 2x4 or rough cut
- This topic has 83 replies, 9 voices, and was last updated 4 years, 4 months ago by
 Mark68.
-
AuthorPosts
-
 17 May 2019 at 7:25 pm #570468
i wouldnt worry since its a workbench, it couldve come out better, but im sure you learned alot and it will function fine. just flatten it again if that cup in the top is really bad.

Something odd occurred today as I was finishing off my workbench legs. When it came to putting together the last crosspiece, the tenon of the crosspiece would not sit flush with the leg. I tried, I coaxed it with the rubber hammer, but it would not sit flush and by not flush I mean there must have been about a half inch gap.
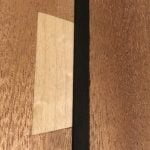
I lay one of the legs flat on the floor and inserted both crosspieces into that one leg. As I looked down I noticed the top crosspiece was somehow off centre – the pic attached to this post shows this.
The black is where the tenons should be going, the grey shows where the tenons actually go. As can be seen, the bottom one fits just fine, but the top one was out of alignment.
I’ve highlighted in red where I think the problem is. The areas in red might not be parallel on both sides, and this is offsetting the crosspiece.
I managed to get all of them inserted but I’m now worrying what the tolerance level is for forcing wood to fit where it won’t smoothly fit. To be honest, it wasn’t that bad a fit, but I did have to use a bit of force.
What do you think, is wood that forgiving?
Attachments:
You must be logged in to view attached files. 22 May 2019 at 9:09 pm #574389
If risk is probability times consequence, then correction before gluing up might be the wise thing. If the cross rail yields after assembly, repairing the bench will be much more complicated.
Assuming that both the distance between the shoulders of the rail and the other tenon are OK, one approach could be to saw off the faulty tenon and use it to plug the mortice hole. After re-chopping a mortice in the leg and another one in the end of the rail, a loose tenon can be inserted. The joint will be just as strong.
Another alternative is of course to add support by use of an angle bracket.
The above I’ve learnt from experience – a harsh but very efficient teacher.
I was glueing up and I noticed the top of one of my workbench legs has two cracks that start from the mortise. That’s so disappointing. 🙁 I think it occurred when I was clamping.
Do I need to be concerned about this? There’s a bearer to go on top of it, but should I strengthen it and if so, is there a preferred method?
My workbench will have six legs as opposed to the four legs in Paul’s video on how to build your own workbench, so I can position that leg in the far right corner away from me, but I was wondering if there was something else I should do.
Attachments:
You must be logged in to view attached files.
Today I learned the importance of getting your timber square, parallel and flat. Quite a costly lesson too in terms of time and effort. I may have to redo a major part of my workbench, namely the attaching of the benchtop to the apron. Though it’s glued fast and flush to the apron, the opposite side of the benchtop is a good few millimetres off the supporting legs.

Glue, screws, clamps, might solve the issue. Or, I can remove the apron and benchtop and work on flattening the bottom of the benchtop. If not, oh well. At least if I have to redo things, I’ll have my winding sticks this time around.
1 November 2019 at 1:30 pm #623391The underside of my bench-top was (very) slightly twisted. I used a shim somewhere between the bench-top and one of the leg-frame to get the four feet on the ground. Otherwise the rigidity of the bench-top would “telegraph” to the feet when screwing the bench-top to the bearers of the leg-frames.
Now if you have a gap at the two leg-frames, and you don’t want to use shims, instead of correcting the underside of the bench-top, it might be easier to plane
either the bearers on the leg-frame
or the legs
to get an angle on the leg-frames which is the same as the internal angle between the bench-top and the apron.
I didn’t thought about this when I decided to use a shim.
Note also that not all the underside of the bench-top needs to be flat/out of twist/perpendicular to the apron but only where it will sit on the leg-frames.All this assuming that the leg-frames were square to begin with.
21 November 2019 at 5:19 pm #629414Paul has a three part posting on vise installs. bolt dimensions are here:
https://paulsellers.com/2016/06/bench-vise-part-ii/
Just google “Paul Sellers vise” for the others.
-
This reply was modified 4 years, 5 months ago by
Larry Geib.
Thanks Larry.
I took a look but Paul uses imperial measurements and says the coach screws are 1/4 inch. But I’m not sure what that is in metric. I have had a look but I’m still unsure.
Edit: that said, this website says 1/4 is 6.4mm:
https://www.boltdepot.com/fastener-information/US-Metric-Conversion-Table.aspx
That sounds about right. Is that correct?
-
This reply was modified 4 years, 5 months ago by Mark68.
Just popped back from toolstation and got myself some m6 x 90 coach screws and they feel a little loose. Not sure what to do about this because I couldn’t find an m7 coach screw and I can’t do anything about the pilot hole.
One of the screws is biting but the other is just turning effortlessly and not clamping anything.
-
This reply was modified 4 years, 5 months ago by
-
AuthorPosts

- You must be logged in to reply to this topic.