Workbench – Legs – Problems
Welcome! / Forums / General Woodworking Discussions / Projects / Workbench – Legs – Problems
Tagged: workbench, workbench legs
- This topic has 31 replies, 9 voices, and was last updated 10 years, 1 month ago by
Carlos J. Collazo.
-
AuthorPosts
-
6 February 2014 at 9:49 am #27325
Hello,
I’ve started my workbench.
I’ve found 4 @ 90mm x 90mm for the legs and 6 70mm x 70mm for the cross rails.
The wood is spruce. It is a little spongy and tends to compress and to easily split. The end grain, in particular, seems fragile (it’s very porous).
Now, two problems…
A)
I think that the dimensions of the cross rails are a little bit problematic for the haunched tenons. The haunch is ~20mm (more or less 70mm/3) and the tenon is ~50mm; maybe 50mm are not enough for a strong tenon…
B)
Another problem is the fragility of the end grain (at the top of the leg). I think that a through tenon – pressing the inner faces of the mortise – would break the 20mm-thick, spongy wood of the top. So I’ve decided not to make a through tenon: see the drawing, please. I think that a stub mortise – preserving an intact (~30mm) back side – could help. Or am I wrong?
What do you think about this solution?
I know that the top cross rail is now not so strong… So I’d like to add a third cross rail in the middle (with through tenons).
The bottom and middle cross rails would be the strong ones.Any advice is very appreciated.
Thank you for reading.
Attachments:
You must be logged in to view attached files. 6 February 2014 at 1:33 pm #27338
Emilio…I think you may be over thinking it. The vast majority of the stress for the upper cross rail will be taken up by the aprons and the top. The upper cross rail is there to provide a place on which to rest the top. The area that you are concerned about will eventually be completely housed by the surrounding structure of the bench.
Adding a 3rd cross rail is up to you. The structural benefit is marginal but the peace of mind benefit may be worth it to you.
Remember that there have been hundreds of benches made to Paul’s design. Most, if not all, from cheap construction grade lumber. I have not read any account of failure of any of the assemblies.
In the end, its your bench and you must decide what elements you are comfortable with. I see no issue with what you have proposed to change and wish you the best of luck in your build.
6 February 2014 at 4:45 pm #27346Thank you for your reply, Greg, and for the clear explanations as well.
Have a nice day!
(PS: I know that Paul’s design is unquestionably good and reliable. The problem is… mine!)
 6 February 2014 at 10:49 pm #27373
Greg, Mexiquite, Dave, thank you!
@mexiquite: great work your workbench! Thank you very much for posting.
@dave: “millions of homes resting on spruce end grain”… 😀 Yes, this is an “incontrovertible evidence”: it clearly proves that spruce end grain is… strong enough for my bench! 😀
@gman3555: I thought – stupidly – that a 50mm (70mm with the haunch) tenon for the upper rail was too weak to support the bench top. But a thick enough bearer can help and solve. The bearer, after all, rests on solid legs. And, as you said, the upper rail is a base for the other elements. Thank you again for your help.
6 February 2014 at 11:48 pm #27379Emilio…we were able to answer your question because we have already went through the same concerns your having now. Its nerve wracking I know. We all want a bench that is strong and that will last. Once you build your bench, per Paul’s design, you will wonder why you ever worried about it. Your bench will be rock solid. You just have to trust the design.
Just concentrate on making the joinery square, the H frame legs, the apron dados etc. having a twisted frame will just extend that twist to the rest of the bench as you assemble it. As spruce is a forgiving wood in this respect you can remove twist somewhat, but don’t rely on it. Just focus on accuracy and all will be good.
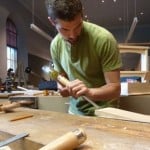
27 February 2014 at 12:28 am #28375Enough spare time this week… So a little progress with my workbench project…
Last week I had to move my little shop: the new place is a little part of a garage, but it’s ok. Can’t complain. It’s time to go on!Attachments:
You must be logged in to view attached files.27 February 2014 at 7:26 am #28388Good progress. Look forward to each new update of your workbench project.
27 February 2014 at 11:46 pm #28416Thank you for your replies!
I have to admit that that leg has been for me a sort of “test”, a “line” to be overcome.
Firstly to become more confident, I think.
Of course I know I have to improve my technique, but many of the initial worries are gone. It’s beautiful.2 March 2014 at 11:53 pm #28528Mortises, this afternoon, for the other leg. And knife walls for the last two tenons.
Chopping mortises is not for me a quick procedure yet: ~20 minutes for a 100mm (length) x 12mm (width) x 70mm (depth) mortise. But I think my skills are growing and I feel more confident.Attachments:
You must be logged in to view attached files.
3 March 2014 at 12:00 am #28532Emilio your progress looks great. As long as we focus on technique, speed will come of its own accord.
-
AuthorPosts
- You must be logged in to reply to this topic.