Large Back Saw
Welcome! / Forums / General Woodworking Discussions / Large Back Saw
- This topic has 15 replies, 10 voices, and was last updated 11 years, 3 months ago by
 Scott.
-
AuthorPosts
-

Part of our holiday tradition is making the rounds to the “junk” stores in our area. My wife loves combing through them for hours on end. I tag along; my holiday diligence. However, yesterday I found a saw. A back saw. A LARGE back saw. It’s a Stanley No. 39-123 and reads 28″x5″ on the blade. This thing weighs four pounds. Oof.
Attachments:
You must be logged in to view attached files.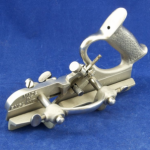 19 December 2012 at 4:55 pm #5234
I have an older Diston about the same size. I found it at an estate sale.
Brent
 19 December 2012 at 4:57 pm #5236
It’s a miter box saw. Great find! The 39-123 code actually means something – Ron Herman talks about it on one of his DVDs but my dog got hold of my copy and pretty much destroyed it so I can’t check up on which numbers mean what. Will have a Google around and see if I can find something.
George.
19 December 2012 at 10:03 pm #5282I can’t seem to find anything on the numbering system. I can’t believe it’s not uncommon knowledge so someone here might be able to shed some light on it. If anyone’s got a Shopclass subscription it’s on there – Ron Herman’s guide to restoring saws, the section on miter boxes.
If Santa brings me another copy of the DVD (my wife left it in a puppy-accessible place) I’ll come back to you with what the numbers mean.
George.
George, I think your thinking of the stanley miter boxes. It got me thinking and I found this link: http://www.forums.woodnet.net/ubbthreads/showflat.php?Number=6019654
Looks like the saw went to a stanley 358 miter box.
23 April 2013 at 4:21 am #11255Happy woodworking everyone! I just finished my first woodworking project and found that I need a lot of practice cutting straight, not as easy as it seems. Very hard to square things up afterwards if your cross cut was off a bit or a lot. Using a miter box sure took some of the frustration of my inexperience cutting straight but left me wondering if I may be cheating by using a miter box to do what Paul would have done free hand. I will practice cutting straight but I would like to know what you all think of the use of a miter box to do cross cutting? It sure saved me lots of time and produced very accurate and clean cuts.
 23 April 2013 at 8:13 am #11259
[quote quote=11255]Happy woodworking everyone! I just finished my first woodworking project and found that I need a lot of practice cutting straight, not as easy as it seems. Very hard to square things up afterwards if your cross cut was off a bit or a lot. Using a miter box sure took some of the frustration of my inexperience cutting straight but left me wondering if I may be cheating by using a miter box to do what Paul would have done free hand. I will practice cutting straight but I would like to know what you all think of the use of a miter box to do cross cutting? It sure saved me lots of time and produced very accurate and clean cuts. [/quote]
Use Paul’s knife wall this give saw something to register against. Try holding your saw especially back saw as light as possible. Your hand and arm really only to give motion and guidance. If saw sharpened and set properly should saw in a straight line.
I alway used to over set my hand saws say a 24″ cross cut more to do with timber I was using. Stud work Rafters 1st fix so I could at least get through timber. Just that saw will wonder more because of set.
Hey Rod, just my opinion buddy but I don’t think you are cheating. If at the moment you cant saw straight and square, just keep practicing till you can. I had trouble with this for a while, then one day it just clicks.
If your stock is not straight and square, then your joints will never fit properly and that will give you more frustration, some people use a shooting board to square things up and no one thinks that is cheating.
Rod, just enjoy making your projects, practice, practice, practice on your weak points, It will come buddy.
Remember Paul has been doing this all his life, it is second nature to him, but even Paul struggled at first.
Do what you have to do 😉
 24 April 2013 at 5:08 am #11299
Thank you all for your feedback. I did try using Paul’s knife wall method but on reading Mark’s comment I think I was doing more than guiding the saw. My chisels may also need to be a bit sharper to make more defined knife walls. I had to hit the chisels with the mallet pretty good to get it to go deeper.
Ken, thanks for your opinion on using the miter box and for your words of encouragement. For now I’ll use a miter box until my sawing improves. I had totally forgotten about using a shooting board! I tried to square the end grain of some boards on the wood vise using a hand plane but it was very hard to do and ended up rounding corners. So that’s when I resorted to using a miter box and it helped me finish my project.
Ripping some longer board was a pretty good workout. Again sawing straight will come with practice and better technique but at least it was easier getting it down to the line planning with the grain, as Dave suggests. Love using hand planes very relaxing to me.
Finish a couple of lawn chairs for a friend of mine. Figured law chairs would be a good project to get started on woodworking. Here is a picture. Have a great day everyone.
Rod
Attachments:
You must be logged in to view attached files. -
AuthorPosts
- You must be logged in to reply to this topic.