Skip to content
Woodworking Masterclasses
Facebook Instagram
  • Register Now
  • Video Library
  • GalleryExpand
    • Bedside Cabinet GalleryExpand
      • Assembly Table Gallery
      • Bathroom Cabinet Gallery
      • Bench Stool Gallery
      • Blanket Chest Gallery
      • Bookends Gallery
      • Book Shelves Gallery
      • Breadboard-end Cutting Board Gallery
      • Carrying Tote Gallery
      • Chess Board Gallery
      • Chest of Drawers Gallery
      • Christmas Gallery
      • Coasters Gallery
      • Coat Rack Gallery
      • Coffee Table Gallery
      • Corner Shelf Gallery
      • Craftsman-style Lamp Gallery
      • Dining Chair Gallery
      • Dovetail Boxes Gallery
      • Fly Swat Gallery
      • Frame Saw Gallery
    • Foot Stool GalleryExpand
      • How to Make a Table
      • Joiner’s Mallet Gallery
      • Joiners’ Toolbox Gallery
      • Keepsake Box Gallery
      • Laptop Desk Gallery
      • Leaning Wall Shelf Gallery
      • Mitre Box Gallery
      • Occasional Table Gallery
      • Picture Frames Gallery
      • Rocking Chair
      • Sawhorse Gallery
      • Shaker-Style Bench Seat Gallery
      • Shaker Stool Gallery
      • Sofa Table Gallery
      • Stepladder Gallery
    • Trestle TableExpand
      • Tool Cabinet
      • Tool Chest Gallery
      • Walking Cane Gallery
      • Wall Brackets Gallery
      • Wallclock Gallery
      • Wall Shelf Gallery
      • Winding Sticks Gallery
      • Wooden Plane Gallery
      • Wooden Spokeshave
      • Wooden Tray Gallery
      • Workbench Gallery
      • Other user projects vol. I
      • Other user projects vol. II
      • Submit Photos to Gallery
  • About Us
  • News
  • FAQsExpand
    • General FAQs
    • Workbench FAQs
  • Contact
Account Login
Woodworking Masterclasses

Modern Stanley No. 4 :-(

Search
Previous Back to: Tools and Tool Maintenance/Restoration14 Replies

Welcome! / Forums / General Woodworking Discussions / Tools and Tool Maintenance/Restoration / Modern Stanley No. 4 :-(

Tagged: plane, stanley

  • This topic has 14 replies, 8 voices, and was last updated 9 years, 8 months ago by orkaniusz.
  • Author
    Posts
  • orkaniusz
    24 July 2013 at 9:59 pm #15241

    Hi,
    I have a modern Stanley no. 4 (I know, I know… bad idea…).
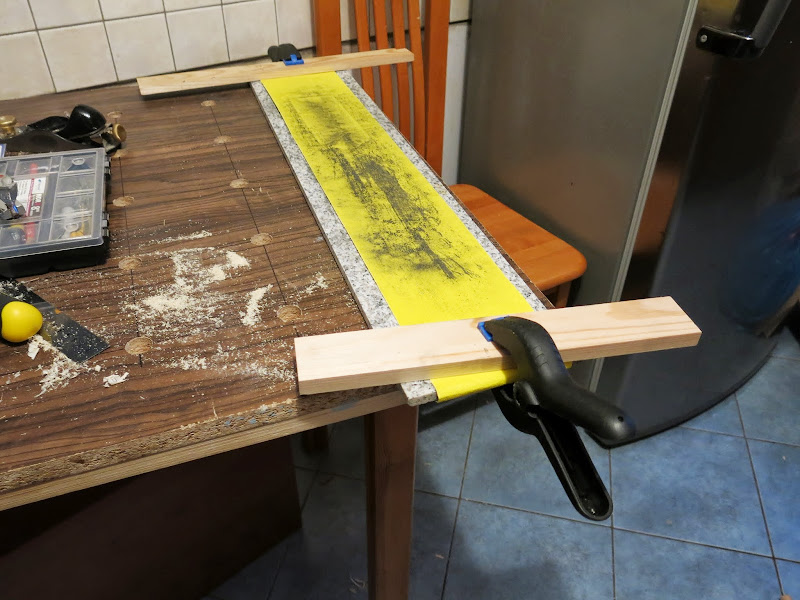
    I’m not pleased using it, it just doesn’t work like the one Paul uses… So, I decided to flaten the sole of my plane. Here is my flatenning station:

    My flatenning station

    I’m using 80 grid sandpaper.
    Here is a picture of the result after about one hour of work:

    I tried to use it – I don’t see any improvement. I just can’t get thin shaving. Additionally I tried to close the mouth – the plane works even worse.

    So, I don’t know what to do – should I work on this plane or is it useless – maybe should I buy new one (maybe the chinese one yumma or something…). Is it posible to improve modern Stanley no.4? (sorry for my English…)

    Settings
    Mark Armstrong
    24 July 2013 at 10:40 pm #15242

    @orkaniusz
    Nothing wrong with Stanley No.4
    Looks like it could do with a little more work I would go up to 120 grit paper. Keep using marker pen as reference.
    Also the front of the mouth looks like it could be filed using fine file to get rid of ragged edge.Remember to file inwards at an angle.Be careful not to open moth up too much.
    Remove frog and look for any rough bits in the seat and frog its self.
    Flatten the frog where plane iron sits.
    Most important thing is the plane iron make sure you get the back as flat and as polished possible. Then hone bevel in the method you want to use. Different schools of thought on this so I wont influence you one way or the other your choice.
    Make sure cap iron dose not have any gaps at front edge. Put cap iron back on plane iron about 1.5 mm from cutting edge.
    I would even flatten the lever cap.
    hope this helps

    Dagenham, Essex, England

    Settings
    orkaniusz
    26 July 2013 at 12:49 pm #15314

    Thank you, Mark. I continue working on my plane. Today is better then yesterday, I hope until next friday it’ll be like Lie Nielsen… :-), otherwise I’ll throw it out the window… 🙂

    Settings
    Mark Armstrong
    26 July 2013 at 12:58 pm #15316

    Do not throw it out its not a bad plane.
    It maybe your technic. Practise practise 😉

    look at this post https://woodworkingmasterclasses.com/discussions/topic/planing-technique/#post-15307
    or go to Pauls blog

    Dagenham, Essex, England

    Settings
    Krzysztof K
    26 July 2013 at 2:22 pm #15319

    Piotr,

    I know how you feel – some time ago I got new stanley 60 1/2 low angle block plane. I was too eager to get it and didn’t want to wait until something nice shows up on ebay with reasonable shipping.

    Regarding your technique – remember to dust off the sandpaper periodically and change it when it stops abrading satisfactorily. From the photo I’m judging you’re using the one intended for sanding drywall or plaster. I’d get the more durable one intended for working with metal (cloth underside). You can easily see when paper loses its bite when the particles are “glazed” and have lost sharpness. Far cheaper in terms of labor is to get fresh sandpaper than to wear yourself on the dull one.

    BTW – I still haven’t fettled my 60 1/2 to acceptable level, but I’m getting there in stages!

    Settings
    jgust747
    26 July 2013 at 2:44 pm #15323

    It’s not necessary to be 100% flat all over the the sole. The toe, heal and the area in front and behind the mouth needs to be flat and on the same plane. But the rest of the sole is less important.

    A great tip I got is to alternate the way you sand, switch between forward stroke and then turn the plane around and push it backwards.

    As Mark points out be sure to check that the frog is flat and where the frog is attached to the sole is flat.

    Dallas, Texas

    Settings
    rusty
    26 July 2013 at 3:21 pm #15328

    I had a Stanely no.4 from England that looked in good shape and sharp so I just tried it. It didn’t cut…period. I’m glad I didn’t file anything and looked closely at the blade. It had a microbevel that prevented it from cutting. Paul’s book has a trouble shooting section for planes and spokeshaves. If your following Paul’s flattening method the plane should be completely assembled during flattening with the iron backed off I can’t see your blade so that would tell me it isn’t fully assembled and if it is the frog should be advanced forward. To get fine shavings you need a sharp blade and the frog should be advanced to close the mouth.

    Settings
    Ken
    26 July 2013 at 4:11 pm #15333

    Russell, quick question how dose a micro bevel stop a plane cutting. All my plane Irons have micro bevels, and I can get shavings of less than a thou if wanted to.

    Cheers 😉

    Settings
    BarryB
    26 July 2013 at 5:40 pm #15337

    If the micro bevel causes the final angle to be near 45 degrees, it definitely won’t cut! What i’ve noticed on some of my 2nd hand planes is people have ground a micro bevel on the back (flat) side of the blade … that doesn’t work well at all! LOL!

    New Brunswick, Canada

    Settings
    Serhiy D’yachyshyn
    26 July 2013 at 6:55 pm #15338

    Hi Barry) Micro bevel on the back of the iron… interesting… I think that was done for a reason, some times if you have to work with difficult grain you add this micro bevel to the back of your iron.Just my 2cents))

    Toronto, Canada

    Settings
    orkaniusz
    26 July 2013 at 7:27 pm #15341

    I’v seen Rob Cosman doing microbevel on the back of the iron and a few others, mostly woodworkers connected to Lie Nielsen…

    Settings
    Serhiy D’yachyshyn
    26 July 2013 at 7:27 pm #15342

    Hi Piotr)
    I believe you can tune up any plane.It just time consuming and amount of sand paper what you want to spend))
    1 Question how bad is your plane sole?
    2 Is your flattening surface reasonable flat( I can see from the picture you use some tile or marble)
    3 Did you mark your sole with the marker to see the high and low spots during flattening process?
    4 Did you flatten the plane sole with the fully assembled plane?
    5 How often you change you sand paper?
    6 Clean your sand paper during the process.
    When your sole is flat start checking rest of the parts
    Is your frog reasonable flat? How flat is the area where frog attached to the sole? Did you tune up cap iron(no gaps between cap iron and blade). When your assemble your plane how tight every parts? How sharp is your blade? I can ask so many question. Don’t wanna be smart just trying to help. All what I know you just mention you can’t get thin shavings.

    Toronto, Canada

    Settings
    orkaniusz
    26 July 2013 at 8:01 pm #15343

    Hi Serhiy,
    here is my answers:

    1 Question how bad is your plane sole?

    I don’t have tools to measure. I think it’s not so bad (maybe a piece of paper from my printer would fit in the gap)

    2 Is your flattening surface reasonable flat( I can see from the picture you use some tile or marble)

    I think it’s pretty flat – it’s an artifitial granite or something

    3 Did you mark your sole with the marker to see the high and low spots during flattening process?

    yes, I did – low spots are in the center area in front (before iron) and in center area in the back (behind the iron)

    4 Did you flatten the plane sole with the fully assembled plane?

    Yes, as Paul has showed.

    5 How often you change you sand paper?

    About every half an hour

    6 Clean your sand paper during the process.

    OK.

    I think maybe main problem is bad condition of the sole just before the iron (it’s visible on my pictures)…

    Settings
    Serhiy D’yachyshyn
    26 July 2013 at 8:35 pm #15345

    OK. Lets go from there cigarette paper 0.001″, regular paper close to 0.003″ just checked.Do you have any tool to check your flattening surface?

    Toronto, Canada

    Settings
    orkaniusz
    28 July 2013 at 7:07 am #15406

    Well, I check flatness using my ruler from the combination square…

    But, I must say, after another hour of flattening my plane started to work better… It’s not perfect, but…

    Settings
  • Author
    Posts
  • You must be logged in to reply to this topic.
Log In

Security and Payments

Payments on this site are processed using stripe.com and gocardless.com. Customer's credit card details or bank details are stored on the secure servers of stripe.com or gocardless.com This entire site is secured by SSL.

About Our Company

Woodworking Masterclasses is a trading name of Rokesmith Ltd

Rokesmith Ltd


About Rokesmith Ltd | Privacy Policy | Terms and Conditions | About Us


Useful Links

© 2023 - Rokesmith Ltd

Loading...
  • Register Now
  • Video Library
  • Gallery
    • Bedside Cabinet Gallery
      • Assembly Table Gallery
      • Bathroom Cabinet Gallery
      • Bench Stool Gallery
      • Blanket Chest Gallery
      • Bookends Gallery
      • Book Shelves Gallery
      • Breadboard-end Cutting Board Gallery
      • Carrying Tote Gallery
      • Chess Board Gallery
      • Chest of Drawers Gallery
      • Christmas Gallery
      • Coasters Gallery
      • Coat Rack Gallery
      • Coffee Table Gallery
      • Corner Shelf Gallery
      • Craftsman-style Lamp Gallery
      • Dining Chair Gallery
      • Dovetail Boxes Gallery
      • Fly Swat Gallery
      • Frame Saw Gallery
    • Foot Stool Gallery
      • How to Make a Table
      • Joiner’s Mallet Gallery
      • Joiners’ Toolbox Gallery
      • Keepsake Box Gallery
      • Laptop Desk Gallery
      • Leaning Wall Shelf Gallery
      • Mitre Box Gallery
      • Occasional Table Gallery
      • Picture Frames Gallery
      • Rocking Chair
      • Sawhorse Gallery
      • Shaker-Style Bench Seat Gallery
      • Shaker Stool Gallery
      • Sofa Table Gallery
      • Stepladder Gallery
    • Trestle Table
      • Tool Cabinet
      • Tool Chest Gallery
      • Walking Cane Gallery
      • Wall Brackets Gallery
      • Wallclock Gallery
      • Wall Shelf Gallery
      • Winding Sticks Gallery
      • Wooden Plane Gallery
      • Wooden Spokeshave
      • Wooden Tray Gallery
      • Workbench Gallery
      • Other user projects vol. I
      • Other user projects vol. II
      • Submit Photos to Gallery
  • About Us
  • News
  • FAQs
    • General FAQs
    • Workbench FAQs
  • Contact
Login Account

Insert/edit link

Enter the destination URL

Or link to existing content

    No search term specified. Showing recent items. Search or use up and down arrow keys to select an item.
      Search