Pedestal desk
Welcome! / Forums / General Woodworking Discussions / Projects / Pedestal desk
Tagged: desk
- This topic has 20 replies, 7 voices, and was last updated 8 years, 4 months ago by
 chemical_cake.
-
AuthorPosts
-
 21 July 2015 at 12:53 pm #128681
Hello fellow woodworkers,
I just want to share my current project, a pedestal desk. It’s my most complex but also most rewarding project so far. I am building this for my first daughter. She is almost 6 years old now and she is getting too tall for the little simple desk/table she uses at the moment. A couple of months ago I asked her to look for a desk she might like. She came up with a pedestal desk. With her preference in mind I started the design, making drawings, decided on the material etc etc.
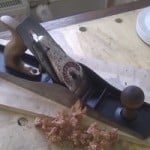
It’s made from Spruce and some cheap plywood, be cause it will be painted white and pink (it’s a girl remember :)). And off course it’s all hand work, no machine whatsoever. So far I’ve cut 48 mortices and tenons, with the help of Paul’s morticing jig. That really speeded up the process.
My original plan was to have raised panels in the frames, but I failed horribly. I was not happy with the results and be cause of time restraints I decided to do it differently. Just a plain plywood panel with a moulding. The latter has to be done yet.
While gluing up the frames and panels I made a big mistake. When I glued the last stile to the rails I noticed that I forgot to insert one of the panels. I am not quite sure how I managed to forget that. Unfortunately the glue had already grabbed the wood. You can imagine how I felt at that moment. With very much luck and devotion I managed to loosen some joints and squeezed in the panel. I was able to breathe again.Let me finish this part with some pictures. More to come later.
[attachment file=”128682″]
[attachment file=”128683″]
[attachment file=”128684″]
[attachment file=”128685″]
Attachments:
You must be logged in to view attached files.
 21 July 2015 at 1:11 pm #128689
It’s a pity the pictures won’t load for me but looking at the thumb nails it looks good and a sizable project too.
21 July 2015 at 1:15 pm #128692Can you see them now? I clicked on “insert into content” which might help.
21 July 2015 at 1:18 pm #128693Only one loaded and it struggled. How big are your files, it shouldn’t matter but I have the kids playing online games and the wife streaming a movie. I think my bandwidth is over stretched.
21 July 2015 at 1:21 pm #128695aha the desk loaded, it looks cool I hope you didn’t use an antique saw on that plywood but I like it very much. It’s going to look even better when you put some nice finish on it.
21 July 2015 at 1:26 pm #128696Thanks. Well I did use an antique saw on the plywood 🙂 I have to buy a new construction saw. There is still a lot to do. The top isn’t cut to length and width yet and it needs an edge band. I have to make drawers, doors, a base skirt and some other details. At least it looks like a desk already 🙂
21 July 2015 at 1:34 pm #128697I don’t have to tell you how quickly that plywood will blunt your saw, unless you know how to sharpen it, it would be a pity. For a first complex project you have done really well I commend you just don’t rush to finish it so you don’t make any mistakes you’ll regret later. When you do the drawers take your time and go back & forward between the shooting board and the opening. Whatever you do don’t rush this process. I don’t think you need any tips though you have done remarkably well all on your own. Congrats from the land down under, in case you don’t know what that means (Australia)
 21 July 2015 at 5:16 pm #128701
Michael, the desk looks really nice already. Good luck with the drawers and the rest of the build. You daughter will love it!
28 July 2015 at 2:36 pm #128863I have made some progress with the desk. The cabinets are glued now, the compartment in the center is almost ready, the top is cut to size and the edge band is in place with mitered corners.
I am almost ready to start the build of the drawers. But first I will enjoy a holiday. I will make the drawers like Paul did on the tool chest.
[attachment file=”desk1.jpg”]
[attachment file=”desk2.jpg”]
Attachments:
You must be logged in to view attached files.
4 December 2015 at 11:18 am #132857Last month I finally finished this project. The build took me about 5 months. My little princess is very happy with it and that’s what matters most.
The hardest part must have been the paint job. Using multiple colors made things a little more complicated.Installing the desk led to other tasks. In the following pictures you see two bookshelves hanging on the wall. These had to be relocated and while drilling new holes in the wall I hit an electricity cable. So another task came along and that was replacing the cable.
I also had to repair the previous holes I drilled and now I must repaint the wall.Anyhow, here are some pictures.
-
This reply was modified 8 years, 4 months ago by
 Michael van Zadelhoff.
Attachments:
You must be logged in to view attached files. 4 December 2015 at 3:51 pm #132867
This is fantastic, Michael. You did a real snap job with the paint. What kind of paint and finish did you use? That desktop has a nice clear, smooth surface.
4 December 2015 at 5:53 pm #132871Thank you Derek. I used waterbased paint. To be honest, in the pictures it looks better than it actually is.
-
This reply was modified 8 years, 4 months ago by
-
AuthorPosts
- You must be logged in to reply to this topic.