Planing problems
Welcome! / Forums / General Woodworking Discussions / Tools and Tool Maintenance/Restoration / Planing problems
- This topic has 33 replies, 12 voices, and was last updated 10 years, 4 months ago by
Thomas H.
-
AuthorPosts
-
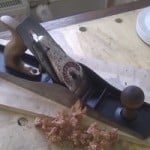
Hi all,
I’m new to woodworking so this is probably a common problem. I bought a Stanley No 4 plane from ebay (see pics). I’ve tried to sharpen the iron following Paul’s method, using abrasive paper (400, 800, 1200). I’ve set the cap iron to about 2mm below the cutting edge. I’ve experimented with the depth of cut and my grip, trying not to put too much pressure on the front knob while trying to apply only forward pressure on the tote. However, the planing is uneven and jagged and the shavings correspondingly so (se pics).
What might cause the problem? Is the iron in need of more sharpening or is it the plane adjustments I’m getting wrong? Thanks for any help.
Attachments:
You must be logged in to view attached files.
I’m sure someone with more experience will chime in soon, i’m a relative beginner with hand planes also.
I would sharpen again, had a similar experience and found the iron was not near as sharp as i thought it was. Could be something else but sharpening is the easiest place to start.
 25 November 2013 at 1:19 pm #22248
hi Thomas have you taken the frog off for cleaning as from the pics it doesnt look straight to me and also are you using a guide of any kind to get the correct angle the reason i ask is the first pic of the iron doesn’t look like its square or the bevel isn’t equal across the whole width of the blade just a thought but practise practise practise
 25 November 2013 at 1:22 pm #22249
A couple of things come to mind. Could you check them?
1. Is the blade mounted bevel down as it should be?
2. Are you planing with the grain?
3. Are you taking too thick a shaving?
4. Did you remove the burr completely?
5. Is the blade indeed razor sharp? Can you shave your hair easily? Can you cut paper with ease?And of course what Eddy asked.
 25 November 2013 at 2:19 pm #22250
Thomas…I agree with all that is said above. From the photo of the blade it looks like you have the blade installed upside down. Turn it over, chip breaker should mate against the flat side of the blade. Verify you are planing with the grain. If in doubt, plane from both directions, you will know the difference when you do this.
Report back and we can go from there.
Thomas it’s a common mistake to put the iron in the wrong way, especially when you are new to hand tools. I think most of us here has made this mistake at some point :).
I know i’m helped by visuals so I just wanted to add this image to show how the iron should be paced in a Stanley No.4.
 25 November 2013 at 2:48 pm #22252
well spotted Greg i looked at the picture and didnt spot the obvious mistake i know its hard to tell an angle from a picture but if this blade is upside down it is way out of the correct angle
 25 November 2013 at 3:30 pm #22253
First, don’t be discouraged! Many if not all of us have had similar experiences. Hope we can help.
As for sharpness, your iron should shave hair from your arm, or darn close.
It looks to me as though you have the blade bevel down, but have ground a fairly radical back bevel. This might affect performance; I generally do only a very tiny micro-back bevel a few thousanths wide and a few degrees of angle. Some don’t do anything at all. Also looks like your chip-breaker is way too far from the edge of the blade; it should show only a tiny sliver of metal, perhaps a 1/32 of an inch or even less if planing hard woods. The position of the chip-breaker is critical.
Also, from the picture, it looks as though your frog is too far forward; this should show a sliver of metal between the front edge of the frog and and the bed. Loosen the two vertical screws and then adjust the frog half a millimeter or so to towards the rear of the plane by turning the screw beneath the depth adjustment wheel counterclockwise slightly. Then tighten the frog again, making sure it is straight.
check your edge with a square to see that it is square with the length of the blade and almost perfectly straight, with only the corners cambered a couple of degrees. Later you will perhaps to put a gradual curve along the entire width of the blade, but this is not necessary for good results with a smoother. This is very important; a variation of perhaps a few thousanths isnt critical and can be adjusted for with the lateral adjuster, but anything more than that requires correcting.
Check your plane sole for flatness.
Also, looks like your depth of cut is kind of deep. You should be aiming for absolutely whisper thin shavings.
Start with your plane taking absolutely no shaving at all, then very gradually increase depth of cut until you begin to take the very minimum of shaving.
Do this on a thin piece of wood, edge-on, planing with only the right side of your plane first. Once you get the beginnings of the tiniest hint of a shaving, try the left side of your plane . if you get a shaving that is very much the same, your lateral adjustment is pretty good. Chances are that you will not, however. If you get no shaving on the left, you need to move your lateral adjuster towards the right a tiny bit and try again. repeat until you get similar shavings with each side of the plane. Holding the plane in your hand as if to use it, moving the adjuster to the right *decreases* the depth on that side, and vice-versa.
This will make sure your blade edge is square to the mouth of the plane.
Hope this helps and don’t give up. Feel free to come back and let us know if any of this works, or if you’re still having trouble. Good luck!
Thank you all so much for your feedback! As soon as I’m back in my little home workshop I will start over, with sharpening, attaching the iron the RIGHT way ( 🙂 ), and addressing the frog, the sole and work gradually towards a good cutting depth. Hopefully I will report back soon with some nicely planed shavings.
Much obliged.


 26 November 2013 at 3:43 pm #22324
I have exactly the same problem. I was given a No 4 a few weeks back. I attempted sharpening, re-assembling and tried shaving a scrap of pine, the shavings where worse than before I took the plane apart. Guess I have reassembled the iron and possibly the chip breaker incorrectly too. Suppose I best start over, Doh. Thanks Thomas.
You’re welcome, Dave. 🙂 And yes, I don’t mind making mistakes. What is very obvious to experienced people might be a small mystery to the novice. I want to focus on setting up my tools correctly. It seems that is one of the most important aspects of woodworking with hand tools. Thankfully I’m airing my mistakes in this wonderful community.
Take a look at the frog position of my plane, how is this looking?
Attachments:
You must be logged in to view attached files. -
AuthorPosts
- You must be logged in to reply to this topic.