Scott's Hamster Coffin
Welcome! / Forums / Project Series / Dovetail Boxes / Scott's Hamster Coffin
- This topic has 12 replies, 10 voices, and was last updated 11 years, 3 months ago by
John Poutier.
-
AuthorPosts
-

Hey all-
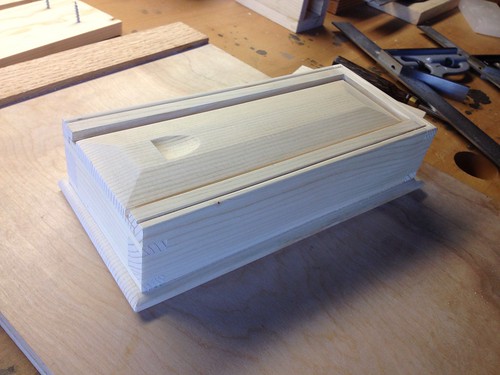
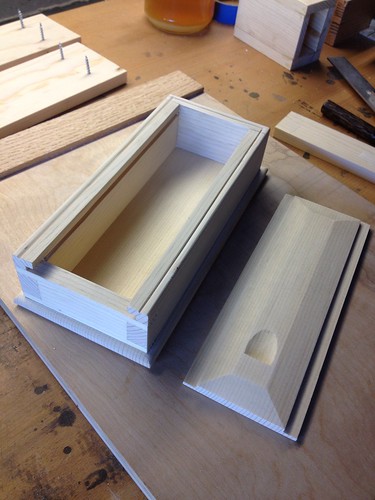
Below are pictures of my first finished dovetail box. Our family jokingly calls this my “hamster coffin” since our family dog ( a Lab/Weimaraner mix) has to be closely supervised around my daughter’s new pet hamster. :-0
Since the project was small, I gladly remade several components when I was not quite pleased with the fit or made a gross error. Overall I probably had about 100% waste, which amounts to a lot of good practice. There are a few mistakes in the finished piece, but nothing too major. Overall I am giving myself a B- grade.
I learned a few things along the way:
1) Haste makes waste. Several times I found myself trying to “streamline” the process, which is another way of saying I was going too fast and not thinking carefully. This “bravado” almost always led to a slap on the forehead, like when I did not mark my waste and then cut on the wrong side of the line, or when I forgot to put glue into the extra pin socket surfaces just below the groove opening. I doubt the box will be falling apart due to that last gaff. I also discovered that my SECOND lid’s raised panel took shape much more evenly when I slowed my plane passes way down. I was trying to imitate Paul’s lightning speed but the results were not pretty.
2) Although all the in/out of the vise made the process a bit slow and tedious, I must admit that Paul’s dovetailing method turned out about 3x more accurate for me than anything I did previously. Each joint fit right off the saw with only a minor amount of cleanup. Hooray.
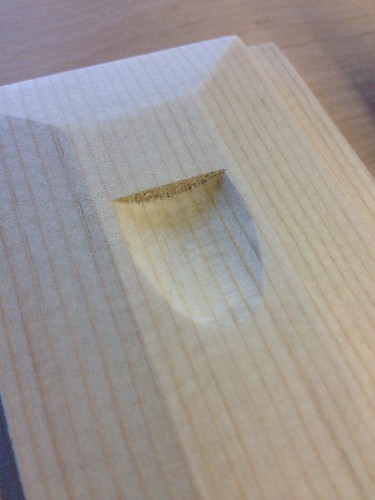
3) The gouge work was more fun than I expected. I bought a vintage 1.25″ gouge for $4 USD from the local tool swap, did some rehab work on it, and made a few practice runs. I could not figure out how to get a smooth surface on the vertical knife line edge. I sharpened my knife, and the strokes were very light and careful, but I could not obtain a smooth surface in the pine. Any tips would be appreciated.
4) I still have to figure out how to handle project pieces without getting grime on them. I was trying to be neat, but I kept noticing smudges on the job. This is probably a result of having dirty hands after sharpening tools. I’ll have to wear gloves next time…
5) I really suck at brushing Shellac. I thought I did well at first, but in the morning I found all sorts of drips and ponds. Paul makes brushing look easy. Next time I will try a different brush, or try padding instead. I also have no fondness for the steel wool. The wool was shedding with each stroke, and that wool dust is very hard to get out of the inside corners. Perhaps there are better quality steel wools? I ended up ditching that and using a synthetic wool instead.
6) I went with a quarter sawn piece of pine for the lid because I was worrying over the lid warping. I hind sight I would probably go for something different since the straight grain looks quite boring.
Here are some pics before the finish:
I am looking forward to my next box. Perhaps one done in cherry…
-S
 19 April 2013 at 11:52 pm #11160
Looks great Scott! Mine too has been called “The Coffin.” I just started to shellac it today and the process seemed to go okay. I first tested with a sponge brush and that held way too much shellac. I switched to a brush, dabbing off as much as possible and that went much better. Someone had posted some shellac instructions from a guitar maker; they recommended using a piece of wool sock wrapped in a scrap of old t-shirt as an applicator. I’ll try that next time.
Again, that’s a beautiful box.
 19 April 2013 at 11:56 pm #11162
Well done Scott! Shellac has a learning curve for sure. I’ve also had the same experience with steel wool. What synthetic wool did you use? What are your thoughts on it?
Thanks for the complements guys. I had fun even when I fumbled.
Lance- I think the “Purdy” brand brush I bought was too course for thin shellac. I may try to find a true hake brush like Paul uses. Some sources also recommend an Athena Glaze 7100-1-1/2″, which is inexpensive for a Taklon brush.
Padding (the wool sock and tshirt method) sounds more fool proof, but requires many more coats I believe. Is it hard to get into the inside corners of a box with a pad?
Greg- I picked up a Norton Extra-Fine General Purpose Synthetic Steel Wool from Home Depot. Supposedly replaces 000 wool. Looks like Norton sells a white colored one that replaces 0000 wool, but Home Depot did not carry that one. The synthetic pad did shed a few fibers while in use – probably because I cut the pad in quarters – and only about 5% of what the steel wool shed.
I was alarmed with the rough surface after applying the shellac. Eeek! I used some 320 grit sand paper to knock down the drip and pool buildup, then buffed out all over with the synthetic wool. after buffing out and applying the wax, I was pleased with the final result. With the right brush I think I can do much better next time, and it will probably take less labor to buff out.
 20 April 2013 at 5:40 pm #11179
Hi All,
I dislike the shedding of the steel wool also in corner’s etc… the first time I used it. Works great on a long, flat surface. So I gave it some thought on my next attempt. I tried not to be so “rough” especially in the corners. If you notice Paul applying shellac, sanding or using the wool, he uses a very light touch in my opinion.
Scott, I purchased several hake brushes on Ebay. The first use was a 2″ brush.My second use was a 1″ brush. I liked the 1″ much better for the corner/edge work. However, regardless of which brush I used, if I did nto use a very light touch on the edges/corners, I had pooling or runs/drips too. Now I use that very light touch and double check corners, etc… immediately while the shellac is still wet in cash I over did it a bit and can correct the error by taking some off.
The same with sanding and steel wool. I would sand through the shellac or paint. Lighter touch and not so much worked much better. A lot less sheding with the steel wool too. If you have sharp tools, woodworking should be effortless. I am finding this to be more and more true in all aspects of woodworking.. If I am straing/struggling, I am intuitively thinking that I am doing something wrong. When I lightened up on the steel wool, almost perfect results.
As a last bit here, Robert Lang published and article in Popular Woodworking about something called Siawool. I am sorry, I do not remember the article, but, he provided a link to Lee Valley (http://www.leevalley.com/US/wood/page.aspx?p=69024&cat=1,190,43040) in the article. It is made in the UK and unfortuately the fine grit is not avaialble currently. I tried searching and found places in the UK that have it but due to shipping it is either too expensive or the companies will not ship to the US. I will keep an eye out for it, but, currently, I will go with the Norton that Scott suggested since it seems to be the only one available.
Hope that helps everyone.
Jim
Robert Lang published and article in Popular Woodworking about something called Siawool.
I think this is the one.
http://www.popularwoodworking.com/woodworking-blogs/editors-blog/siawool-review-substitute-for-steel-wool-substitute
[quote quote=11179]If you have sharp tools, woodworking should be effortless. I am finding this to be more and more true in all aspects of woodworking.. If I am straing/struggling, I am intuitively thinking that I am doing something wrong. When I lightened up on the steel wool, almost perfect results.[/quote]
Jim-
Thanks for the thoughtful reply. You are probably right, my pressure was probably too hard, and I was probably rushing (again) as well. I will pay more attention to this on the next box.
Thanks also for the siawool info, and thank you to Ken for the article link. It is funny that I have been through the Lee Valley site many times, but have never noticed Siawool. Hopefully LV will get the finer grades in stock so we can try it out.
-Scott

 22 April 2013 at 6:41 pm #11234
Scott
A very nice neat and uniform box I agree with Dan I think the straight grain adds to the look
23 April 2013 at 3:31 am #11254Scott, the straight grain looks good…and the nice about it is…..it’s straight! Very nice work.
-
AuthorPosts
- You must be logged in to reply to this topic.