Technique problem
Welcome! / Forums / General Woodworking Discussions / Projects / Technique problem
- This topic has 7 replies, 7 voices, and was last updated 11 years ago by
Josh Eagle.
-
AuthorPosts
-
23 July 2013 at 6:52 am #15167
Hi folks,
I am in the process of building a crib for my newborn. The headboard and foot board are identical. On the head/foot board are a top rail and a bottom rail. Inbetween the top and bottom rails, I’ve run a number of vertical slats. The vertical slats have mortise and tenon joints on both ends of the slat. I have been consistently ending up about 1/32 short on the slats, causing a gap on the shoulder of the joint. I thought I’d describe my technique and maybe someone may have some insight on what I’ve done wrong. I don’t have much experience, I’ve only made saw benches, Paul’s bench and now this project.
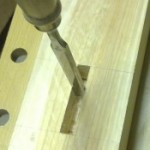
First I chop all the mortises on the top and bottom rails. I take a slat and cut the bottom tenon. I place the tenon into the bottom joint, leaving the uncut top long and sticking to the side of the top rail. You can see the fourth slat in the second photo shows this. I then carefully mark the edge of the top rail onto the slat, using a marking knife. I use that mark and mark out the tenon shoulders wi a knife. Last I cut the tenon using Paul’s knife wall technique. The tenon usually ends up beautiful, square and 1/32 short of the top rail.
Is there a better way?
Thanks, josh
Attachments:
You must be logged in to view attached files. 23 July 2013 at 10:00 am #15174
Hi Josh,
Great work building your own crib. My wife is pregnant with our first at the moment and if I can get enough time once the decorating is done I’d love to do the same as you.
A couple of things spring to mind. Firstly, you could be moving the knife wall, so keep an eye out for that when cutting the shoulder and be gentle with the first couple of cuts.
The other thing I’d try is not fitting the tenon into it’s mortice before marking the other end that you need to cut. Place the already tenon’d end on top of the rail, so the tenon is over but not in it’s mortice, if you get what I mean. Line up the shoulder with the top of the rail and make sure that it’s square, then mark the other end. That may give a more accurate position for the other tenon.
You could also make a kind of story pole. This would be a piece of wood cut to the exact distance between the two rails. It should fit snugly between the two rails across the whole width of the crib. You can then use this to mark the shoulder lines for the slats by placing it on top of the slat, making sure there’s the same amount of extra length each end of the slat, then put knife marks at each end, which will be the positions for the shoulders. It’d be better to make it a hair longer, so you can trim the shoulders to fit perfectly.
Hope this is some help!
George.
 Anonymous23 July 2013 at 4:03 pm #15183
Josh, I used a different method. I ran a grove in the rail the length of the rail Then cut spacers the depth of the groove and placed then between the slats. I was careful to get a tight fit. Doing the groove saved a lot of time and looked good also.
Boyce 23 July 2013 at 6:26 pm #15184
Looks a loverly project.
You are marking at an angle that would mostly cause the problem.
Put shoulder of bottom tenon on edge of rail do not put in mortise then mark top shoulder with knife.
Josh-
This may be helpful:
Paul marks two rails for his book case project (from his DVD series) by assembling the shelf (with clamps to insure joints are fully seated), then he lays the rail (no tenons are cut yet) across the bookshelf front as close to the location of the mortises as possible. When he makes the small reference marks, I believe he states it is as if his knife point is reaching JUST UNDER THE EDGE. Then he makes his knife line and knife walls (on the waste side now) from those light reference marks.
So the “trick” may be the “Just under the edge” part. Worked for me.
24 July 2013 at 4:34 am #15197It may just be something as simple as putting some clamps on there to give you that little bit of extra pressure to help seat the joints. Excellent work on those.
27 July 2013 at 3:46 am #15349Thank you all for those ideas. I am getting much more consistent results.
-josh
-
AuthorPosts
- You must be logged in to reply to this topic.