The old new bench stool
Welcome! / Forums / Project Series / Bench Stool / The old new bench stool
- This topic has 7 replies, 3 voices, and was last updated 6 years, 7 months ago by
Richard Kelly.
-
AuthorPosts
-
10 November 2017 at 3:21 pm #362185
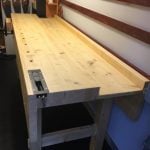
Made to Paul’s design apart from a little tinkering with the backrest, from some pretty average European Redwood.
Painted with the ‘antique’ look of black over red chalk paint, plus a coat of water-based varnish.
I might knock a bit of the shine off at some point but am letting it all sink down first.
Attachments:
You must be logged in to view attached files.
 10 November 2017 at 5:25 pm #362360
All good questions Zeppos, and thanks to all for the compliments.
Time taken? Very ad-hoc work, and so very hard to be sure, but if I were to try to convert to working ‘days’, i.e. start at 9am and finish at 5pm, I’d say the frame (i.e. excluding seat) is 2-3 days’ work.
I’m a relative beginner, and so as a benchmark, I did one of the dovetail shaker boxes in 1 day, from complete start to glued up and hinged, although I’d say that was pushing it a bit and in softwood to be painted so I could chance my arm a little more – I wouldn’t really aim to work at that speed. The stool I did 100% carefully as I did not decide to paint until the end.
Lessons learned? The instructional videos are first class so it was hard to go wrong, but I’d proffer:
(a) Make sure that you select/orientate your timber so you won’t be chopping into or making tenons of, badly knotted parts (my wood was less good than I would like)
(b) Have a very solid method of marking parts (triangle method or whatever)
(c) Similarly remember that when you saw the tops of the legs to shape, you may lose your witness marks! (I did…)
(d) Make sure that your sliding bevel has a parallel sliding bit as the cheap ones may not be! And this will catch you if you use inside and outside of the slide interchangeably assuming it will give the same angle.
(e) I glued up two ‘A’ frames of the stool and set aside before then assembling the whole stool, in my keenness to have the frames 100% without twist.
(f) The mortice fence Paul uses is very valuable to get mortices parallel to the leg face. Have a look at my post on this where I found a way to create an adjustable one.
12 November 2017 at 10:34 am #364028Adding while I remember, although they’re obvious when written down…
(g) Don’t lever the tenons apart during what might be frequent test fits – the corner of the rail will bruise the leg, especially with SPF. Might not matter if it’s painted but we should aspire to create the perfect item and not rely on covering up our mistakes.
(h) The Router Plane is a very good tool to ensure parallel tenons – given we’ve taken the trouble to get parallel mortices!
(i) Don’t undo your sliding bevel until the project is FINISHED! e.g. it’s still handy to check the angles on those seat fixing rails, by which time you may have put it away!
(j) If you see my comment elsewhere about the mortise guide – which I’ve not attached below – I also used the same plastic wedges with the clamps for glue-up (with some hardwood packing of course to protect the legs)
(k) Try to register the mortice gauge always from the same relative face (e.g. outside face) of every rail. It’s easy to assume that because you checked it at the start and found it ‘centred’ perfectly on ONE rail that it won’t matter if you flip at some point. However, unless you’ve dimensioned every single one of the 8 precisely and perfectly equal, then tiny errors can creep in – potentially adding a little twist to the ‘A’ frames.To be fair, it’s a stool and perhaps some of my points are too fussy – but if I were doing this in cherry for a breakfast bar in the house, and not painting it, I’d want it spot on.
Attachments:
You must be logged in to view attached files.29 December 2017 at 11:31 am #420907Been meaning to add:
Having set my sliding bevel, I at one point notice that the angle using the outside wasn’t quite the same as that on the inside.
Turned out that the wooden bit of the sliding bevel was neither parallel, nor were all faces square.
So, before you start, take a look and, if necessary, fettle your SB – to make both the wooden and metal parts 100% parallel AND square.
-
AuthorPosts
- You must be logged in to reply to this topic.