Workbench question – how to flatten rounded corners after lamination?
Welcome! / Forums / General Woodworking Discussions / Projects / Workbench question – how to flatten rounded corners after lamination?
Tagged: workbench
- This topic has 9 replies, 5 voices, and was last updated 7 years, 1 month ago by
Hugo Notti.
-
AuthorPosts
-
I am building the Paul Sellers workbench and have completed by glue-up of 7 doug fir 2x4s. I bought these from a USA big box lumber store, so they have rounded corners (see closeup photo).
While I planed the faces for the lamination, I did not plane the edges.
I’m not sure what my next step should be. I have a #4 smoother plane and I was going to start planing the top of the glued up bench top to remove around 1/4″ to get the top flat.
Beyond the several hours I imagine it will take to plane the top flat, I’m not confident in my ability to keep it flat (given the small size of my plane, lack of experience, and that I don’t have other tools like winding sticks to check for flatness).
Does anyone have a recommendation for how to proceed (or do I need to start over with square wood)?
Attachments:
You must be logged in to view attached files.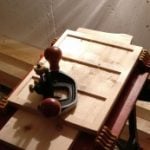 12 March 2017 at 6:08 pm #310083
Hello draske,
i started to built the bench a few weeks ago. To plane, i also used a #4. My advise, keept the plane sharp and cut two simple sticks. They’ll do it als winding-sticks.
It takes some time to plane the tabletop down but its also a good practise.cheers!
12 March 2017 at 7:07 pm #310090Start accross the grain, because this requires less force. The round corners will protect the edges for a while, so you can go all the way of the width. You can use a wall to rest your table against, then clamp the wood at the front edge. You have all glue lines as depth markers, so keep watching, how they get smaller. Once you are about one or two mm away (3/16) from the final thickness, start planing with the grain and get rid of the tearout as far as possible. Be patient around knots, better use a shallow setting and spend more time. And do sharpen whenever you are in doubt, if the blade is still sharp. By the way, this will take time and it will be exhausting, but you don’t need to finish it in one go. Only make sure, you are working the complete surface in one go, because this will ensure, that you remove about the same amount everywhere. And do check often. Or, better check even more. I think, I needed roughly two hours per face, pure planing time, no rests, sharpening or taking breath included.
Measuring equipment:
Eyes make quite good measuring equipment. You can check an edge for straightness by scanning it from corner to corner. By scanning the short edge on the other side of the board against one of the near corners, you can even tell, if a board is twisted. Unfortunately, this requires not only good vision but also experience, and even an experienced eye can be fooled by ondulating grain.
Instead of winding sticks, you can use metal rulers (with support, so they can stand on the side) or spirit levels. If you have one spirit level, you can check the position of the bubble while in one place. It should be at the exact same position in any other place. Not very accurate, but better than nothing.
For a long straight edge, you can use a square aluminium “tube”, the wider, the better. There are special boards to check the flatness of concrete floors, which cost about as little as these tubes, while the manufacturer hopefully paid even more attention to have it straight. I was quite happy, when I discovered Paul’s video about making straight edges. But eventually, I figured, that I would need a straight edge to check them for straightness…
Alternatively, you can use a fishing line or any thin string with a fairly smooth surface. You have to stand the slab on the side, because the line won’t ever be straight vertically. But under tension, it will be perfectly straight horizontally. This is, how brick masons measure their walls for straightness.
Ok, I hope, this helps a bit. Anyway, don’t give up. I found, that building my work-bench is one of the best projects to learn planing and measuring. In the end, nothing needs to be absolutely perfect and you can even out mistakes even after years. During assembly, only one side of the bench-tops needs to be flat, so I decided to flatten the harder side first, expecting the other side to look better when done.
Dieter
-
This reply was modified 7 years, 1 month ago by
 12 March 2017 at 11:19 pm #310104
Draske, a scrub plane definitely comes in handy for that job. About three passes with a scrub plane with the grain gets the rounds down enough to use the #4 to smooth it out and flatten.
If you only have a #4, take a heavy skewed cut and keep it sharp. Don’t worry so much about flat and smooth as getting the rounds down to a level, then start finessing it.
Keep a towel handy to wipe up the buckets of sweat.
In addition to the good advice already given, here are some thoughts in case they help anyone.
Flattening the large benchtop areas can seem quite intimidating, especially for a beginner with just a #4 to hand. But it’s possible to postpone or even avoid flattening the top for much longer than you may think, depending whether your goal is a working bench or a work of art.
Before flattening the top of the worktop:
1. Flatten only the approximate areas on the underside of the laminated top where they will rest on the bearers on top of the leg frames. Do this by planing across the grain just for those few inches. Don’t worry about the finish too much because this will be under the bench and not ever seen anyway. As long as they top will sit on the bearers reasonably flatly, the bench will be rock solid.
2. Make the aprons and cut the housings to fit the leg frames (wedged or otherwise) as per instructions.
3. Glue the top section(s) to the aprons while the leg frames are in place in the apron housings (glue or bolted etc) as per instructions. You probably need to plane the meeting glue edge of the apron and benchtop sections a bit, but this is limited in size and function and you don’t have to do it perfectly – clamps are your friend.
4. Carry on just as per Paul’s video/ instructions.
Rounded corners underneath the benchtop? Who cares? If the benchtop is approximately flat, you don’t actually need to get rid of the rounded corners on top at all – they won’t harm much. If you want to do so for cosmetic reasons, you can wait until you feel you are ready, built up more experience or have longer hand planes & scrub plane etc – the bench will still work in the meantime and probably prove invaluable anyway.
One other advantage of doing it this way, is that when you do come to plane the top, it is already firmly connected to a very solid bench, which makes the activity a lot easier than balancing it on saw horses/workmates etc if you don’t already have a bench.
I give this option as it’s something I did. My benchtop has never been perfectly flat and this has never affected my work adversely. It’s flat enough for things to sit on top of and I did smooth it after a while, but didn’t go to extremes. I also don’t mind too much when it gets sawn into or scratched etc.
13 March 2017 at 10:56 pm #310140My concern about a rough surface on the bottom of the bench-top is to get a reference for squareness of the sides. I think, it is good to have at least the outer rim flat, level, parallel and square, a bit wider than just the edge, in order to register a square (I suppose, there are few woodworkers who have a square that can register on the opposite edges of a workbench). But I agree, the corners can stay. You could even carve a three-dimensional freize into the bottom 😉 . And, yes, there is no need to plane the top before it is installed. If you want it really flat, you need to do both parts together anyway.
Dieter
@hugonotti I agree that normally/ideally we would use a flat underside of the benchtop as a reference to get the side square and flat where it will glue to the apron. Ideally everything is perfectly foursquared before any joinery (corners or not).
In practise though, it’s not that difficult to rest the top section on the bearers, see how it will fit to the apron and correct any minor discrepancies by planing and eye. Iterate a bit with clamps to see how the joint will close. This method just uses the part of the apron that joins to the top as the reference instead of a square. It analogous to jointing two pieces together in a vice – it actually doesn’t matter if they are not square so long as any offset is countered by the second piece.
Just giving some options because foursquaring such a large piece can be intimidating.
14 March 2017 at 9:20 pm #310183Ok, what you say makes sense! I will go somewhere between perfection and your suggestion, probably more in your direction, if I have to. The aprons look bad, but so did the bench tops, before I attacked them (each log its own thickness). I am mostly worried about the housing dados in the aprons, because they are important keys to stability. As said before, I can improve the benchtop over years…
In short: It is always good to know, when to stop. It is a constant struggle at work, explaining this to others, so I hope, I am fairly good at it (at stopping) 😉
Dieter
-
This reply was modified 7 years, 1 month ago by
-
AuthorPosts
- You must be logged in to reply to this topic.