Skip to content
Woodworking Masterclasses
Facebook Instagram
  • Register Now
  • Video Library
  • GalleryExpand
    • Bedside Cabinet GalleryExpand
      • Assembly Table Gallery
      • Bathroom Cabinet Gallery
      • Bench Stool Gallery
      • Blanket Chest Gallery
      • Bookends Gallery
      • Book Shelves Gallery
      • Breadboard-end Cutting Board Gallery
      • Carrying Tote Gallery
      • Chess Board Gallery
      • Chest of Drawers Gallery
      • Christmas Gallery
      • Coasters Gallery
      • Coat Rack Gallery
      • Coffee Table Gallery
      • Corner Shelf Gallery
      • Craftsman-style Lamp Gallery
      • Dining Chair Gallery
      • Dovetail Boxes Gallery
      • Fly Swat Gallery
      • Frame Saw Gallery
    • Foot Stool GalleryExpand
      • How to Make a Table
      • Joiner’s Mallet Gallery
      • Joiners’ Toolbox Gallery
      • Keepsake Box Gallery
      • Laptop Desk Gallery
      • Leaning Wall Shelf Gallery
      • Mitre Box Gallery
      • Occasional Table Gallery
      • Picture Frames Gallery
      • Rocking Chair
      • Sawhorse Gallery
      • Shaker-Style Bench Seat Gallery
      • Shaker Stool Gallery
      • Sofa Table Gallery
      • Stepladder Gallery
    • Trestle TableExpand
      • Tool Cabinet
      • Tool Chest Gallery
      • Walking Cane Gallery
      • Wall Brackets Gallery
      • Wallclock Gallery
      • Wall Shelf Gallery
      • Winding Sticks Gallery
      • Wooden Plane Gallery
      • Wooden Spokeshave
      • Wooden Tray Gallery
      • Workbench Gallery
      • Other user projects vol. I
      • Other user projects vol. II
      • Submit Photos to Gallery
  • About Us
  • News
  • FAQsExpand
    • General FAQs
    • Workbench FAQs
  • Contact
Account Login
Woodworking Masterclasses

board thickness

Search
Previous Back to: Wood and Wood Preparation15 Replies

Welcome! / Forums / General Woodworking Discussions / Wood and Wood Preparation / board thickness

  • This topic has 15 replies, 7 voices, and was last updated 9 years, 7 months ago by Ken.
Viewing 15 posts - 1 through 15 (of 16 total)
1 2 →
  • Author
    Posts
  • David R.
    26 October 2013 at 8:36 pm #20402

    I can’t seem to find any solid wood boards thinner than 3/4″. Do I look in all the wrong places here in Germany? Do you cut yours with a bandsaw? A ripsaw? do you plane your boards?

    Any suggestions are welcome. Thank you.

    from Germany

    Settings
    humanic
    26 October 2013 at 9:02 pm #20403

    Hi and welcome aboard @David,

    We discussed this issue about two months ago in this forum. These are the threads:

    Cut with the grain

    More Resawing cupped boards

    I hope this helps you. Best regards from Catalonia,

    –Óscar

    With love, best regards from Catalonia.

    Settings
    David R.
    26 October 2013 at 9:41 pm #20404

    Hello Oscar and thanks for the welcome and for pointing me to these two threads. I think this might work well for smaller, thicker pieces of wood, but would anyone cut a larger 1″ board with this method? I plan to make a silverware drawer organizer. For the bottom, I want to use a 1/2″-3/8″ panel. Do I have to cut it from thicker stock? Do I have to use plywood? Can you go to your local wood supplier and get a 1/4x24x28 maple or ash panel?

    Or is it only my ignorance, and you don’t use thin solid wood boards – apart from veneer – at all?

    from Germany

    Settings
    humanic
    26 October 2013 at 10:37 pm #20405

    This is my technique for resawing thin boards from a chunck of wood using a frame saw (republished here in this format only for clarity):

    First, set your marking gauge slightly more than your desired size (10 millimiters in this case)…

    //http://cssmosaic.com/images/IMG-20130826-WA0036.jpg
    Set your marking gauge

    Mark your gauge line along the both faces of your chunck of wood…

    //http://cssmosaic.com/images/IMG-20130826-WA0037.jpg
    Mark your gauge line

    Run your line also across the grain in both sides…

    //http://cssmosaic.com/images/IMG-20130826-WA0035.jpg
    Run your line across the grain

    With a chisel cut an small dent in the corner of your saw line…

    //http://cssmosaic.com/images/IMG-20130826-WA0041.jpg
    Cut a small dent

    The magic begins now! Use an inexpensive frame saw to cut a perfect slice of wood following your vertical gauge mark. First, start at the front corner sawing until you reach the opposite corner…

    //http://cssmosaic.com/images/IMG-20130826-WA0024.jpg
    Using a frame saw

    Now saw vertically until you reach about the half of your block of wood. Then flip it and start from the oposite corner. Happily the two lines will meet…

    //http://cssmosaic.com/images/IMG-20130826-WA0028.jpg
    Using a frame saw

    Then you are here: your panel slide cuted exceptionally straight. The frame saw allows an easy control leveling your cut using both hands…

    //http://cssmosaic.com/images/IMG-20130826-WA0030.jpg
    Your thin panel cut

    I build this small frame saw two years ago based on an engraved of “L’Art du Menuisier” of Andre Roubo. Here you can see the artifact disassembled showing its parts. Very simple construction, very effective, and only costs me five bucks by the wide saw hack blade, the long carriage bolt and two small pins…

    //http://cssmosaic.com/images/IMG-20130826-WA0023.jpg
    The frame saw disasembled

    Finally, you only need to plane your piece to remove the saw marks using a thin face planing stop…

    //http://cssmosaic.com/images/IMG-20130826-WA0031.jpg
    Removing the saw marks

    Finish the surface with a smoothing plane and you are done.

    //http://cssmosaic.com/images/IMG-20130826-WA0026.jpg
    Smoothing your surfaces

    NOTE: Excuse my poor english and the low quality images.

    Best regards from Catalonia,

    –Óscar

    With love, best regards from Catalonia.

    Settings
    humanic
    26 October 2013 at 10:46 pm #20406

    @David, indeed, the plywood for 10-16 millimeters are commonly often used in this type of work and can be found easily in retail providers, at least in my area.

    –Óscar

    With love, best regards from Catalonia.

    Settings
    humanic
    26 October 2013 at 11:02 pm #20407

    Another method, much more traditional and ideal for practice of the hand tool techniques and get away from industry, is fill the back side of cupboards or bookcases with natural wood strips with a special joint, named “shiplap joint”. It’s very decorative and delicate and enhances absolutely your piece of furniture.

    Anyway, for the bottom of your drawers, plywood is perhaps the most practical solution.

    –Óscar

    With love, best regards from Catalonia.

    Settings
    RL
    27 October 2013 at 12:13 am #20410

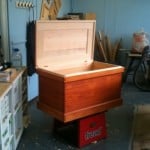
    I use aspen for my drawer bottoms. It’s a really cheap wood so I don’t mind buying 4/4 and planing it down to 1/2″. It’s also soft so it’s easy on the planer knives. Looks gorgeous and silky when hand planed too. It only comes in narrow widths so you have to join the panels together but that’s easy. Finally, it’s very light which is always a boon in drawer bottom construction.

    Sorry I don’t have a better picture available.

    Settings
    Ken
    27 October 2013 at 1:16 am #20412

    @davidr welcome buddy, this is what I have to do to get thin stock. Just about impossible to find in my area of the UK

    Settings
    Mathbone
    28 October 2013 at 7:10 am #20449

    I tried the ripsaw (hand, not frame) technique to resaw an 11 inch wide board, and ran into trouble with the blade barreling inside the board. Is this more likely a sharpening issue or a technique issue?

    Settings
    Ken
    28 October 2013 at 7:30 am #20451

    Hey Brandon, I’m not sure, but it could have a lot to do with the width of the board. That is one wide board to resaw by hand. The widest board I have done was 6 inch wide

    I’m sure some of our forum experts will be able to answer it better for you.

    Cheers 😉

    Settings
    Mark Armstrong
    28 October 2013 at 8:42 am #20452

    If I was doing board that wide make sure you cut from each side. I would say that 11″ a bit wide. 6″ about widest I would go if only 1/4″ thick I would prefer 4″ and glue edges together woul be more stable.

    Dagenham, Essex, England

    Settings
    humanic
    28 October 2013 at 9:43 am #20453

    Hi @Brandon, really it’s a mixture of tool condition and technique.

    You can use a regular panel saw to do this work but, definitely, for a wide cut like this, you need a large and sharpen rip saw with a configuration of 4 to 7 TPI and the appropriate set. I recommend use a marking gauge to set the path of the saw around the plank to cut. This is not a really difficult work but something tedious. Remember, this was done over centuries by our ancestors who obviously had no band saws.

    Peter Follansbee resawing

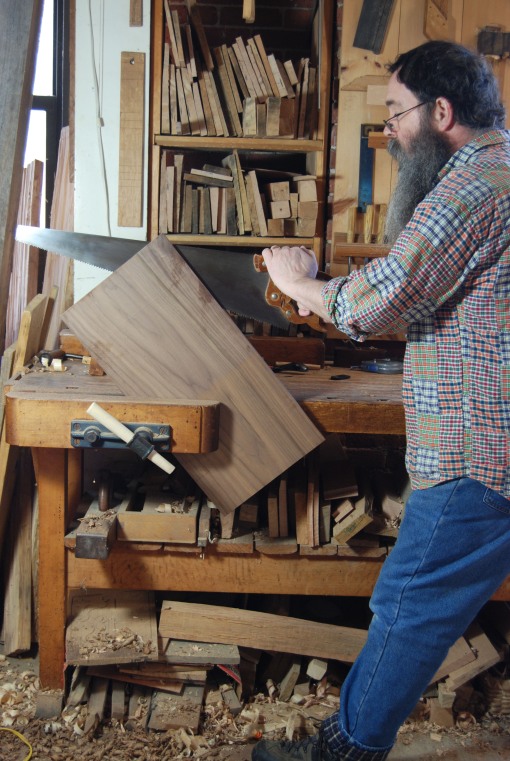
    Personally, I use frame saws for this kind of work for various reasons: mine is lightweight, so i’m just less tired, second, my cuts tend to be next to perfect to the line, and finally, if the work needs it, another person can help me pushing from the another side of the saw. But this is only my personal preference.

    Resawing

    TIP: Greasing o waxing the saw plate during the process will facilitate the job.
    TIP2: When the saw blade sinks into the cut, put a pair of small wedges on the kerf to prevent the saw runs aground inside the board.

    Wedges into the kerf

    Best regards from Catalonia,

    –Óscar

    With love, best regards from Catalonia.

    Settings
    humanic
    28 October 2013 at 9:53 am #20454

    @Ken, the real expert on the subject is Bob Easton, who in this modern days resawed by hand a board of sixteen foot. He documented their feat in his blog:

    Resawing Boat Lumber

    Obviously, he used a frame saw 😉

    I think he is member of this forum too.

    –Óscar

    With love, best regards from Catalonia.

    Settings
    Ken
    28 October 2013 at 11:25 am #20455

    Thanks Oscar, yes Bob is a member, and yes that is a big board. 😉

    Settings
    David Gill
    28 October 2013 at 12:13 pm #20457

    David
    I do not know what is available in Germany but here in UK my local timber merchant has sawn and planed me 1/2″ and 1/4″ boards for making Paul’s dovetail boxes

    Wigan, Lancs. England :

    Settings
  • Author
    Posts
Viewing 15 posts - 1 through 15 (of 16 total)
1 2 →
  • You must be logged in to reply to this topic.
Log In

About Our Company

Woodworking Masterclasses is a trading name of Rokesmith Ltd

Rokesmith Ltd


About Rokesmith Ltd | Privacy Policy | Terms and Conditions | About Us


Useful Links

© 2023 - Rokesmith Ltd

  • Register Now
  • Video Library
  • Gallery
    • Bedside Cabinet Gallery
      • Assembly Table Gallery
      • Bathroom Cabinet Gallery
      • Bench Stool Gallery
      • Blanket Chest Gallery
      • Bookends Gallery
      • Book Shelves Gallery
      • Breadboard-end Cutting Board Gallery
      • Carrying Tote Gallery
      • Chess Board Gallery
      • Chest of Drawers Gallery
      • Christmas Gallery
      • Coasters Gallery
      • Coat Rack Gallery
      • Coffee Table Gallery
      • Corner Shelf Gallery
      • Craftsman-style Lamp Gallery
      • Dining Chair Gallery
      • Dovetail Boxes Gallery
      • Fly Swat Gallery
      • Frame Saw Gallery
    • Foot Stool Gallery
      • How to Make a Table
      • Joiner’s Mallet Gallery
      • Joiners’ Toolbox Gallery
      • Keepsake Box Gallery
      • Laptop Desk Gallery
      • Leaning Wall Shelf Gallery
      • Mitre Box Gallery
      • Occasional Table Gallery
      • Picture Frames Gallery
      • Rocking Chair
      • Sawhorse Gallery
      • Shaker-Style Bench Seat Gallery
      • Shaker Stool Gallery
      • Sofa Table Gallery
      • Stepladder Gallery
    • Trestle Table
      • Tool Cabinet
      • Tool Chest Gallery
      • Walking Cane Gallery
      • Wall Brackets Gallery
      • Wallclock Gallery
      • Wall Shelf Gallery
      • Winding Sticks Gallery
      • Wooden Plane Gallery
      • Wooden Spokeshave
      • Wooden Tray Gallery
      • Workbench Gallery
      • Other user projects vol. I
      • Other user projects vol. II
      • Submit Photos to Gallery
  • About Us
  • News
  • FAQs
    • General FAQs
    • Workbench FAQs
  • Contact
Login Account
Search