Dovetails – Just OK to very good?
Welcome! / Forums / General Woodworking Discussions / Woodworking Methods and Techniques / Dovetails – Just OK to very good?
Tagged: dove tails, dovetails, technique
- This topic has 7 replies, 7 voices, and was last updated 5 years, 3 months ago by
 btyreman.
-
AuthorPosts
-
3 March 2019 at 4:02 pm #555456
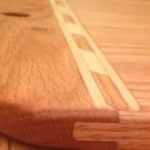
I think my dovetails are “ok”. What techniques do you use to get your dovetails to the “very good” level? I can’t seem to get those little gaps closed up! Any tips or tricks that you used to improve your dovetail technique?
-
This topic was modified 5 years, 4 months ago by
joemonahan.
Attachments:
You must be logged in to view attached files.When a half-blind dovetail does not go together perfectly at first, something, some bit of wood, is holding it up. For me, it is often a problem with the tail piece, that is, the drawer front. I sometimes do not get the front wall of the tail piece exactly plumb. I go back and pare it down a bit, taking out any slant. Then the dovetail might close up. I got this from one of Paul’s videos: his half-blind dovetail did not close up right away and he fixed it by paring that front wall in the drawer front.
Yes, things could be tighter, but glue this up and put some finish on it. I think you’ll be surprised how much those gaps disappear. Did you use a rabbet on the tail piece? It helps make sure that you are registered to the front of the drawer exactly right when marking the tails onto the pin board. Otherwise, you must guess that you have things exactly right. It absolutely can be done, but with the rabbet, it’s one less thing to figure out, although the rabbet is one more thing to cut. This would address the gap on the tail side. For the gap on the bottom of the sockets, it seems that your layout line is a bit wide. Maybe sharpen up your knife or gauge and mark lighter. Your gap at the bottom of the sockets seems consistent with the thickness of the line. It’s also easy to take out a few fibers too many at the bottom of the socket.
Those are things to look for but, honestly, glue this up. I think you’ll be surprised and pleased.
 20 March 2019 at 8:10 pm #555625
You can do like I did, make a whole bunch of small jewellery type boxes. For me, it was learning eye hand coordination 90%, then holding the chisel or saw straight. Box after box after box. Sometimes I would keep a box with bad cuts just to refer back to later. Most times I would just re-cut the ends and square them again then start over, less waste of wood. I got big boxes (use them for my tools now) and so many small gift type boxes, but it was a great way to learn to prep stock, extremely important, and cut tails, slowly getting better and better
Now the confession. I just made my Trestle table, and the dovetails were the least of my worries. As it turned out, everything else was perfect, mortises and tenons absolutely perfect. Dovetails….. very first one I blew into a differnt time zone. The next 2 were super good and the last one perfect. That dog’s tooth was my fear on the first one and I think I let that get to me. Turned out to be pretty easy to do really. So with all my practice on Dovetails, when it came right down to it, I can still blotch them.
-
This reply was modified 5 years, 4 months ago by
 5ivestring.
21 March 2019 at 2:03 am #555627[quote quote=555625]You can do like I did, make a whole bunch of small jewellery type boxes. For me, it was learning eye hand coordination 90%, then holding the chisel or saw straight. Box after box after box. Sometimes I would keep a box with bad cuts just to refer back to later. Most times I would just re-cut the ends and square them again then start over, less waste of wood. I got big boxes (use them for my tools now) and so many small gift type boxes, but it was a great way to learn to prep stock, extremely important, and cut tails, slowly getting better and better
Now the confession. I just made my Trestle table, and the dovetails were the least of my worries. As it turned out, everything else was perfect, mortises and tenons absolutely perfect. Dovetails….. very first one I blew into a differnt time zone. The next 2 were super good and the last one perfect. That dog’s tooth was my fear on the first one and I think I let that get to me. Turned out to be pretty easy to do really. So with all my practice on Dovetails, when it came right down to it, I can still blotch them.[/quote]
Excellent post! Thanks. Practice is certainly the answer to getting better at something. Musicians call that “paying your dues”. All the tips in the world aren’t going to help much, unless you do the work……….over and over again. Unfortunately, many don’t attempt something simply because they’re afraid of failure. You’ve certainly offered a lot of encouragement.
Jim
21 March 2019 at 3:22 am #555628@flyboyjim Figures, I play the banjo, 44 years now. Played 15 years in with one group. Paid those dues too.
 21 March 2019 at 4:17 am #555629
I agree with the others’ suggestions, I’ll add:
The saw work looks pretty good; I’d say it’s losing the knifewalls on the chisel work that’s your biggest issue there.
I’ve seen many machine-made dovetailed drawers for kitchens and furniture that look a lot like your picture.
Glue + sawdust to fill the gaps. In one of Paul’s videos, even he had to use a wedge to repair a miss-cut dovetail. (I believe it was the video of the half-blind drawer for the workbench add-ons series)
After glue-up, I’m often amazed at how much better the joints look after using the chisel and plane to clean up the joint.
@5ivestring There are banjo players in Columbia? Cool 🙂
one of the most overlooked parts is testing to see how square the female pins are from above, presuming you were thorough with your stock preparation it can sometimes look square but it isn’t, check it with a tri-square, or ruler with a square edge, and avoid undercutting, that might close gaps by a fraction of a millimetre, the difference is noticeable and it’s usually done at the last stage of fitting before glue-up, as always practice practice and practise, the more you do it the less likely there will be errors, it took me a LOT of joints before they were coming out with no gaps.
-
This topic was modified 5 years, 4 months ago by
-
AuthorPosts
- You must be logged in to reply to this topic.