Gap on dovetail joinery
Welcome! / Forums / General Woodworking Discussions / Woodworking Methods and Techniques / Gap on dovetail joinery
- This topic has 10 replies, 9 voices, and was last updated 5 years, 5 months ago by
 ted clawton.
-
AuthorPosts
-

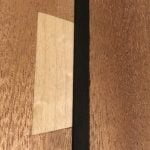
My third project on making the keeper safe box have many difficulties cutting dovetail joint as tight without the gap showing at knifewall and the pin. So far i have not tried any other technique but just cutting tail frist and line it up for drawing pins. These are what i have done so far. Please help me. Thank you
Attachments:
You must be logged in to view attached files.30 October 2018 at 2:05 pm #552901It looks like to me it is mostly dull equipment and lack of experiance. Go to pauls dove tail box videos and practice some straight ones.
You cut off your line in a couple places and some of your cuts broke out. This just takes a ton of practice to get perfect.
It aint bad for a first goaround if you havent done any of the beginner stuff.@deanbecker seems right. Personally, I found it best to spend a lot of time just practicing the most basic stuff. I see you missed your line in a number of places by a good bit. Have you practiced just sawing and chiseling to a line without actually making anything? It can take many hours of practice for some of us to just be able to cut accurately to a line. Its like so many other things: break the skill down into its smallest parts and practice each part separately. Or so I think. @deanbecker also mentioned sharpness of tools. I can see a lot of tearing of the wood in the last picture after you shaped the curves on the outside of the box. And your knife walls look like they tore rather than cutting. Pine tears easily. Sometimes it seems more difficult than oak.
 30 October 2018 at 4:48 pm #552909
I practiced sawing and planing on scrap wood from work for 6 months or so before even attempting a large straight dovetail.

Thank you so much. All of your comments are very important info. I have missed every beginning steps,most importantly, the warm up of chiseling at the baseline before getting into the real wood. Also, i am still clueless of telling whether my chisels are still sharp or required sharpening. The diamond stones, coarse,medium and fine with leather strope are always sitting on the corner on the workbench. I am sharpening evry time i am beginning chopping dovetails, but other time i skip sharpening and go straight to work on the wood.attached here is my second box. Same mistake of cutting into baseline. Thanks again to btyreman,meithmw,sanford and deanbecker
Attachments:
You must be logged in to view attached files.I’m no expert but I can surely say don’t lose heart. This one is definitely a improvement over the last one.
IMO, that box is one of the hardest projects (maybe hardest?) on this site. It may be 2 or 3 years before I even dare to attempt it — LOL.. Keep up your hard work and practice, practice, practice and then some more. With attention to detail. And as others have said, perfect your dovetailing skills on square boxes before trying this one. You’ll definitely get there.
-
This reply was modified 5 years, 5 months ago by
Selva.
 30 October 2018 at 11:05 pm #552916
Quite like the finished box. It has a symmetry that appeals to me, the joinery does not impede very much, and can of course be adressed with wedges, composite glue mixed with sawdust, and shims.
Mr David Charlesworth, a master cabinet maker, freely admits that his handsawing is not the best. In a series of videos (available from https://www.lie-nielsen.com/) he shows how he has adapted his work process to overcome the less than perfect handsawing. Apart from using a bandsaw, he demonstrates techniques for removal os wastewood exactly down to the knife line, after having sawed well into the waste.
Saw guides have helped me a lot.
The little Stanley double beveled knife is the best I’ve found, but the single bevele ones have the advantage of by default only leaving a bevel on the waste part. That makes exact pairing simpler.
Chalk, crayons, and broad pencils can help to make knife lines more visible. Mr. P. Sellers’ technique with masking tape seems to be a very good alternative. There is a recent video where he displays it. Flat pencils with wooden shafts can be ground to a very narrow edge, comparable to a knife.
As has been mentioned, tools have to be sharp.
Basswood and birch were recommended to me as good species for learning how to make joints. Though, when plaining one has to be mindful of the grain direction.
Then, paractice is said to make perfect
/Sven-Olof
Attachments:
You must be logged in to view attached files.@JET I actually think your sawing looks good. There are places where it looks like you were confused and sawed past the appropriate place, but the cut itself is fine and straight. The gaps look like places where you worked to the wrong side of the line or where fibers broke out. With regard to breakout, it does look like your tools are not sharp. The gauge lines and knife lines look like crushed wood rather than cut wood (gauges sometimes need to be sharpened).
Rather than making a box, try just dovetailing two pieces of wood together, each about 4″ long and maybe 2.5 to 3 inches wide. Do a bunch of those until you fully understand which side of the line to cut on. It’s different for pins vs. tails. For tails, which you cut first, it doesn’t really matter. For pins, if you trace with pencil, you must leave the line in entirely. Don’t split the line or cut it out. Leave all of the pencil when sawing the pins! Look at the work when you trace and you’ll realize that the pencil is writing on wood that must stay and press against the tails.
Some of the gaps look like broken out fibers. So, that’s either not being sharp or, just as likely, from letting the chisel push all the way through. Only cut from the surface in front of you to someplace in the middle of the joint. Don’t let the chisel come out the other side or else it may break off fibers as it comes out at the other side. Instead, work part way through from one side, flip the work around, and work back from the other side.
Keep at it. You’re making good progress!
Whoa, guys are so amazing. Tips all from experts. Thank you so much. I am getting more pines to practice dovetailing, chiseling and sharpening. Thanks for looking after me, ed,sojansson,and selva.
[attachment file=”20181030_192906.jpg”]
Attachments:
You must be logged in to view attached files.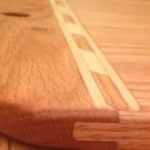 31 October 2018 at 5:28 pm #552946
Your 2nd one definitely looks better. I bet you can make it look real nice by gluing plugs and sawdust in the gaps, and then further paring down the pins and tails with a sharp chisel. Even Paul had to repair a dovetail with a wedge in one video (I think the workbench drawer?). Not sure if you made these already, you may have, but I found Paul’s dovetail boxes and dovetail caddy series very instructive and fulfilling.
I agree with all the others’ advice above. The only other thing I can think of is board thickness. It’s hard to tell from the pictures, but what thickness is the wood you’re using? It looks like you’re using 1-by (about 3/4″ thick) material. The boxes in the videos I mentioned above and the keepsake box all call for around 1/2″ thick or less boards. It’s easier to cut good dovetails on the smaller stock, around 1/2″ or less.
Do you have a honing guide? I’d love to freehand sharpen as well as Paul, and one day I’ll get there, but I have to use a honing guide to properly sharpen my blades.
-
This reply was modified 5 years, 5 months ago by ted clawton.
-
This reply was modified 5 years, 5 months ago by
-
AuthorPosts
- You must be logged in to reply to this topic.