I just needed to bore a hole… my drill fix…
Welcome! / Forums / General Woodworking Discussions / I just needed to bore a hole… my drill fix…
Tagged: drill, millers falls, rehabilitation, restoration
- This topic has 27 replies, 7 voices, and was last updated 9 years, 9 months ago by
 bloqbeta.
-
AuthorPosts
-

Looks like I am in the brink of falling into an addiction. I just needed to bore holes. Little holes, big holes…
I already own a $250 dollar Bosch cordless drill, allowing the battery is charged and ready to go, well I can bore anything with it, just not as precise as a craftsman should, but it does the job.
After using a spade bit to bore the hole on my tool box and watching the “not so tight” fit of the handle, it was obvious I required a more elegant and precise way of boring holes. I needed a brace.
I always research before going on the hunt for tools, and it looked like the North Bros 2100 or 2101 is the “Mercedes Benz” of all braces. Sure, it does not have the beauty or elegance of a John S. Fray brace, but it will bore the best holes with its spin-top chuck.
So I did what I always end up regretting doing, I went on a shopping spree on ebay… Why do I regret it? Well, I basically end up with other tools and accessories I don’t need and intend to buy, and I also end up buying “vintage cheap pieces of crap with great patina in good user conditions”… I can say I have had bad experiences with hand saws and the like.
So I spent my time looking for my North Bros brace, first, it is difficult to find one listed and then it is difficult to buy them cheap. Meanwhile, while I waited days for a North Bros listing, I saw for my first time a Millers Falls eggbeater hand drill. I fell in love with them and saw how people made beautiful restorations out of neglected old tools, and ended up peeping in old tool galoot websites and learning wonderful things of how you can make them sing again.
Bang!!! A Millers Falls No. 1 came my way, 18 bucks + shipping. After the buy, I actually felt bad, it did not look like it was in good user condition. You see, buying tools in ebay when I live in Central America means I need to add another +15 bucks for freight and customs per tool.
Buying a a potentially crappy hand drill (and not the best in its class), that I didn’t need, meant i wasted 50 bucks that could perfectly go into the north bros brace.
Dissatisfied with my compulsive buying and tired of not finding a North Bros, I found a listing for an old Craftsman Brace with a set of Auger bits. The listing was ending and nobody was paying attention to it, it was running cheap, around 20 bucks + shipping ($50 bucks total freight forwarded to Guatemala), so I bought it
It is an old Craftsman brace and will have the job done. It is well made, but with plastic handles, not so elegant solution to by boring problem…
After I had receive both items, I was convinced that I didn´t need any other drill solution.
Until suddenly, an ebay notifications tells me on a North Bros 2101A listing. I check on it, and it looks this fellow is selling grandpa’s old tool collection, and searching deeper, it looks like grandpa had also a Millers Falls No. 5A Hand Drill, one of the better models that MF made.
Holy crap! both were in Very Good Condition. I started watching the listing, and you know what they say, if they are meant for you, they will be yours.
I ended buying the North Bros cheap at $36 bucks +shipping and the Millers Falls at $26 plus shipping.
Holy Molly! now I have one cordless electric drill, two eggbeater Drills, and two hand braces… Guess this is it for my boring addiction…
CAnd by the way, the Millers Falls No. 1 that was in a potentially bad condition, ended up being in great condition, and it is beautiful, with Rosewood handles and it sings, just like any tool should!
Check out my arsenal!!! I will follow up with posts on their rehabilitation-restoration. Cheers!
Attachments:
You must be logged in to view attached files.
Hey Barry, Most of them are, but one of the smaller diameter ones apparently has been dropped and one spur is bent…. I thik there is no way to fix this problem, Can anyone help me with this issue? @paul-sellers , @joseph
 12 July 2014 at 3:16 am #59344
I bought a 5A once but the shaft was bent even though I asked the seller if the shaft was straight or bent so I ended up giving it away. The 2A is the best hand drill ever made I just to correct you when you said the 5A better model.
To save you guys some money on eBay crap here is a website where you can get all the antique tools you want he has increased his prices on some things not all but everything should be in perfect nick with no hidden surpises that’s where I bought my Yankee 2101A it still looks almost like new. http://www.jimbodetools.com/
Hi Salko,
I am pretty impressed with the craftmanship of the Millers Falls tool. Specially the way they have survived , the use, misuse and sometimes the horror of neglect, for so many years and they have done so in good condition.
The MF No. 1 is definitely not the the best amongst the MF drills but I can say that it works like a charm, and it is my favorite. I am also sure the No. 5A and No.2 are also superior tools.
In the future I will end up buying a No. 2 and then my friend, I will have any drill to choose for a task, and my addiction will be satisfied.
I invite you to follow this thread, I will make a step by step rehabilitation-restoration of the drills.
I wanted to take the time and document the MF No.1 Restoration, but I did not have a camera available. I am almost finish with this drill and will post photos of the restored tool.
Now I have the opportunity to document the Millers Falls no. 5A Rehab-Restoration. Please hop in the train and tag along with me on this journey. Please be aware that this is my tool. I am not a professional restorer or a tool galoot, most of the time I finish making things in a much unorthodox way. I will do my best with what I have and my abilities and that is that. If my methods serve you then I will be happy you learn from them.
THE DRILL
Attached are photos of my new (old) Miller Falls Drill model 5A. I am using Georgesbasement.com type study to identify the drill:
The frame is the Wiper Era No. 5 type 17.
The chuck is the 17 GCS-3J.
The main handle is type 17 and the crank knob is the late lacquered HW-15. The principal side Handle shape is the Middle, Chef’s Hat, lacquered HW.
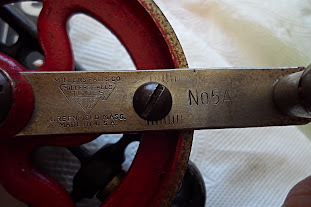
The Crank Markings are the Triangular Millers Falls Tools Since 1868 logo, Greenfield, Mass. Made in the U.S.A. No. 5A. It also has lines marked near the the crank affixing screw.
Given that, we can say that the drill corresponds to the No. 5 type 16: this is the description on georges basement:
Type 16 – The triangular Millers Falls logo and model number are stamped on either side of the crank affixing screw, along with some lines, that perhaps were used to as a substitute for a lock washer, near the crank knob. The protected-spring, 3-jaw chuck is no longer stamped with the patent date; and the thickly red lacquered hardwood main handle has a gently rounded flare.
The major change is in the frame, which is now made of die-cast alloy. The pinions have a more usual pressure angle.Upon further examination. you have to assess whether it needs a complete restoration or if you just want to rehabilitate it.
Given the above, I think that the drill is in good condition, with some parts that has lost its plating, the frame has lost its paint but not its plating and the wooden handles has cracked lacquer that need to come off.
My decision is to go half ways: a rehab-restore.
Some parts will be rehabbed to working order, others will be stripped down and restored like new.
Next up, the dissassembly…
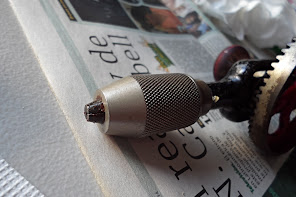
Disassembly of the chuck, and main wooden handle:
First, unscrew the chuck from the frame
Second, take apart the chuck by unscrewing it. It has a slot, where you can use a large flat screwdriver can help you unscrew it, dont use force, it will easily give.
WIth your finger and then a dowel, push the jaws out of the chuck assembly
Disassemble the jaws from its assembly, carefully taking the springs out.
Usually, the ebay vendors “cleans” the items with enough WD-40 to make the piece look good. They actually make a mess inside the chuck with leftover sawdust, grease, years of dust accumulation and rust. Clean all the pieces. I am using here Gasoline because that is what I have on hand. You can use any kind of solvent, Diesel, alcohol, Degreaser, Purple Power, Simple green, or whatever you want. The idea is to clean all the parts for rust and paint assessment.
On to the main wooden handle. I first unscrew the wooden top of the handle where the bits are stored. Then using a pin punch and a light pin hammer I tap the pin out of the ferrule.
The pin only goes one way so try from both directions. you have to tap hammer it gently but firmly, the pin starts moving after a couple of taps.
After taking the pin out, pull the main handle out. Be careful, other MF drill the wooden handle is screwed to the frame, dont use force, if it doesn´t come out, unscrew the main handle and pull the ferrule out of the wooden handle with a vise or vise grip with leather strip protection so you do not ruin or scratch the ferrule.
Next up Frame,splinde,pinion, drive dissassembly…
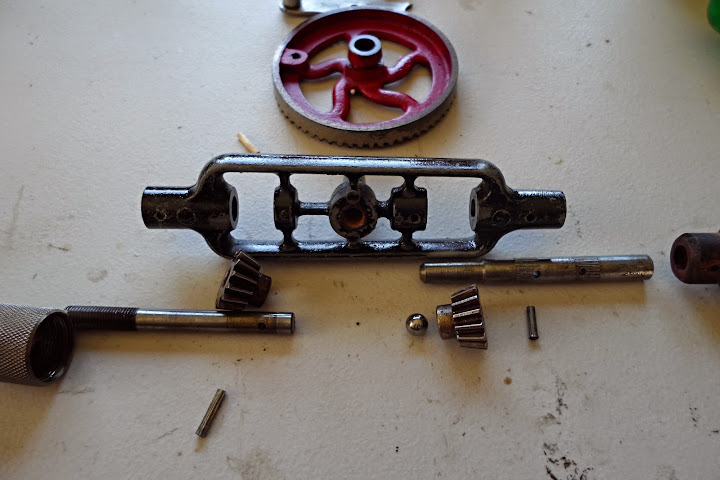
The frame, Crank and spindle disassembly
The crank handle attaches to the crank by means of two screws, unscrew them and both the handle and crank should separate cleanly from the frame.

The frame has two spindles. The handle spindle is attached by means of a pin to the frame, the front of the spindle is housed to the frame and seated to one big ball bearing. The counteracting pinion rides freely in this spindle.The spindle towards the chuck houses the driving pinion and it is fastened by a pin. there is no bearing ball in the spindle that houses this spindle.
Taking the handle of the spindle out was difficult, the spoindle has grooves that makes it difficult to pull. some WD-40 and force helped. the driving spindle came out just pulling with your hand.
Next, clean all parts again, I do it with gasoline. you can do it with whatever solvent or degreaser you fancy.
The frame, Crank and spindle disassembly
The crank handle attaches to the crank by means of two screws, unscrew them and both the handle and crank should separate cleanly from the frame.
The frame has two spindles. The handle spindle is attached by means of a pin to the frame, the front of the spindle is housed to the frame and seated to one big ball bearing. The counteracting pinion rides freely in this spindle.The spindle towards the chuck houses the driving pinion and it is fastened by a pin. there is no bearing ball in the spindle that houses this spindle.
Taking the handle of the spindle out was difficult, the spoindle has grooves that makes it difficult to pull. some WD-40 and force helped. the driving spindle came out just pulling with your hand.
Next, clean all parts again, I do it with gasoline. you can do it with whatever solvent or degreaser you fancy.
Next… Cleaning, derusting,and paint stripping
13 July 2014 at 1:54 am #59378I’ve always wanted to know how to restore these tools this is a great post bloqbeta I am following with great interest.
I’m too scared to pull mine apart what if I break something it’s not like I can go back in time to get replacement parts.
Salko,
I would only worry on losing the small parts that this tools have. Remember that they are top of the line tools and are made superbly with top of the line materials and craftsmanship.
That said, It would be very difficult to render a tool useless just by disassembling it. Dont be afraid to take it apart. It is of the best material and it will resist. And you know, they need some love out of so many years of neglect. They need to shine ones more!
Paint stripping, derusting
Hi all, this is the part I detest on rehabilitating and restoring tools, stripping the paint.
I hate using paint stripper, it is really dangerous. But unfortunately it is the best way to go.
I stripped only the frame and handles. Like I said, the red driving wheel is in good condition, and it is better to let it as it is so it impacts character to the drill.
The frame had half of the paint but all of the plating is intact, so the paint has to go.
The wooden handles had a very heavy coat of lacquer, orange cracked laqcuer. It loocked awful and it was a pain to take it off. After several methods, including wire brushes and cleaning towels, the best way was to scrape it with my joiners knife, The wood looks beautiful and will take a nice color when I finish it.

Next, all the parts gets a bath on a Deruster. I am using Evaporust. It has prove to be effective many times. When I take all the parts out, I continue polishing the metals, sanding the wood, and painting the frame.

Next up… Polishing and Painting, Sanding and Finishing
13 July 2014 at 6:56 pm #59392I wish you were living in Australia I would get you to do mine btw what is a joiners knife.
-
AuthorPosts


- You must be logged in to reply to this topic.