Sharpening
Welcome! / Forums / General Woodworking Discussions / Sharpening
- This topic has 78 replies, 18 voices, and was last updated 11 years, 6 months ago by
 bloqbeta.
-
AuthorPosts
-
 18 November 2012 at 2:56 pm #3404
Well, I gave it another go. Made sure that the frog was flush with the mouth and that the adjustment screw was tightened (it was very loose before) also reduced the gap between the end of the chip breaker and cutting iron to 1/64th as it was about 1/32nd before. Reassembled everything and unfortunately it’s still not very good. I’m really not sure what I’m doing wrong. I’ll perhaps take a few photos and post them to see if anyone can see anything obvious. I resharpened the blade as well and managed to shave some hairs with that too, so I don’t think it’s the cutting iron. GRRRRR!
Anonymous18 November 2012 at 3:28 pm #3405That sounds like a plan Jon. I’ll strip down one of my smoothing planes and run through the process myself and get back to you on this, as I bet the problem is caused by something very easily overlooked.
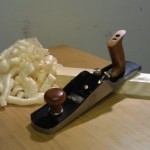
18 November 2012 at 5:55 pm #3426It now seems to be working great. I moved the frog back a touch (it was flush with the mouth, but is now a 1/64th back from that). I’m getting whisper thin shavings now approx 2/3 of the width of the blade. The shavings are perfectly square and even thickness across their width so I’m wondering what the issue could be with the width of them. The blade itself looks to be square enough. I’m wondering if maybe I have the lever cap too tight and that might be changing the profile of the blade slightly? In a similar way to when you tighten up a Stanley scraper?
Anyway, I’ve made the wedges for the shooting board this afternoon and the finish is like glass. It’s just a shame that the are not flat and square though ;o). They will be by the time I’m finished, though, although by then they may well resemble a couple of match sticks, buried in a cubic metre of shavings!!Anonymous18 November 2012 at 6:18 pm #3430Nice job Jon, pleased you have it sorted buddy. It sure get’s frustrating at times. HaHa don’t I know 🙂
Anonymous18 November 2012 at 7:39 pm #3436😀 The timber must’ve been massive before reaching wedge status 😀
2/3 – 3/4 blade width is fine for smoothing plane shavings and even more so when the corners of the edge are radial. I’d not worry too much in terms of aiming for wider shavings as long as the level of finish is as good as you’re aiming for. 🙂

I am practicing Paul’s sharpening method on my new daimond stones but i am having some trouble keeping
the chissels or planeblades at the right angle.
Having set up a protractor at 30 degree on my bench and feel for the angle helps me alot with this.
Do you have some advice for me or is practice the answer.
Anonymous21 November 2012 at 9:45 am #3568Hi Juryaan,
The protractor method works extremely well as a guide and should help you become comfortable with finding the angle, but you could also create an angled block which can be placed alongside your diamond plates and used as a reference.
Practise is the answer to becoming consistant with your sharpening and you will find your grip and stance will naturally adjust within a short while. By all means use honing guides for times when blades need re-grinding after damage, as they help in keeping the grind square to the blade, but honing/whetting of edges is typically best done freehand. 😉
A small 6″ adjustable square is a handy tool for checking blade edges and a fine fibre tipped pen or sharpie is useful for marking square across the blade. 🙂
If one is to start practicing Paul’s freehand method how should I proceed?
1. What is the easiest tool/iron to sharpen? A wide chisel or 2″ plane iron? My instinct tells me that narrow chisels will give less feedback.
2. Is there any special considerations to observe when converting from a flat bevel to the convex “macro camber” that Paul uses?
I made an attempt on my 1″ chisel but the resulting bevel was skewed so my technique needs more time…
Anonymous21 November 2012 at 10:41 am #3573Hi Jesper,
I’d continue practising with the 1″ chisel, but use the sharpie method to mark a line square to the side of the blade and as close as possible to the edge. This can also be done on the rear element of the bevel (Near the spine of the blade) and can help you determine possible adjustments. I tend to find working an edge square to the side tends to help with balancing even pressure on the blade.
In truth the best way forward IMHO is to continue honing at the same angle as before – but freehand – and adopt a convex bevel once the secondary bevel is past halfway across the primary. In cases involving single bevels I’d pursue a convex bevel once the edge is within 1/4″ – 3/8″ of the spine of the blade. (By spine of the blade I mean the point where rear of the grinding bevel meets the flat).
 24 November 2012 at 2:13 am #3766
I need to understand how one maintains square edges with Paul’s method of cutting edge honing.
Anonymous24 November 2012 at 8:05 am #3779The simplest means of maintaining square edges involves frequent checks using a small square, but in the case of tapered blades without parallel sides you can draw a centre line length-wise along the blade from which square can be established. It’s actually quite surprising how you can develop an eye for square without a need for engineering precision.
-
AuthorPosts
- You must be logged in to reply to this topic.