Stanley #4 restoration issues
Welcome! / Forums / General Woodworking Discussions / Tools and Tool Maintenance/Restoration / Stanley #4 restoration issues
- This topic has 9 replies, 5 voices, and was last updated 4 years, 10 months ago by
Larry Geib.
-
AuthorPosts
-
24 August 2019 at 4:08 pm #602282
Hi. I am having two issues while restoring a smoothing plane I just bought on eBay that I need advise on
The first one and the most problematic is a problem with the lateral adjustment lever. When the lever is turned, It is crushing against the cutting iron, and as this happens, the cutting iron seats over the lever (instead of only on the frog) and this cause the cutting iron not having a continuous and east adjustment. I do not know how to solve it. I guess filing the lever a little can be a direct correction but I am hoping there is a more elegant way to do it. I Will attach some pictures and ser if somebody has an idea
(Paul suggested that maybe not all the parts where from the same plane and maybe that is why they are not perfectly matching)
The second is related with the sole flatness. I have flattened It in the Diamond Stones, and it looks quite flat now, but I could not reach the mouth as It seems lower. How important is to have the mouth flat and at the same level as the test? Is It maybe fine like It is?
Thanks all, and sorry for my english. I am not a native speaker and I try my bestAttachments:
You must be logged in to view attached files. 24 August 2019 at 6:21 pm #602313
Hello Carlos,
Not knowing whether it will help, but here’s a photo of a #4 from Wickes (sole is flat, but that’s all there is that is right), and a Lie-Nielsen #2 (with everything right [in my humble]).
It looks like the lateral adjuster of your plane should be bent towards the handle to create a clearance to the blade. Please note: I have no experience from Stanley bench planes.
-
This reply was modified 4 years, 11 months ago by
 Sven-Olof Jansson. Reason: Attachment forgotten
Attachments:
You must be logged in to view attached files.24 August 2019 at 7:06 pm #602327Sven-Olof gives good advice. Just bend the lever down a little until it doesn’t rub. The lever should be a slightly sloppy fit when the iron isn’t in the plane a drop of oil helps. Use a plyers near the frog and don’t use the frog or pivot rivet as a fulcrum. The picture below shows what to shoot for.
The plane needs to be flatter. It’s not unusual for planes to wear around the mouth and you should have plenty of metal, so don’t worry about taking off two much. Right in front of the iron is important for a smoother, less important for a scrub plane.
The very front and rear of the plane should also register flat ( except maybe the last 1/4” or so). A hollow in the central portion behind the iron is less important. Japanese planes are hollow there on purpose to reduce friction.
Start with 60 grit and make sure your downward pressure is uniform along the length of the plane. You might be concentrating too much towards the front. Only after it is flat should you go through finer grades until you achieve the level of smoothness you want. I usually stop at around 200 grit. Finer grades will scratch back to that level almost immediately. Cast iron is soft.
And check that your frog isn’t too far back. The iron really doesn’t need to touch the body of the plane, and won’t if you have the mouth set fine. One picture shows the iron might ride on the body. That makes adjustment dodgy.
-
This reply was modified 4 years, 11 months ago by
Attachments:
You must be logged in to view attached files.25 August 2019 at 5:11 pm #602611Thanks a lot for your answers, you helped me a lot (sometimes one does not realizar of easy solutions, as bending the lever is). I will follow your advice, bend the lever without forcing the rivet and flatten the plane. I will get a granite block as flat as possible and use it with the abrasive paper to get flattening to the mouth
I will post the final state of the plane in case this can help to another new woodworker like me
Regards,
Carlos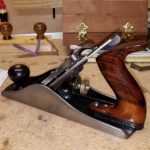 3 September 2019 at 3:27 am #605042
Hi Carlos,
The mouth is an important area to get flat with the rest of the plane, at least the front portion of the mouth. The shavings need to follow a course to the chip breaker and out the top without any interference. We are only talking about thousandths of an inch, but when a shaving is .001 or thinner it may make a difference. Keep flattening it and see where you wind up. Don’t about the very front, back, or the sides of the sole too much. As much as an 1/8″ (4 mm) of margin is ok.-
This reply was modified 4 years, 10 months ago by
 Ross Hollinger.
A granite block is nice to have, but expensive, and not really necessary – unless like Paul, you’re flattening a shed-load of planes for the school.
They appear very heavy, fragile (brittle), and difficult to store and protect. If it gets scratched, chipped, or wears down in one area, it’s a paperweight. You only have to drop it once.I began with an MDF shelf from B&Q (Home Depot). It works just fine.
I then followed Paul’s advice and bought a single granite Floor Tile. Checked it was flat in the store with a Steel Rule borrowed from their tools section.
Paul suggests Float Glass too. Easy to buy a small piece from a glazing shop, and a lot cheaper.
25 September 2019 at 4:33 pm #612015Thanks a lot for all your answers.
The rocks around my town are all granite, so I went to a granite slabs industry and they gave me some broken parts they had as waste for free. They are flat enough.
I finally bought two more planes, as this one needs much more work than the time I have available now, and I prefer to start woodworking. As Paul suggested when I asked in one of his videos, It feels like the frog is not matching the plane. It is maybe a “Frankenstein”. I tried to bend the lever but It is still crushing, so I have filed It. This way I think It may work but o have not finished yet
The new one I prepaired has everything correct and It is working nicely following Paul’s video. It is a USA made Stanley, and I do not know why but It feels better made than the other ones
As some of you pointed, the plane has to be flat just in front of the mouth. I tried the one that was not and It got stuck easily when the planing is started and it does not shave well
If I have time I Will add some pictures to show where the missmatch between plane body and frog can be seenYours doesn’t appear to be a “Frankenstein” plane. The “Stanley” embossing on your Lateral Adjuster suits Stanley planes with thinner, rounded Wings for that era.
Lateral Adjusters often touch the Cutting Iron. This doesn’t usually cause a problem with the Iron riding over the Adjuster, as you describe. It just makes the Adjuster Arm a little more stiff to move.
I think your Lateral Adjuster Rivet is sitting too proud and interfering with the turning of the Adjuster Wheel. Perhaps it was replaced with a larger Rivet? It could also be preventing your Cutting Iron from fully seating over and engaging with the Adjuster Wheel, causing the Cutting Iron to ride up as you adjust it laterally.
Gently file the top of the Rivet so it doesn’t interfere with the free spinning of the Wheel. Oil the Wheel and Rivet.
Make sure that the Cutting Iron and Cap Iron are flat. If either, or both of them, curl up slightly towards the back end, your Lever Cap might not be able to exert enough pressure to hold them down flat.
Check that the central Channel of the Cutting Iron (where the Wheel locates) is wide enough to allow the Iron to fully seat over the Wheel. The iron must be flush against the Frog in that area. File the Channel sides if necessary.
Make sure the large Screw that secures the Cutting Iron to the Cap Iron (Chip Breaker), is actually fitting in the frog’s recess for it. It could be a larger replacement from a different plane, causing the assembly to sit proud.
Turn the Lever Cap Screw half a turn more to lock it all a bit tighter.
I notice that you have a two-part ‘Split Yoke’. These were sometimes problematic and replaced with the standard one-piece ‘Cast Yoke’. Yours appears to be worn unevenly. Make sure both halves of the Yoke are engaging with the square hole in the Cap Iron. If one half of the Yoke is seated, while the other is askew, it might be causing this riding-up problem.
In your fourth image (165003) you can see that the rivet is too large, too close to the Wheel, the Yoke is worn unevenly, and you can see where the Iron hasn’t touched the rear/top of the Frog. I don’t think your iron is sitting properly over the Adjuster Wheel.
26 September 2019 at 4:21 am #612151The rivet rides in the slot in the iron. In normal use, I don’t think it rubs on anything as long as it isn’t thicker than the iron. the washer on the lateral sdjuster should also be completely in the slot.
But make sure when you install the cap/ iron assembly in the plane the depth yoke is in the slot in the cap iron and the lateral adjuster washer is in the long slot in the iron.
I usually install the iron so you can see the yoke tip in the cap iron, then “waggle” the lateral adjuster until it is obviously moving the iron back and forth.
Then I install the lever cap. That needs to be snuggly adjusted, but the iron should still move freely.there is such a thing as too tight.
-
This reply was modified 4 years, 11 months ago by
-
AuthorPosts
- You must be logged in to reply to this topic.