Tear out when chopping dovetails
Welcome! / Forums / General Woodworking Discussions / Woodworking Methods and Techniques / Tear out when chopping dovetails
- This topic has 22 replies, 11 voices, and was last updated 6 years, 10 months ago by
 dclare.
-
AuthorPosts
-
When Paul chops his dovetails he gets very little tear out. I often get quite a bit. What are the most common causes of this? I made sure my chisel was sharp, but that did not help. I thought maybe it was the wood I was using. But it has happened in Poplar, walnut and ash (so far).
14 February 2017 at 4:11 am #309184In my experience (which spans only a few projects), I’ve seen two causes: the sharpness of the chisel (especially early on), and hitting too the chisel too hard when approaching the break through.
The two may be related: a somewhat dull chisel calls for heavier blows.
One thing that I changed about my sharpening was to make sure I wasn’t holding the bevel at too shallow an angle (20-25 degrees instead of ~30). It caused the chisels to dull prematurely, followed by similar problems to yours (seen in pine and maple).

I often have this issue too–and assume you are referring to that last little bit of wood that tears out of the middle (meaning it’s not visible when the joints are put together but it also means you’re not getting perfectly clean joints/losing some potential glue surface area…
I think the first response may have some validity as to how hard you chop when approaching break through. One other thought could be not chopping straight down when approaching break through, rather “following the rake” as Paul says–by angling the chisel a bit, you might overcome some of that issue as you’ll be approaching the grain with more of a slice vs. a blunt chop straight into the grain. Just a thought (and it’s an issue I still struggle with as well).
14 February 2017 at 4:17 pm #309212A really sharp chisel and easy blows.
Watching the videos it appears that it is a 4-5 part job meaning it is 4 chops on both sides to get through.
These are approxamate of course and different woods react differently but softer wood for me takes more cycles than hard wood like oak
If you really welly it you can do it in two passes for example and will get tear out.14 February 2017 at 8:09 pm #309213Make sure, your chisel IS sharp, not WAS 😀 Sharpness is one of the keys, and Paul Sellers doesn’t hone his chisels for the beautiful mirror face, but because they cut even better then. And sharpness is relative. After a few days of practise, I thought, oh, this is really sharp. A week later, I realised, that it was quite dull, because I had gotten to a new level of sharpness. Another level weeks later, and the next one might take a bit longer.
The other key is to get very careful when close to the breakthrough. Actually, you don’t want to break through, but connect the air, that is separated by the wood.
Dieter

I’m really struggling with this. Even with sharpening right before I chop, taking my time, chopping at an angle. I mean it might be the wood, but I doubt it. Sometimes the tearout will happen right at the edge of the wood so that I can’t get a clean line. It’s pretty frustrating.
Attachments:
You must be logged in to view attached files.
As it is I need to make 40 drawers for my kitchen, this is my 2nd or 3rd attempt at dovetails, so maybe I will get better, but I can tell this is going to be a real slog. I even borrowed a dovetail jig from my Dad but really don’t like the look of them. Plus it’s a pain in the butt to set up right. Even when I nibble away a bunch of the waster with a bandsaw it still tears out, you can see the lines of tearout right where the bandsaw didn’t cut. That actually looked worse than just using the chisel.
 27 May 2017 at 12:36 pm #312370
Hi @dclare, it will get better the more you make just keep at it.
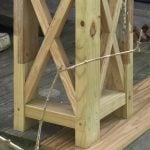
Looking at your picture thats pretty typical of a dull chisel, do you use a strop?
If no then you most likely have a burr left on the edge, if yes you may be messing up the angle and either go too low not catching the burr or too high and rounding over the edge again.
A good test is to take a page of Phonebook or Catalogue paper and try to cut through that, the chisel should should cut reasonably well without catching, at best it should glide effortlessly and without any tearout through the page. If it does catch you still have a burr or a nick in the Edge.So if your Chisel is truely sharp next thing is to watch your technique, if you sledgehammer the chisel through at all cost, tearout like that can also happen. Go easy and let the tool do the work, come in from both sides and remember to leave a bit standing maybe 2 mm at the edge of the board so it doesnt vibrate when you flip it round and come from the other side.
Some people also like to remove the bulk of the waste with a Coping or Fretsaw, you could probably also drill out the bulk of it though.
@dclare The tear out along your knifewalls makes me wonder if your knife is sharp enough and if your knife wall is deep enough. The first chops should be very gentle. Not much comes out at the beginning (1st pass, maybe two) when you deepen the knife wall.
Remember that the strength of a dovetail comes from the long grain, not the end grain. So, while the tear out may frustrate you, the joint is likely 100% strong. So, go ahead and build your drawers and learn as you go. I think that as long as a dovetail looks good, the long grain surfaces will be tight enough for a good glue joint. In fact, I suspect that even if a dovetail is a little imperfect, you’ll still have a strong joint. It’s funny….we stress over dovetail appearance but one of the wonderful things about dovetails is that they are almost always strong no matter how messed up they may look. That’s not true of other joints, like M&T’s, which can look beautiful, hidden behind their shoulders, but which might be quite weak if sloppy. In some ways, dovetails are the ideal “quick and dirty” joint. It makes me suspect that the old timers used them because they worked, not because they looked good, while we fuss over how they look and forget about how they work. Upside down backwards….
Thank-you Gentlemen.
When I sharpen I did the first couple by hand, the last one using a honing guide set to 30deg with no improvement in results. I use a coarse and fine diamond plate (DMT) then strop on a piece of leather attached to a board with some polishing compound on it. I may be rounding it over again on the strop, I will watch for that next time.
I did sharpen my knife but will try using a razor with a fresh blade on the walls and see if that helps.
One thing that may be contributing, when I started this kitchen project I put 1/2″ plywood over the top of the bench to cover over the well and give me a flat surface to work on, but the plywood had warped a bit and has a bit of spring to it. I will try clamping the piece down with a caul and eliminate the bounce. Also the hammer I am using is a wooden one I made and is a bit heavy, so I will switch to a lighter rubber mallet. I do suspect it’s my poor sharpening job though so I will go back again, use the guide, and take care when stropping.
Thank-you very much for your tips. I will keep at it and report back if I see any improvement :)Thank-you for your encouraging words.
27 May 2017 at 6:30 pm #312374A non bouncy surface will certainly help, though do yourself a favor and keep the wooden mallet or make a lighter one, if you really want to switch over to a Plastic one.
But stay away from rubber mallets, if by rubber mallet you mean what i think you do, you lose alot of force that way, tiring you more quickly and they tend to spring/wander around a bit.AS for sharpness its a skill that takes time but is well worth it, practice practice practice.
A little tip if you are using a wax based compound on the strop, if you charge it up add a few drops of leather oil afterwards and rub it in nicely.
That prevents the glassy layer of wax forming that peels of after a while and also distributes the particles more evenly. You can do the same thing if the strop appears to be losing its grit, it prolongs the periods between having to apply new compound you can do that 2 or 3 times before having to recharge.
Great advice Philipp! Thank you. Joeuu, It’s as close as I can make it, but the crushing/tear-out is happening all the way through. The outside edges are not so bad, except for the tear-out on the inside weakening the edge.
I will keep plugging away at it. Finished one drawer today, and if you crossed your eyes you could call it vintage farmhouse, haha. (I bet Generation Z hipsters will love it after I am long gone.)
I sharpened as carefully as I could using the guide and going from coarse—>fine–>extra fine then stropping. Maybe just for fun I will try a different species and see if it improves. Doubt it but can’t hurt to try. Haven’t found my rubber deadblow, (like what paul uses) but I was as gentle as I could be with the wooden mallet.
Thank-you for all your kind advice everyone. -
AuthorPosts
- You must be logged in to reply to this topic.