tool chest progress
Welcome! / Forums / Project Series / Tool Chest / tool chest progress
- This topic has 44 replies, 17 voices, and was last updated 10 years ago by
 sidreilley.
-
AuthorPosts
-
Just seeing how everyone is coming along… My plan is to make three of these.. One for me and one for each of my kids. First one is being made out of white pine and the others may be built out of hardwood, maybe. I like the cost and the ease of workability of whit pine, but its also brittle in the end grain. Right now I’m at the dry run stage of the case glue up.. I think I drank to much coffee because one of the pins is crooked.. I may recut the tail to fit better.. But, I may leave it go since this will be stuck in the workshop on under the bench.
How are you guys coming along?
Dan
Attachments:
You must be logged in to view attached files.
You are WAY ahead of me Dan, I am still building my workbench. I do not have much extra time for my woodworking. And I keep getting sidetracked restoring old tools that I “need”.
Your tool chest looks great. How many hours to you think you have into it so far?
I really need to start working in building a workbench with a decent vice. Problem is I have a bench and need tool storage, but also like building stuff too and not a whole heck of a lot of time for the workshop.
As far as building this chest, I don’t think I have a lot of time in it. 3 hours? I only work on it an hour or two at a time, sometimes only 20-30 minutes. One thing for sure I’m getting more efficient at cutting and chopping out dovetails…
Cheers!

 23 August 2013 at 8:09 pm #16960
Dan
That is tremendous progress for 3 hours I have not started making one yet but if got that far in say 20 hours I would not be unhappyI confess, the wood was already planed to thickness and I used a table saw for cross cutting the lumber to size. I did have to glue up the panels to get the proper width, but it really didn’t take long to chop the dovetails… Maybe it took longer, but just enjoyed the process so much it didn’t feel like a long time. Maybe I should ask my wife how long it took? She might have a different opinion.. Lol
You’ll see, once you start chopping out the waste you get into a rhythm and it just moves along quickly. Its a fun project, I’ve enjoyed every moment…
 23 August 2013 at 8:31 pm #16962
Great work, Dan. You’re making fantastic progress.
I haven’t started mine yet – I’m hoping to get the coffee table finished soon, then I’ll start the tool chest.
George.
 23 August 2013 at 9:20 pm #16964
Haven’t started mine yet, beyond getting the wood and putting it up in the shop…but you look like you’ve made great progress already!
 23 August 2013 at 10:54 pm #16965
Looking really good Dan!
I have not begun on mine yet either, hopefully soon.

Nice work Dan-
I started to plane my (Cherry) boards, but then noticed that they were still moving, so I set them down again to acclimate for the past two weeks.
In the mean time I am working on a small wall cabinet with some leftover pine. I did the carcase, so now I am working on the frame&panel door. A lot of the same techniques apply to this cabinet, so it is a lot like doing a trial run. I made a mortising jig this morning to try out Paul’s method.
I will probably start the toolbox in a week or two.
Wish me luck.
Thanks all! Next week i will probably glue it up and work on the top and bottom.
Scott, a cherry tool chest will look fantastic! I wanted to use something like cherry or walnut, but wanted to do a test run, as I continue to learn, with material that is less expensive and easier to work with. Not only that, this will sit in my work shop, so it is going to take a beating.
Good luck to you guys when you start! I’m looking forward to seeing pictures of you tool chest!
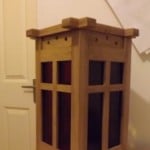
Major accomplishment for me, the lid is just about complete and the mortise and tenon joinery looks pretty darn good. The middle rail is a hair longer than the end rails. Also the rail in the upper right hand corner is missing a slice of wood from where the chisel slipped while chopping the tenon.. I will probably recut that piece.. Most important, the lid is laying flat without twist. I did use the mortise jig explained in the video and it made all the difference..
Attachments:
You must be logged in to view attached files.
Looks great Dan. The middle rail on my first door (for my small wall cabinet) was long also. I had a shoulder plane to assist me, which was handy.
Although it is not _the_ tool chest, my cabinet is serving as a good primer for the chest. I am almost done with the door. The frame for the door came out flat, thanks to the jig no doubt – but my jig did cause a wrinkle. My jig was a bit shallow, which caused the M&T to be extra fat. This meant that I had a lot more paring to widen the mortise than should be necessary, and it also meant that I had to cut my tenons extra fat, which I somehow failed to do on a few joints!
Just between you and me: Instead of re-making the frame entirely, I decided to glue shims to the errant tenons because I liked the grain of the rails and I thought the thinner tenons would still be plenty strong. After glueing the shims and truing them with the router plane, they came together quite nicely. I still have to plane all the rail faces flush, but they are already close.
I have learned my lesson. I suspect the tool chest frames will come out much better.
I decided to run the panel grain horizontally for this vertical door, mainly because I did not have stock wide enough to run it vertically. 😉 In retrospect, I could have run my center rail vertically as a stile. I probably broke an unspoken rule here, but it will help me mount chisel racks without worrying too much about movement. I decided to play with the grain pattern a bit to keep things interesting. Tonight I should be able to get the panels fit into the frame.


-
AuthorPosts
- You must be logged in to reply to this topic.