Vise Mounting
Welcome! / Forums / General Woodworking Discussions / Vise Mounting
- This topic has 12 replies, 11 voices, and was last updated 6 years, 5 months ago by
Dave Ring.
-
AuthorPosts
-
2 September 2017 at 4:29 pm #315444
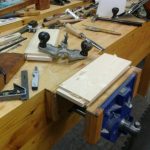
I bought a used Record 52 1/2 vise made in England off of ebay. Looks just like Paul’s. My question has to do with the mounting. Now that I have the vise in hand, I realize the bolt-holes closest to the the vise jaws won’t clear the apron (1.5”) laterally once inserted. It doesn’t seem like a good idea to use only the open bolt holes to mount the vise to the underside of the bench top, especially as I plan to chop in the vise. How to make use of the closed bolt holes if they are *inside* the apron hole?? In theory I could mortise the inside jaw flush with the side of the apron, but even so the bolt hole would barely clear the apron and I’d want the coach screws going into clear wood and not anywhere near a seam. What am I missing?
Attachments:
You must be logged in to view attached files.
Don’t forget the two 1/4″ horizontal holes through the rear (stationary) jaw. You can either countersink them and run a couple of long wood screws through them into the bench top or add a wooden pad to the rear jaw, drilling holes corresponding to those in he rear jaw, countersinking those and running in the biggest wood screws you can find.
My main vise (a Japanese made 10″ Craftsman) is installed the same way–lag screws vertically through open slots underneath and wood screws horizontally and it’s held together for 20 years.
Dave
 3 September 2017 at 12:51 am #315460
Leland,
You really do ignore those closed bolt hole locations.
IIRC, I used qty 2 of 3/8″ x 4″ lags and washers in the rear/underside of the vise (mine is an Eclipse, but nearly identical to yours) and some of the extremely long screws commonly used in timber framing and log home construction for the jaw face screw locations. The width of the bench top is an excellent opportunity to use the timber framing screws. My vise is solid as a rock!
The relevant blog posts that Wesley mentioned can be found here: https://paulsellers.com/2012/06/making-the-workbench-15/
and another here:
https://paulsellers.com/2016/06/bench-vise-part-ii/As a side note, I used timber framing fasteners in all relevant locations of my workbench. They seem to me to be more solid than common decking screws and lags due to their depth of bite and ability to tie everything together at a negligible additional cost considering the quantity required to build a workbench or mount a vise.
-
This reply was modified 6 years, 8 months ago by
 Arthur Coates.
-
This reply was modified 6 years, 8 months ago by Arthur Coates.
3 September 2017 at 6:10 am #315467Paul’s blog post on mounting a vise is from 2012. Also look at the post that follows it
https://paulsellers.com/2012/06/making-the-workbench-15/
He also has a companion YouTube video.
Mount a vise.Leland,
If you want to use those hole then you can do as I did, and mount the vise to a piece of oak with carriage bolts through those holes. It worked for my bench top which is made of 2×4 laminations.
JimAttachments:
You must be logged in to view attached files.20 October 2017 at 11:16 am #337616Hello, new guy here,
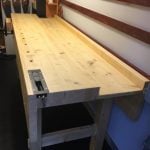
I just installed mine this past weekend by recessing the vise 3/4 of an inch into the apron (which is 1.5 inches thick) and using a piece of 3/4 inch jaw material to bring it flush again to the apron. I was a little concerned because I felt like I might not be able to do it right but it turned out really well. This allowed me to use the front bolt holes. I have an Eclipse 9 inch vise which is very similar I think. My top is laminated 2x4sTotally agree on the ‘don’t need to use them’ comments. 10″ Eclipse on my bench and it hasn’t moved at all. I did discover during installing mine that it’s quite easy to drill through the metal (I over-tightened a 1/4″ lag screw in the front jaw and broke it off :/ Rather than try to dig it out I drilled a new hole in the rear jaw). If you feel like you want more holding your vise in place from below, drill a hole or two elsewhere in the underside where you can get at it.
-
This reply was modified 6 years, 8 months ago by
-
AuthorPosts
- You must be logged in to reply to this topic.