Wood storage solutions?
Welcome! / Forums / General Woodworking Discussions / Wood and Wood Preparation / Wood storage solutions?
- This topic has 9 replies, 7 voices, and was last updated 8 years, 9 months ago by
Ed.
-
AuthorPosts
-
What style of wood storage do you guys recommend? Care to point to plans or pictures of what is working well for you?
I am currently employing a standing wood storage solution which I built along a shop wall.- The wood isn’t terribly accessible
- I feel that it is causing some warping on the longer boards
- I have lots of smaller (2-4′) pieces which just end up jumbled
- I need to reclaim the space if possible due to a vehicle change.
I’m looking for something that is:
- Easy & cheap to build
- Fairly easy to keep organized
- Uncluttered in appearance
- Safe to get get wood from when overhead
- My shop is ~15′ tall and I’d like to lift a lot of the wood up off the ground and onto the wall so I can free up space for more needed things on the ground
I mainly work with hand tools, but I do have some sheet goods. Most of my boards are 6″ wide 4/4 at up to 12′ long. Though I do have a few 4/4 12″ wide boards that are 12′ long.
I understand that this solution is probably best for my longer boards, but what do you guys do with the shorter board?
 21 October 2015 at 9:44 pm #131577
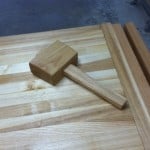
I think the best way to show you what I do is provide as big of a picture as I can.
In this picture, I am standing on the far wall of my garage. Since I use my garage for storage, parking cars, and a shop I have to really make the space work. Everything I can put on a wall goes on the wall.
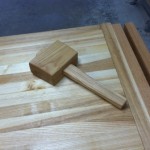
When I am working on something, I just open the door and pull the car out. Getting to my boards isn’t that bad. I have a little 3 step ladder I pull out and I can easily reach the stack. Anything that is too short to go on the wall goes in the small storage on the floor (second picture). That is a pallet that I cut in half. It works amazing for storing offcuts. And it is slim enough that It doesn’t get in the way of my cars.
Anyway, that is what I do. The brackets holding the wood up were $1.50 each from Lowes.
Attachments:
You must be logged in to view attached files.
joetato,
If the license plate on the wall is an indication of your current abode you need to be aware of a couple of things.
1. PA has nice weather year round so the shop side car needs to get banished to the drive so that side becomes your “shop”. ( Just tryin to help out here 🙂 ).
2. The other vehicle I assume belongs to your beautiful, talented and most certainly patient and forebearing wife. ( How’m I doin so far?) so THAT car stays.
You can negotiate for the whole space after you start getting some furniture built.
PS The storage suggestions are great, me, I just use garbage cans and stack the rest where I can.
Apologies to all for the Thread hijack.
Best,
Craig
21 October 2015 at 11:10 pm #131581I am originally from PA but moved to the Seattle area 8 years ago. The weather here is mild all year long and I could park it outside if I wanted. It doesn’t hurt to move it though. I hope to eventually build a 10×12 shed outside dedicated for a shop.
-
This reply was modified 8 years, 9 months ago by
 Joe Kaiser.
 21 October 2015 at 11:55 pm #131584
I’m originally from PA, too. I know you guys are legit because you refer to the state simply as “PA.” Dead giveaway for Keystone Staters. 🙂
I work out of my garage too and haven’t done enough to get it organized. I just bought the place three years ago, so give me another 20 and I’ll be good.
Right now I stick my seasoned lumber up in the garage rafters (unfinished garage). My cutoffs end up propped up against the back wall in no particular order. I usually season my lumber stickered on the garage floor for awhile until I get tired of walking over it and get it up in the rafters after a sufficient amount of time drying.
 22 October 2015 at 2:20 am #131590
When I worked from the garage I put 2×4.. between the door track and wall 18 inches this held a lot, also I hung 2×4.. frome hooks on chain 11/4 hole in 2×4..put chain though use bolt though chain. This made the rack adjustable there is a lot of room up there between the tracks.
Frankj
I made this rack thought it would not hold much..it actually holds quite a bit…it is not too tough to sort through either…then I got a pile of walnut from a guy that had it outdoors under a tarp…wanted to let it air out so stickered it off the floor…will be moving it to an edge type system sooner or later…pain in the rear to get boards from the bottom of the pile…not a native Keystoner…moved here for work late 2012…and yes I need to clean up my cut off collection
-
This reply was modified 8 years, 9 months ago by
 trooper82.
Attachments:
You must be logged in to view attached files.I made a wood rack to store wood horizontally by fastening 2x4s vertically at intervals along the wall. Unlike troober82’s setup where the 2x4s are on face, mine were on edge. Prior to putting them up, I bored holes into their edges at intervals of about 6 to 8 inches and about 2 inches deep. It is critical that you carefully layout these holes so that every 2×4 has the holes in the same location. I bought some pipe like you’d use for a Pony clamp style bar clamp and had it cut into lengths of about 18″. The bores in the 2x4s are equal to the outer diameters of the pipe, plus a smidge, so that the pipe can easily be inserted into the holes. I hung the first 2×4, placed a pipe into one of the holes, placed a piece of pipe in another 2×4, and then used a straight edge and level to fasten this second 2×4 so that it’s holes were level with the first one I hung. This second 2×4, though, was at the far end of the rack, not right next to the first one. With the two end 2x4s hung, I put a straight edge across the two pipes, which are seated in the holes bored into the 2×4 edges and which are projecting out from the wall. I then hung the other 2x4s by placing a pipe into a hole in a 2×4 that I wanted to hand and then making sure that the pipe hit the straight edge. Got it? When you are all done, you have a bunch of two by fours with bores in them and all the bores are lined up horizontally. You now have a completely adjustable wood rack for horizontal wood storage. Grab a number of the pipes you cut and put them into a series of holes. This gives you a shelf of pipe onto which you can place your wood. If you need more shelves, cut more pipe. If you need to change spacing between rows, just move pipes around.
A couple caveats:
1. Watch your face. That pipe sticking out from the wall can catch you and injure you when you lean into the rack to find stuff. If you can cap the ends, you’d be much better off than taking a core out of your cheek.2. The pipe can stain your wood. If it’s rough it doesn’t matter. If it is a problem, you can get some PVC pipe, cut lengths, and use it as sleeves over the pipe. Or, but scrap over the wood.
3. I did not hang my vertical 2x4s vertically. I gave them just a little bit of tilt back towards the wall. I was afraid the pipes would sag and then dump the wood. If I recall correctly the top of the 2×4 was flush to the wall and the bottom was out 3.5 inches, i.e., I used a 2×4 as a spacer at the bottom.
4. IN the end, I didn’t really like having a horizontal rack. I found it a pain to dig through the wood. This rack is nice because you can put in a bunch of layers to reduce that, but with vertical storage, it is much easier to pick through what you have. But, if you have a low ceiling, vertical storage will be limiting. Horizontal storage can take up a lot of space in a small shop.
Sorry that I don’t have any photos. This was in a previous house.
Oh, one other thing: You may be tempted to store short lengths in a can of some kind. I stored dowels, misc. narrow scrap, etc., in a can next to the wood rack. It was very neat. One day, I bent over to get something and was stabbed in the eye by a piece of the scrap in the can that was leaning out. Off to the hospital. No irreversible damage, luckily.
The lesson is that, if you store skinny stuff vertically, have it in a can or container that is at least as tall as the scrap. If you have a trash can in your shop for trash, don’t let scraps project out from the top of the can. Well, do what you want, but I won’t do that again. No thanks. Learned my lesson. I think if I built a vertical rack, I’d have one vertical bin *with sides* for shorter material such that none of that material could poke out over the top of the sides of the bin. Maybe all the bins would have sides. Not sure.
Sorry for all the posts. This page has photos of something like what I built, although I used 2x4s on edge rather than 4x4s. My 2x4s were attached to the joists, which is why I might have gotten away with 2x4s, which are cheaper.
http://www.sawmillcreek.org/showthread.php?65903-Lumber-rack
I found a photo of a rack made with electrical conduit. That might be cheaper than the black pipe.
-
AuthorPosts
- You must be logged in to reply to this topic.