Recutting and Resizing Saw Teeth
Posted 12 December 2014
This is a free video, want to watch it? Just log into the site, and you can enjoy this video and many more!
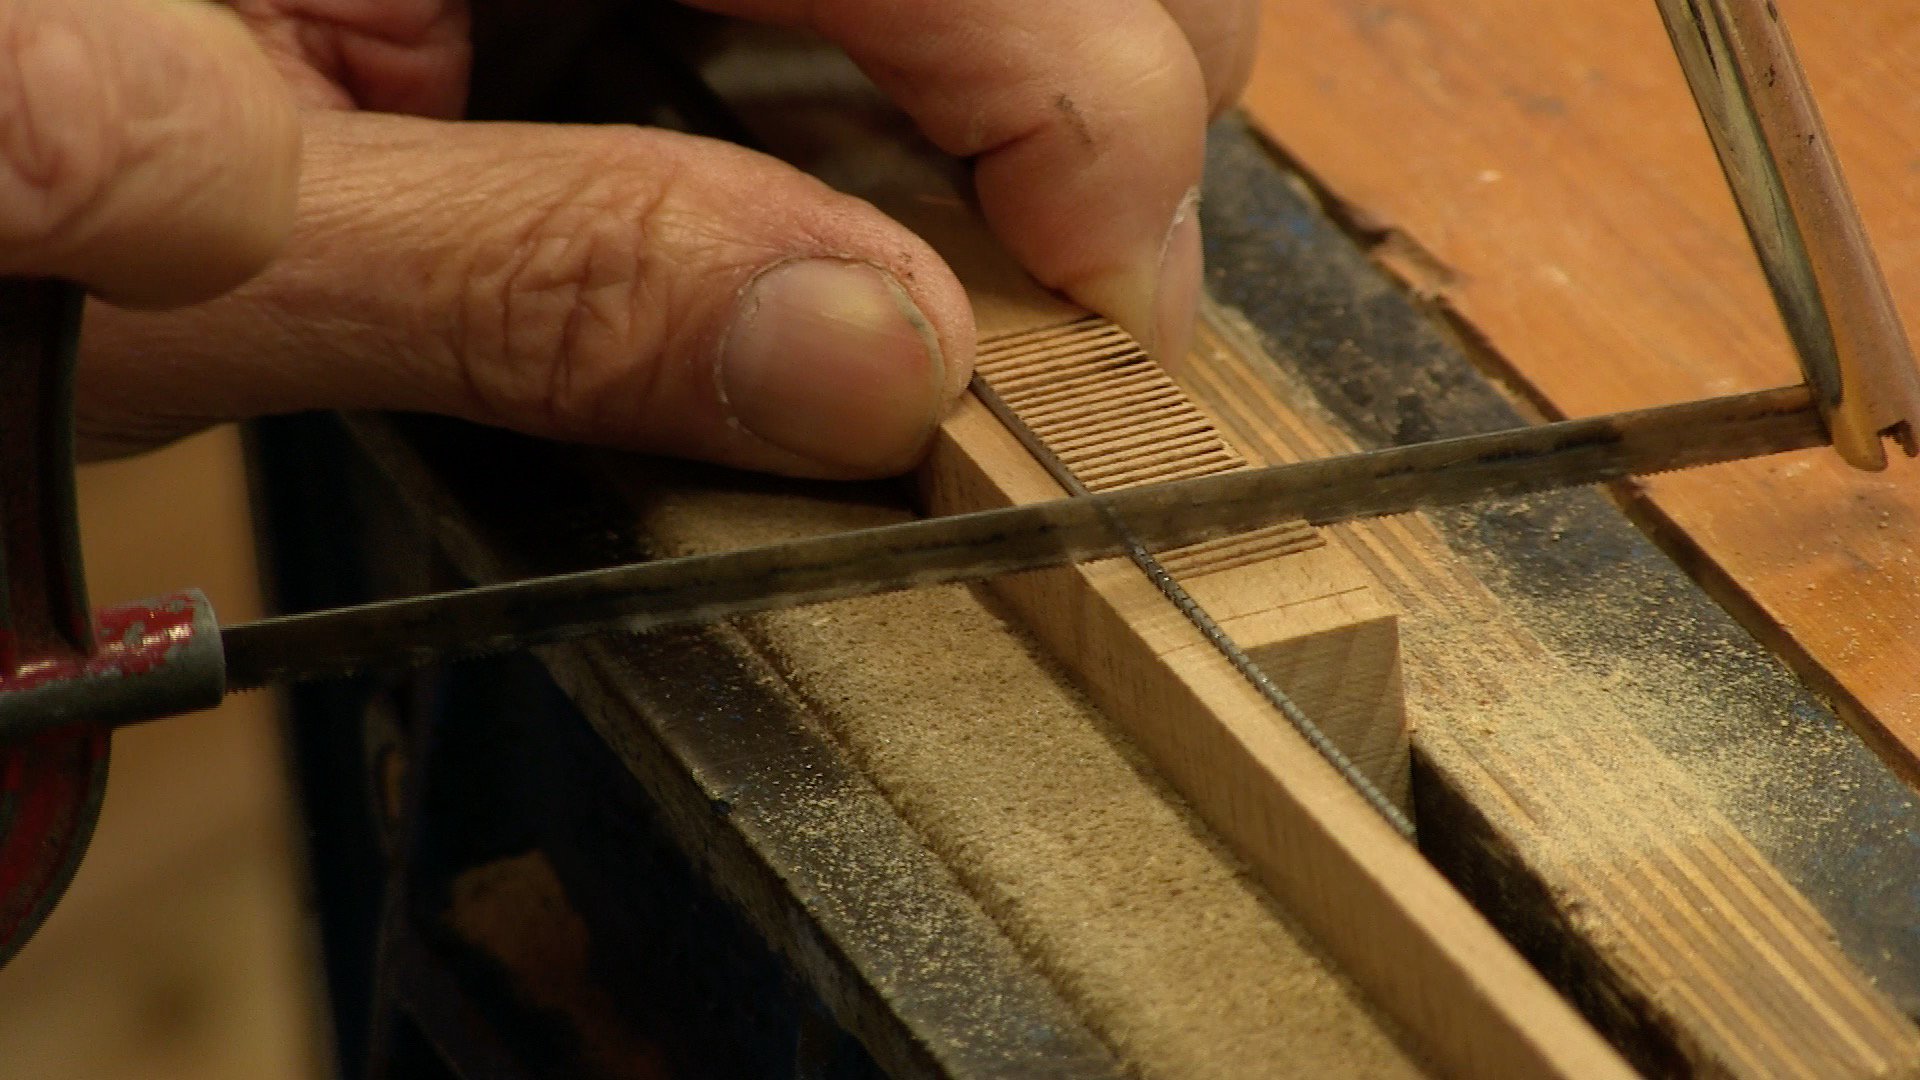
No matter the reason, this video show you how simple it is to cut new saw teeth in any handsaw. Yes, that means from small dovetail saws to the largest hand saws you have. If you have a saw you ruined, then file off the teeth and reach for your junior hacksaw. You are on your way to a saw tooth recut you won’t regret no matter the maker old and new.
This method works BEAUTIFULLY. I used the method recently to create a plate for a “kerfing plane.” It’s a straightforward method, easy, and produces fine results.
I swear blind I’ve seen this video already but it says it’s new….
I’ve found out why I’ve already seen it….it was a freebie video on the YouTube channel a few months ago.
No swearing here, please! 😀
A very enjoyable video, indeed. I hope there will be a nice saw under the Christmas tree this year for me.
Inspiring, as you always are Paul! Thanks for those little details that make this such a great technique, like tapering the lead in to the teeth of the hacksaw blade. BTW, what hacksaw blades do you use, and how fine was that blade please?
My little dovetail saw needs some remedial work, having been badly sharpened in an attempt to do fleam angle etc. which it shouldn’t have. I may just go ahead and start from scratch using this method, to make it a very fine rip cut..
i have a saw waiting for this treatment but am still practising on my larger tooth saws it took me a while to get into the rhythm of filing an .excellent and well thought out presentation .thank you
Thanks, Paul, I too am making a kerfing saw blade plane. Is “The final tweeking” covered in your regular saw sharpening video? Or do you have other aspects to enlighten us with later?
The final tweaking is indeed in the ‘Saw Sharpening’ video.
All the best,
Although I had seen this video previously on Y tube I was again struck by the simplicity of your teaching methods. I am in awe of your ability to make the difficult task a simple matter of approach, technique and performance. Thank you for making my wood working experience not only more enjoyable by following your techniques but more productive and safe by always using a sharp tool which has been improved by your methods.
Recycling free content on a paid channel. Hmmm.
I have to admit that I thought the same at first but then I thought about it and decided that they don’t have to do any of these videos really…we had the project video this week already so this was just a bonus really….still I would have liked for this to have been released on the paid channel first rather than the free youtube channel.
I got it for free here – you can choose not to pay the premium price.
Come on Marty. We already get regular weekly episodes with occasional bonuses. Yes it was “free content” but only because of the generosity that led Paul to publish on Youtube in the first place. I’m very happy to have had the prompt to rewatch this, and to have it categorised with related content here.
I know this is an old thread, but I don’t think the original complaint/negative comment has been properly teased out for the sake of others finding their way here after the point.
Possibly Marty browsed the free section of this website (like i have been doing recently), was encouraged by what he saw and became a premium member.
Paul being the honest man he is, has often stated that as a working Craftsman his goal is to earn a living (I have the feeling that even he is somewhat overwhelmed by the effect he is having on so many people in this his newest venture)
This being so, Paul would obviously need to keep feeding new material into his ‘Free View’ content – Nobody is going to join up if the content they are seeing is years out of date.
Moreover a successful Interweb enterprise like this doesn’t just spring up, Paul gathered a Big following on Youtube, by making videos for no personal monetary remuneration. He built up viewers that then became his first paying members.
He will continue to produce content that will go on Youtube and the free member area to grow his business. It will be available to paying members by default and as an adjunct to the learning cycle.
I have seen a number of Youtube videos that paul has actually’ ‘Recycled’, In that he has re-edited/ reshot Youtube sequences to use in this arena. I have been following his blog and these Recycles are done to answer questions by viewers/members — to be fair, He’s hardly going to re-shoot the whole video again.
I’ve read comments from members describing Paul’s videos as ‘therapeutic’ . I will soon be paying the equivalent of $15 for my therapy — less than a minute’s worth of a Psychologists time.
(I do not know Paul or have ever met him. I have no other reason to write this, except to speak on behalf of Paul who as a matter of course would have remained silent — I hope You forgive me the impudence of speaking for you.)
Paul, thanks so much for your guidance and encouragement. I have purchased several old back saws that I am refurbishing for dovetails and tenons. This is invaluable guidance in this effort.
Initially, my purchase of the saws was just so that I could begin the transition from Woodworking Machinery Operator to Woodworker, but as I looked at these beautiful old tools that had been neglected, it just broke my heart. I determined that I had the skills, patience, and determination to give them a new life.
So, my first task to is refurbish neglected saws, chisels, planes, augurs, and other tools that I have purchased on eBay. It appears that refurbishing old tools will become as song a passion as woodworking.
The second task will be to build my workbench. And I’ll follow your plans for that. All the other workbench plans I have studied violate Sellers Law: “Workbenches should always be as simple as possible.”
Thanks again for all your help.
Harvey
Make that “as strong a passion.”
Auto-correction strikes again.
Harvey
Hi everyone,
As a few of the comments above point out. This video was previously made available on YouTube here: https://www.youtube.com/watch?v=mTqZTGPPRj0
We thought it would be useful to add it to the library of free videos here. I had forgotten the video was available elsewhere when I sent out the notification. Apologies to those of you who have already seen it.
@martybacke yes, the video was previously released but we are not charging anyone to watch it. It is free to watch on this site as well.
I think it was a good decision to submit the video here, because this is our main repository. If it’s not here we might forget about it.
i for one am glad the video is here its much easier to refer back to rather than opening up another page/site, so thanks for taking the time to bring us this bonus video,at a time when i’m sure you have a lot of other things you could be doing .
Hi Joseph Sellers (an to You all in WWMC)!
Thanks for posting this video here. It’s very simple and helpful-as usually!
I “almost” saw it in YT, because of my poor internet connection (living in a rural place). Now I can download it and watch it properly!
Great video: simple, clear, practical. I think the editing out of repetitive procedures is very welcome as some previous videos seemed to be all in real-time, which made them longer to view than needed. All of them, though, are brilliant additions to woodworking knowledge and technique. Many thanks indeed.
Great video !! i already studied it…but i must say another time that this is a great video. i hope Paul next future will show us how straighten a kinked or bowed saw blade. So we will be able to restore old , beautifull saws. Thanks again!
My vote is for a video on straightening a kinked saw, too! I’d love to see what tricks Paul has for that tricky task.
I second that Derek. I have tried a few things but the results are not great. I would love to see Pauls approach especially on panel saws. I have heard that tapping the spine on a back saw with straight out a bow.
I, too, vote for a video on straightening a kinked or curved saw. It would be a great service.
I have been searching the web for advice on this. Bob Smalzer on the woodenboat.com forum gives some instructions on how to hammer a blade, but this looks like a great way for rookies to get in deep trouble in the least amount of time.
George Wilson has another approach with which I am much more comfortable. It can be found at http://www.sawmillcreek.org/showthread.php?103313-How-to-straighten-bent-saw-blades.
I would love to hear Paul’s thoughts on the subject and to see him do a video on the topic.
— Harvey
We have a short video on it’s way on how to straighten a saw that has a curved back or curved blade. Getting a kink out (depending on the kink) can be a lot more tricky and some are beyond help, but I think the video will be very useful.
Paul when you were cutting the teeth, I notice on the closeups that some teeth were not as deep as others. Does this affect shaping at all or did you have to adjust the depth of those few that were cut shallow?
Thanks for the video. I would never have even considered doing anything like this previously but now I might just try it on an old saw I have in the shop.
Excellent video and thanks again for showing this, I love simple no nonsense way’s of doing things.
I have a few to fix and I will adapt this method for sure, and this also proves you can use a rip saw for all most anything.
Steve
I’m glad this video was reissued, on the first viewing I missed one part of the process. So a couple of the cuts went a little deeper then rest. It did not effect how the saw cut it just did not look right. I all my years as a carpenter I had never topped and recut the teeth on a saw. The saws and tools I am restoring now are the ones I am buying on ebay as most of my own tools were stolen about two years ago. This was a terrible time in my life it was like losing old friends. Like most people I have alot of power tools which I am certainly not attached too as I was to my hand tools.
This video is simply great : now I understand what a ‘saw doctor’ should be.
Thank you.
For the people that want to learn this .Paul told us where to get a test peice to work with. Go to the big box store and buy a sheet rockers tapping knife. They are .018 to .020 spring steel . They are up to 14″ wide. Remove the handle. You now have a saw plate. Its not the best steel around but it will work. I have made two saws this way and they work , a tennon saw with a wood back, and a kerfing plane . They are not lie valley but they cut wood and that is what counts. Its a cheap way to learn cutting teeth with out risking a decent saw. A few week ago I made a marking saw blade for a friend I used a 6″ putty knife, the teeth cut in very cleanly and took a set with no problem. The blade is as good as any you could buy in a box store.
Frank j
Thanks for gathering up your free web videos and posting them on your site. It will be great to not have to look in both places. I would hate to miss anything.
Do we not need to add set to the teeth? In the video it appeared that you went straight from sharpening to sawing? Did I miss something?
Hello Max, there is a separate video on sharpening and setting the teeth. This video is in addition to that, so just covers the recutting and resizing of the saw teeth,
All the best,
Phil
Ah, I did miss it. 27:39 – “the teeth are set “
Just great
Thanks again
This is the last piece I needed to restore a much abused dissiton that enter my possession.
Ran in to a few sangs with the process. First used some scrap Pine I had around to make the guide at first, well the knife walls were not strong enough to take the cuts. Solved that by picking up a cheap strip of oak . Next one I am running in too is that at 16TPI the hack saw blade is about as wide as the teeth I am trying to cut. At what point is better to skip the hack saw and just go straight to the file?
I am guessing around 16TPI.
Paul was using saw kerfs every 2mm so that makes 12TPI(ish)
He Always gives lessons pitched to his Apprentices (members) – His nature I think stops him from saying “This is as good as any of you are ”
I’d guess the message was ‘Practice at this pitch until you master it then…’
I think that only a Master or a Machine could tooth a saw from flat at much higher TPI.
I would guess It was only when machines to cut teeth were invented that high TPI saws became common place.
The blades are very cheap, In the Uk and Ireland the saw is called a Junior Hacksaw.
Now a £1 Asian import replica of an ??Eclipse model
Steve, I manage to cut at 16 TP. It was a bit on the touchy side as I ended cutting a new guide inch every other inch, but did finish the saw. It is currently the best saw in my shop too.
After I did the recut, I found a place here with the Junior, and it does have a slightly thinner kerf to the regular hacksaw. Even with that, at some point it is probably snips and a file, or just the file. But yeah at some point it probably is just machine only.
Impressive. You have obviously got that extra character trait that eventually turns an apprentice into a real master.
Grit : courage and resolve; strength of character to see a task thru.
Well done.
Did not have any luck with this process. I need to switch to oak for the hacksaw guide and I guess I need a better hacksaw blade. The hacksaw blade I’m using did not come close to cutting the dovetail saw blade. Any suggestions for a hacksaw blade?
I had to use an oak guide piece also. I use a 32 tpi hacksaw blade. I would also suggest a new blade for the task. I discovered flatting the blade and smoothing the leading of the blade as per the video is pretty important.
Thanks. Any specific brand for the hacksaw blade?
Not really, just get a decent 2 pack. Why? Because you will probably ruin the first getting the hacksaw blade setup right.
Wonderful video. This tecnique works great and if you take your time, easy and produces outstanding results. Do you have a technique for sharpening crosscut saws? I’m never quite sure if I have the angle right or even going the right direction w/re to the set.
Michael, take a look at Andy Lovelock’s youtube video entitled “Sharpening Western Saws”. Incredible information. For sharpening crosscut saws, I have a little aid that I made that attaches to the end of the saw file to guide me. It is like the aid that Andy uses in his video, but also has an angle cut on one end at the same angle used for the “fleam” angle. Sorry, I can’t do this justice with words – you need a picture. Anyway, doing a little searching on the internet should show you some easy fleam guides.
As far as the direction, refer to Andy’s video. In words, with the saw upside down in a saw vise and the toe to your right, you want to file the front of the teeth that are set away from you and the back of the adjacent tooth (just in front of the first tooth) that is set towards you. Again, the words are not nearly as good as seeing this in a video.
Almost all the new back/tenon saws I see for sale are filed in a cross cut pattern, which makes no sense to me because, except for the shoulders of a tenon, ALL cutting on a tenon is rip cutting. The great majority of the sawing I see here on the videos is ripping. If I buy a new back/tenon saw, should I just suck it up and refile it for a rip cut? Should I eventually plan on getting more than one so I’ll have at least one of each? All I have now for this type of saw is a medium quality “Gent’s” saw, with approximately 15 tpi.
Thanks
PS. I’ve posted this question in the other saw sharpening comments sections in the hopes of getting a quicker answer. Please excuse the redundancy.
Just a quick thank you to Paul and everyone who runs this page as well as the youtube channel for all of the free videos, I am a struggling woodworker with little or no money to buy new tools and when I recently bought some brand new saws i found that they were worse to use than the really old saws I had been limping on with.
I will be completely re-doing all of the teeth on all of my saws now that I have watched this video again as it reminded me what I needed to do to all of the saws I own.
I did ask Paul a question on the Q&A 2 about repairing a saw with a kinked back and he answered my query perfectly, I have ended up scrapping that saw and will be turning it into scraper blades and Scratch-All teeth in the near future.
Once again, than you all so much for this information and in a format and style that I find very pleasing and relaxing to watch.
Regards, Paddy
It’s not Scratch-All… it’s Scratch-Stock… DOH!
I’ve been needing to do this on a very old 18″ Disston D-8 with 11 ppi that I bought off of ebay. I cleaned the saw plate a few years ago, sharpened and set it, but the teeth were a misshapen mess when I got it, so it hung with my other saws until now. A week ago I filed all the teeth off then proceeded to try this recutting technique. So far I’m a few hours into it. I ordered a Bahco 228 (gents) hacksaw with a 32 tpi blade, removed the set, and tried to file the teeth off the front (I don’t have a grinder). That didn’t work, but it dulled the front teeth enough that it seemed to do the same thing. I printed out an 11 ppi template from Blackburntools.com and used that to make the guide. I had to use higher quality pine, because the cheap (so called no. 2, but probably lower) pine kept breaking out. I found it better to make all the knife lines, then remove the template and make a knife wall and a cut with the hacksaw before moving to the next knife mark. It was a bit difficult to be consistent here. After making 4 inches of guide, I started cutting into the saw blade and got through around 12 before the blade just wouldn’t cut anymore. I also used 3 in 1 oil to help here. I’m now waiting for replacement blades to come in from Amazon before I continue. All said though, while its nice to be able to do this, Circle Saw in Houston will recut and “sharpen” a handsaw for $11. It would take me about 35 minutes to drive their and the same to drive back, so I think the next time I need to do this, I’ll at least have them cut new teeth, then I will sharpen and set by hand. I’ve probably spent over hours experimenting with tools and techniques already. Obviously it would be faster the next time, but life is short and time for woodworking for me is even shorter.
I tried cutting the teeth into a D8 26″ Disston saw, but it hasn’t worked for me yet. I am using a Bahco junior hacksaw. The blade that came with it dulled after I cut several teeth. The replacement blades, which seem identical (32 tpi Bahco blades) can’t even cut half a tooth before dulling.
I am thinking that I am probably using wrong blades? Which blades can be recommended for this?
Or maybe it won’t work on this saw because it is thicker than a dovetail saw?
Hi,
Thank you for your comment.
Paul says:
I don’t think you are using the wrong blades, I have experienced this occasionally and ever so often you come across a Disston saw where the teeth are extremely hard equalling the hardness of the hacksaw blade. In other words, probably the only way to recut the teeth would be using the file only.
Kind Regards,
Izzy
Thank you Paul and Izzy, at least there is hope.
I tried using this method on an old tenon saw, trying to recut the 11ppi teeth. The problem I ran into was that the wood guide I used kept breaking as the wood between kerfs was so thin. I tried walnut and mahogany scraps I had and they broke almost immediately. I then tried using white oak which I also had a scrap of. It held up a little better, but still had the same problem. What wood does Paul suggest for using for the guide?
Hi Steve,
I passed your question on to Paul and he said:
Walnut and Mahogany are both brittle woods, try using something more resilient like Sapele. Although I have used different woods and have never come across this problem, I would suggest a more gentle approach.
Kind Regards,
Izzy
How do you determine how much set a saw has? how do you remove set? How do you tell what size saw file you should use? Confirming you want a slight shine on the point of the tooth? Meaning you don’t want to completely remove the flat spot on the top of the tooth?
Thanks Alec.
Hi ALec,
You might find this video about removing set useful from 5:30 minutes onwards (the link should take you to the correct place in the video) : https://youtu.be/13C5MWTKfwE?t=330
Paul says:
You can really measure the set, just pinch the teeth between your fingers and you should be able to feel if the teeth are protruding beyond the surface of the plate. If they feel flush then the saw needs setting.
The saw file is determined by its relation to the height of the tooth. When the file is in the gullet, the surface protruding above the point of the teeth should match or be slightly wider than the distance the file is in the gullet.
You can take the shine out but only by so small an amount.
Kind Regards,
Izzy
Hi, I’ve tried cutting the teeth with my junior hacksaw as in the video, but the hacksaw blades can’t cut the saw plate. I get about one tooth per hacksaw blade. I read the comments above, and I guess I too have a hardened steel plate, it’s a pre 1906 tyzack. I guess I’ll have to re cut the teeth with just a saw file… any pointers? Cheers
Will
Hi Will,
Paul says: This occasionally happens, it seems as though your plate may be just extra hard plate and there’s nothing you can do about that.
Kind Regards,
Izzy
I don’t have a small hack saw and a normal sized one didn’t work well, so I just used a saw file to establish the gullets. Do the same thing as Paul describes for the hack saw, but instead just use a saw file very gently on those first few passes. Remember the hack saw only cuts down, but the file cuts sideways too, which is why you really should go slow and gentle so it doesn’t move the gullet sideways.
I think Roberto is right. I did use a hacksaw, following Paul’s instructions, to recut teeth on a tenon saw and it worked fine. I used a normal Home Depot hack saw blade and got through the entire saw before the blade was useless. But I also recut the teeth with just a regular saw file on another tenon saw. The file does bounce a tiny bit so it is easy to get just a tad off, which matters on those tiny teeth. As Roberto says, go slow and easy. The nice thing is that if you get it a bit off, you can just file it down and start again. Yah, I had to do do that on one saw but the second try was much better. With my very limited experience, I have no real opinion as to whether starting with a hack saw blade advantageous for me. They both worked okay.
I have seen a vid where just a file was used to recut the teeth on a full sized hand saw and it looked a lot easier than on a tenon saw. Since the teeth are much bigger and further apart, I guess you do not have to worry so much about a bit of bounce in the file. If I had to cut the teeth on a full sized saw, I would definitely try with just a file.
Well, I had a flash of inspiration. After trying to cut a wooden jig to guide my file to cut the teeth with a file only, and failing abysmally I might add. I decided that I needed a steel jig, just a plate of steel with the teeth already cut on it, so I could follow those teeth with my file and cut the new gullets on my restored saw. Then I looked at my other saws, all with steel plates with teeth cut on them! So I just used another saw plate pressed as tight to the plate I was cutting and cut the teeth. Hey presto! Just a little setting to do and she’s good as new!
I apologize if I have missed it somewhere but how do I know how deep to file the gullets. I have acquired an old 14 t.p.i. dovetail saw. All the teeth are there but seem very shallow. It sharpened up well but the teeth seem tiny compared to the 12 tooth tenon saw I have. I’m just not sure how deep I can (or should) go and still maintain the integrity of the saw.
Thanks to anyone who can help.
RoyR,
The depth of the gullet isn’t generally a variable that controls anything. If you use an appropriately sized file and sharpen the saw to joint accurately, the gullet depth will take care of itself.
If you wish to have deeper gullets (to improve cutting speed), you can use an “undersized” file to accomplish that. However, you will burn through files more quickly that way.
I recommend reading the article posted on Bad Axe Toolworks “Maintenance” page. Tons of good information there.
Thanks, I’ll check it out.
R
Roy, saw sharpening is still challenging for me, but in case it helps: One comment Paul has made about saws like the one you describe is to sneak up on the desired result rather than trying to get it all right in one go. So, joint the saw and then focus your attention on the flats (on the tips of the teeth) rather than on the gullets. The flats will be of variable sizes for a saw that is out of tune. File to make those flats equal in width. The wider ones need more work than the smaller ones. Make multiple passes, focusing on the largest flats on each pass, working towards them all being the same size. Eventually, the flats all disappear uniformly, meaning the teeth have all come to sharp points. Here’s the tricky bit: There are multiple ways to change the size of a flat. You can file downwards on the front of back of that flat. Of course, going downwards on the side that has the slope will shorten the flat, but going downwards on the side that has the vertical part (towards the toe) of the gullet will not do as much. But a second factor is whether you push the file towards the heel or toe of the saw. By pulling towards the heel when filing on the toe side of the flat, you pull the point towards the heel. Or, you can push towards the toe when filing on the heel side of the flat. Yes, very confusing and, yes, hard to decide which to do. This is where you look at the gullets, but maybe more with an eye towards whether the teeth points are going to end up being evenly spaced. Make many light passes as you learn to get a feeling for how things relate to each other. Honestly, I think putting a wonky saw right is quite challenging. Fortunately, you don’t need the saw to be perfect for it to cut and, as you repeat the sharpening, you can refine things.