The Paul Sellers Knifewall Technique
Posted 1 March 2019
This is a free video, want to watch it? Just log into the site, and you can enjoy this video and many more!
More and more woodworkers now refer to the term Paul coined as knifewall years ago. When Paul first introduced it to his students in the late 1980s the term did not exist. Paul set out to create a single word that not only referred to marking the wood surface, but one that described severing the surface fibres and the creation of a physical knife-cut wall. Knifewall as a term became something woodworkers would saw, plane and chisel their wood to.
Excellent video, Paul! Thanks a lot for sharing your knowledge. It makes the perfect sense to call it a knifewall.
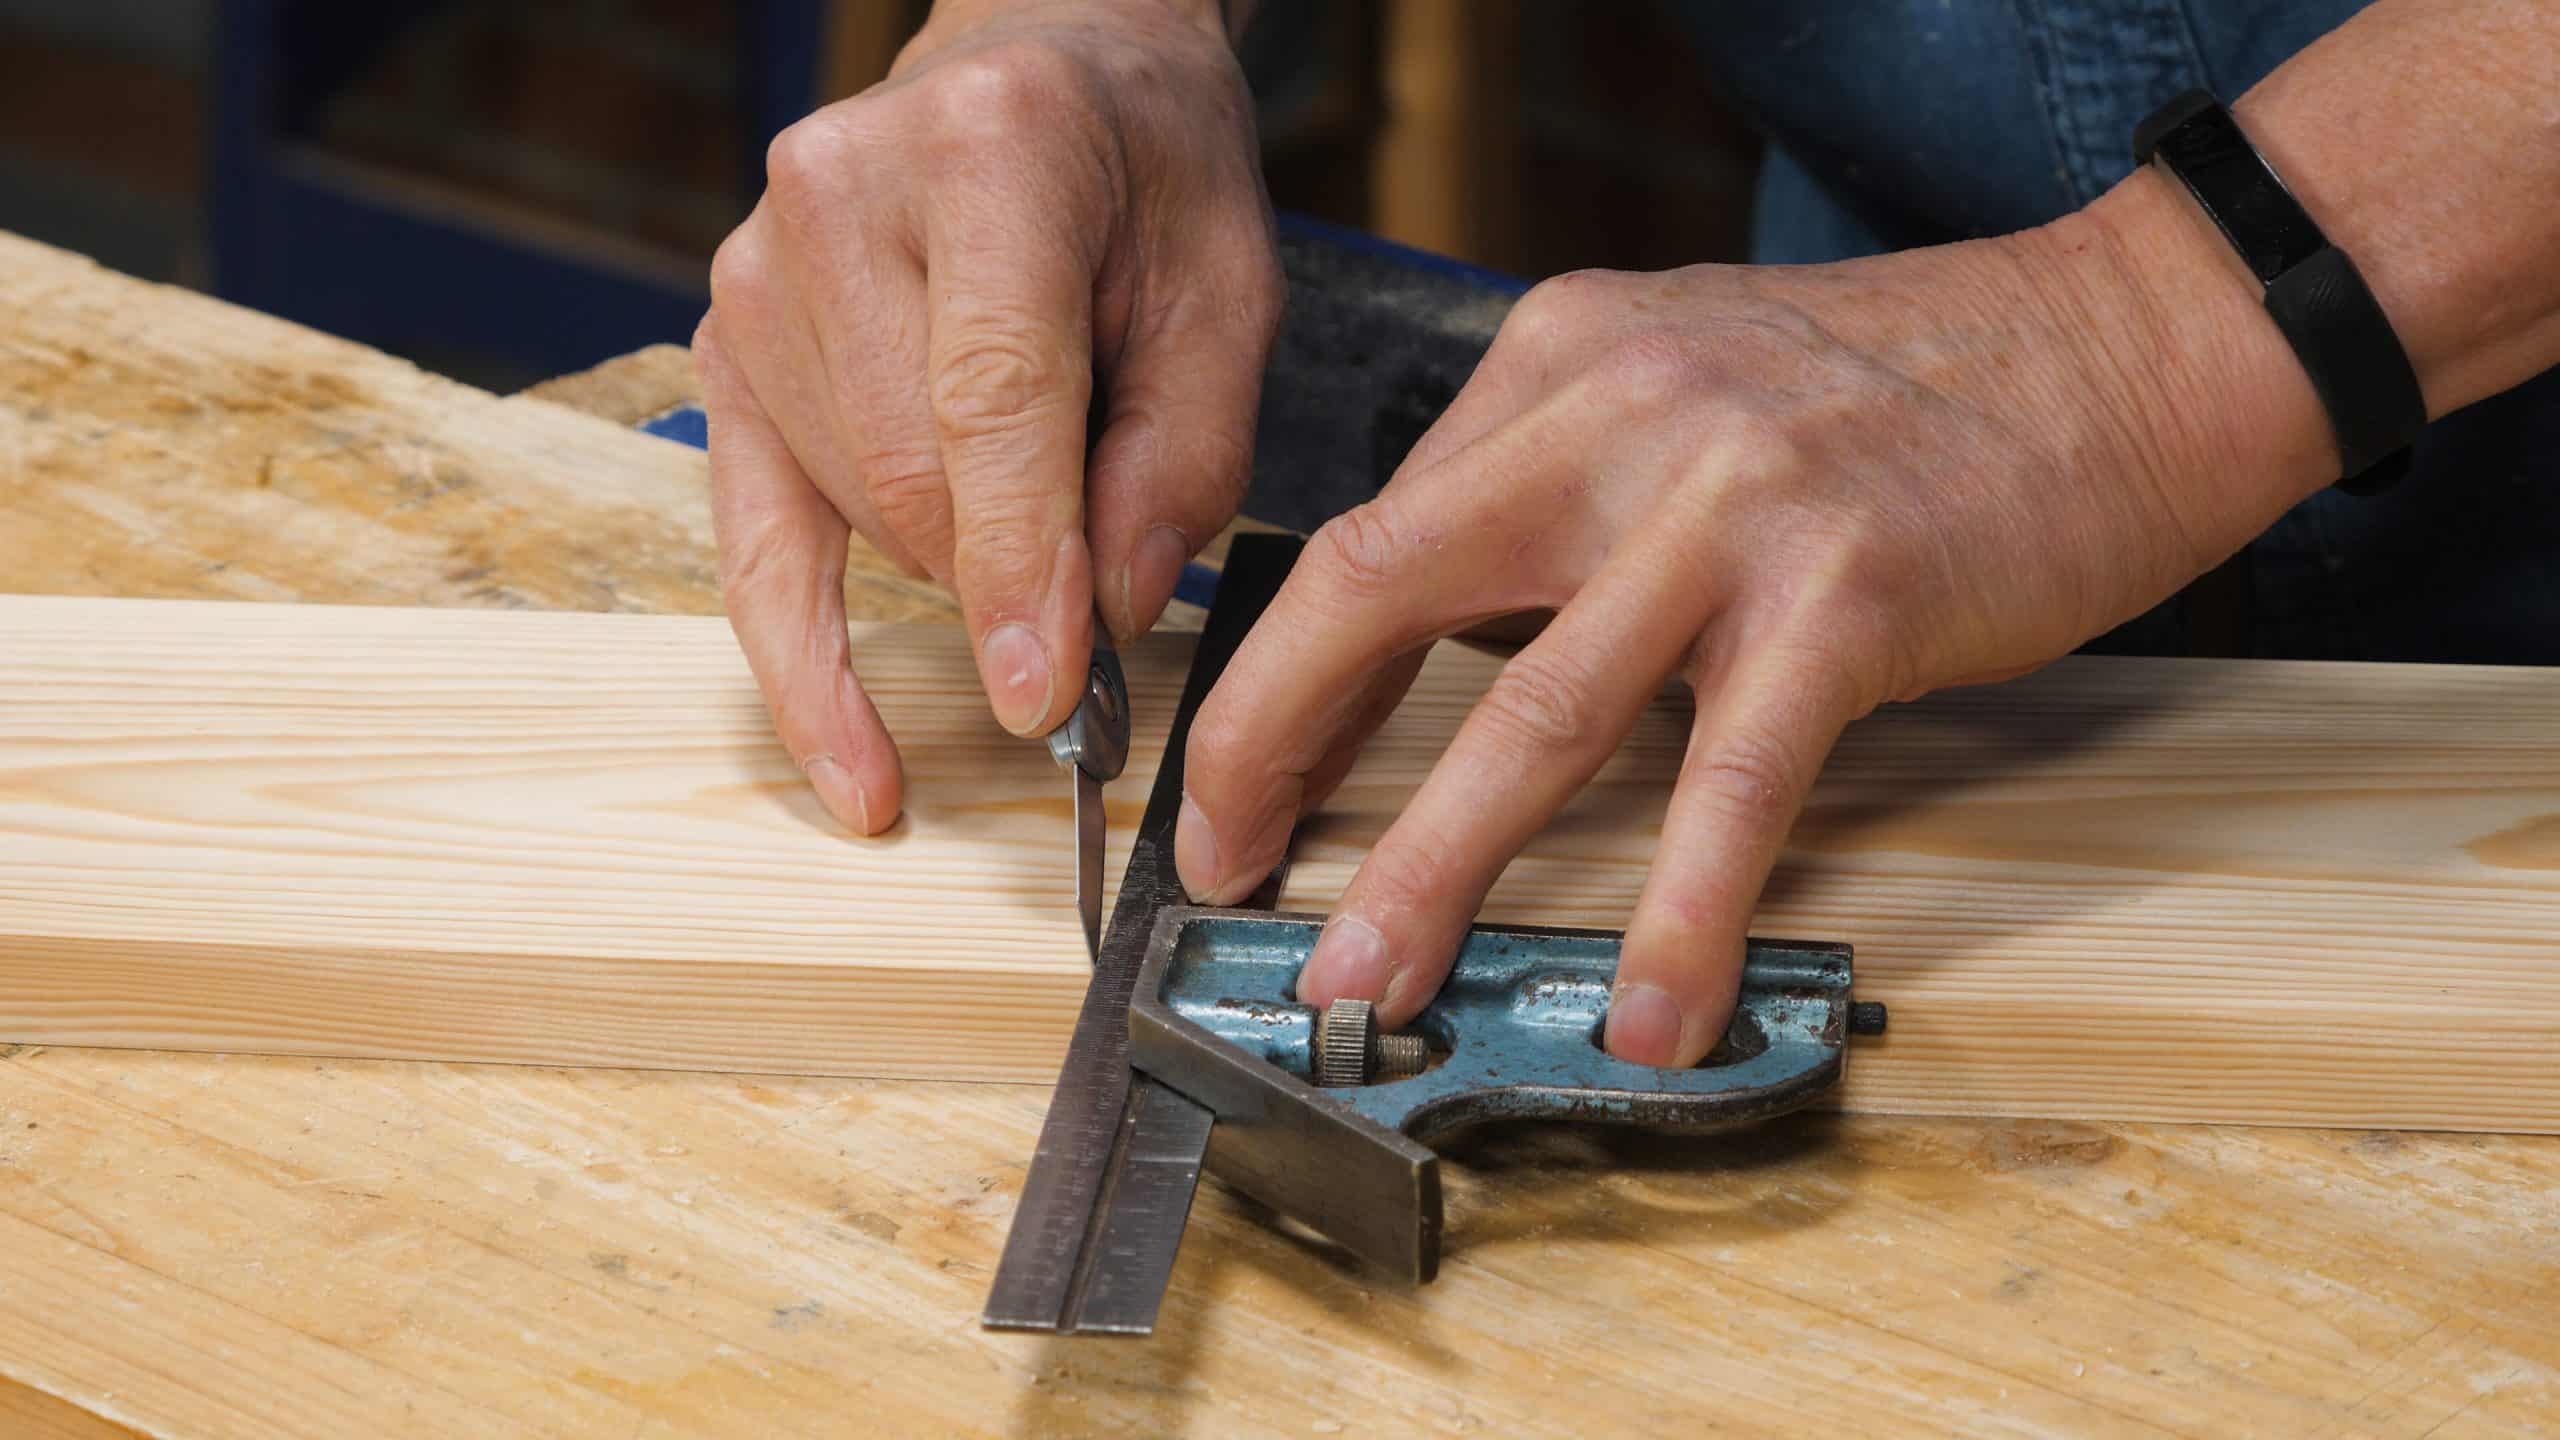
When you rub up against the knife wall, does the “set” from the tenon saw damage the pristine shoulder edge? Do you lean the saw over to compensate for the set?
After learning this technique several years ago, I use it constantly to make very precise cuts
No, The tenon saw does not damage the knife wall. The reason is simple, once you see it in action. After chisleing out that slight trench next to the knifewall, the teeth of the tenon saw actually start cutting just below the depth of the knifewall, never touching it.
The result is a nice clean wall, maybe 1/16″ deep which can be used as a reference for final planing.
– As a complement to this video, I strongly recommend Paul’s blog :
https://paulsellers.com/2017/12/whats-knifewall/
because it shows clearly the difference between the waste side and the keep side of the knifewall.
This was a “Aha” moment for me.
Thanks for that – the blog covers it really well
Thank you for posting the link, the pictures in that blog article are fantastic
– As my mother language is French, I was wandering how to translate “knifewall”.
It is not easy. As in fact the knife wall establishes the limit/reference of the chisel/saw cutting to come after paring/shooting where necessary, I would suggest to other French speakers: “butée de coupe”.
mur de couteau
Or simply adopt the English ‘knifewall’.
I learned this at school in 1961 when it was known as “veeing in the waste”. It’s nearly the same idea but “knifewall” is a much better expression. I have to say that “veeing in the waste” did bring home to me, in those very early days, which piece I was keeping and which piece I was cutting off.
One thing that Paul has definitely brought to this is the three-cut approach. I wasted a lot of time (and wood) pressing too hard on the first stroke.
When using the chisel, the knifewall is an essential first step to prevent the bevel pushing the chisel into what would be the knifewall, hence spoiling the finished part.
We used to call this “Scoring”, and a chiselled “Step-down”.
Thanks so much Paul. Perfect nomenclature for a perfect technique. Greatly appreciated.
When I saw Paul use this technique at the Somerset NJ woodworking show many years ago, it literally changed my woodworking path.
Thank you, Paul and crew, for all the great techniques. Keep them coming.
This a great technique, I learned it years ago from Paul. Sometimes I am tempted to skip the step using a pencil (or I get sloppy with my pencil) to outline my cut. But then I remember the old adage “measure twice cut once”
Thanks Paul for your teaching, leaning the bevel of the knive was a good tip for me. I was wandering you seem to have a different shooting board that you have on your to do video, is it and improvement of the old version and do you think to do a new video.
Thanks
Robert
Quebec Canada
I have been watching you for years using the knife wall. This in depth explanation was so enlightening. Thank you Paul
Paul, the shooting board you are using is not the one/type you showed us how to build. Is this new? Do you find it better than the old one? Is there a specific reason you changed it? I find the knife wall mandatory when I cross cut with a hand saw. Thanks for the refresher.
Hi,
Paul says:
I still prefer the original shooting board because I feel it has longevity built into it. The second one was one I put together for a video series and was showing people how to make a sort of poor man’s version quick and simple.
Kind Regards,
Izzy
Paul, I love watching your technique videos. Could you make one a day? Each is a great vitamin of knowledge to us all!
How deep do you make your knife wall? When you chisel out that first channel, you always seem to get such a nice chunk out, leaving a decent wall established to guide the saw. I assume that is a function of the depth of the knife wall and of course a good sharp chisel. Thanks for all that you do.
Dear Paul.
Thank you for teaching us. I am a beginning woodworker, so i have a lot to learn.
With kind regards
Dirk Ogier
This was great. The info on the double bevel of the knife is so helpful. Thank you, thank you, Paul.
One thing I would love to see is any tips or advice for keeping the saw square and plumb. I’ve been practicing, but my cut wanders. Is it just repeated practice or is there a trick or two?
#1 is starting with a sharp saw, so that the cut doesn’t follow the path of least resistance — the soft summerwood — rather than cutting through both soft and harder winterwood layers equally. #2 is to establish a square cut at the beginning, and then tip your saw, tip-up and hand-down, so that your new cuts that face you are triangulating against the first cut you made at the far back corner. I often use a chair to help making very acute cuts nearer to vertical — say 30 degrees or more. This way you can keep cutting along the line that’s easiest to see, knowing that the back point is always the same. #3 is to occasionally bring the cut down to nearer 90 degrees by applying pressure to that back point of the triangle, keeping the near point cutless. When doing this, I always check the back side, even though it rarelywanders off line. Continue in a see-saw rhythm like that, all the way though the board.
I recently ripped 10’ 2x4s into two 2x2s. I told the guy at the lumber yard, who expressed surprise that I was able to follow the line without wandering, using a hand saw, keeping my cuts square and true. Who needs a table saw?!
One more tip: keep your saw lubricated, using Paul’s oil-in-a-can technique.
Question for Paul…Regarding the knife wall for dovetail shoulders.
I cannot get my knife walls to meet up on the last corner, it could possibly be from me pushing too hard against the square with my knife?
I’ve tried scoring lightly on the first pass but I’m doing something wrong
I had this problem as well. My square… wasn’t. I’d check it to make sure it’s truly giving you 90 degrees.There are a bunch of Youtube videos on checking and adjusting combination squares.
Hi Nick,
Paul says:
This is a difficult one to answer because the wood needs to be perfectly parallel and I have no idea if your wood is indeed accurately milled, but this is usually the most common cause of knifewalls not meeting on that last corner.
Check your wood for parallel and straightness.
This guide will help you to check your square: https://commonwoodworking.com/setting-up-a-square/
and you may find this guide useful too: https://commonwoodworking.com/using-registration-faces/
Kind Regards,
Izzy
Hej Nick,
A link to a thread on this. My contribution was on base-squares (T-squares) as an alternative.
https://woodworkingmasterclasses.com/discussions/topic/difficulty-getting-a-square-line-around-a-board/
Don’t fight the saw. My old woodwork teacher (back in the 1960s) used to say that the saw does the cutting, you just push it backwards and forwards
Hi Dean,
Paul says it’s just a question of doing it over and over again.
Kind Regards,
Izzy
I say we petition dictionaries to add the word to the lexicon for eternity. https://www.merriam-webster.com/dictionary/knifewall
What kind of knife does paul use?
It’s a Stanley Folding Pocket Knife 0 10 598 which can be found here. https://www.amazon.co.uk/Stanley-Folding-Pocket-Knife-598/dp/B0001IWDBU/ref=sr_1_16?ie=UTF8&qid=1551459311&sr=8-16&keywords=pocket+stanley+knife
Wow they’ve gone up in price since I last purchased one a few years ago!
Do you have a link to the “non” Stanley blade that Paul recommended?
These knives have gone WAY up in price since Paul displayed and praised them. I bought my first one years ago for $2, the second one for $3 (lost the first one…). Now you’re looking at almost $10 and if you read the Amazon reviews, nearly all of them are saying they bought it because of Paul Sellers. I’ve been using these knives since long before I even knew who he was but never tried using it as a marking knife until I saw Paul do it.
The replacement blade cost has skyrocketed also… $5-$6 for a single blade. I bit the bullet and bought a 10 pack for $18 which will last me a life time and most likely my son’s as well (he’s only four right now but so excited about woodworking already) as you can resharpen rather easily.
They are fantastic little knives though and will last a long time if you take care of it.
Once this technique is learned (along with creating a square reference face) and appreciated for its accuracy it becomes ingrained in other activities where precision and accuracy meaningfully improve results. The razor sharp knife-edge is the closest thing to a singular point/line that can provide a visible divide between waste and want. Respecting its definitivity (a word I just made up:) ) ensures accuracy, improves quality and gives confidence in measurement.
Plus, it’s the only way to follow the same exact line around corners. If you try marking with a pencil, you’ll never wind up at the same line after trying to follow around all four corners. It requires a definitive, mechanical “tick,” instead of a visual pencil line, which is always a guess, no matter how accurate.
This is nothing new. I was taught exactly this method aged 13 at Swanmore Secondary Modern School in the UK in 1964.
The technique has been around for a very long time. Probably centuries, if not millennia. Paul decided to start calling it a knife wall. Some people seem to think that’s a big deal. What I would call a knife line, he calls a knife wall even before he has turned the line into a wall with the chisel.
My old woodwork teacher, Mr Good explained to me when you are using a marking knife that you are making a wall and that wall will help stop saw’s from slipping help guide your cut, also when you chisel when you finally get close to it the wall will fall down, this would have been about 1965/6, so from that time I always used to call it a wall, so yes the logical name would be a knife wall.
Knife wall has saved me many hours of trying to get clean cuts with hand tools. I first learnt it building the workbench from the YouTube series and have used it everyday to great effect to complete tasks accurately and cleanly. Even builders should use knife wall.
Thanks Paul.
Nathan
Mr. Sellers you are a genius sir. I’m humbled by your depth of wisdom and knowledge of woodworking. I own two of your books and plan to purchase anything of yours I can get my hands on. Thank you very much for sharing that knowledge with all of us.
Joe Garrett
When you pop the chisel, do you ever go too deeply and dig into the knifewall? I could see me doing that and then throwing the wood into the fire.
I’m not sure what you mean by “pop the chisel”? If you’re talking about the first chiseling up to the knife wall, I don’t “pop it”, I just gingerly work it from about 1/8″ from the knife-wall to the knife-wall. You can feel it when you cross the knife cut and arrive at the wall on the other side. No firewood necessary. Grab some scrap and practice. It won’t take long to get the feel of it.
Hi Jeff,
Paul says:
I can see this being a possibility but the more you do it the more confident you become.
Kind Regards,
Izzy
I was unfamiliar with using a knife/knife wall for layout and so on, yet again Mr Sellers has lifted my work to new levels of accuracy and quality. I thank him
Cheers
Jcat
Thanks Paul. Employing this technique has completely changed the results I am getting in my woodworking. It is probably the single best piece of guidance I’ve ever received.
Like others here, I’m curious about the different looking shooting board, compared to the original one you showed us how to build in a video.
It’s always a joy to watch and listen to Paul. Having been enlightened to this technique by Paul a few years ago, I made myself two separate marking knives (out of a spent crosscut saw blade) one with a left hand bevel and one with a right…
yes I could have made do with a double beveled edge, but I don’t need much excuse to start a woodwork/woodshop related project. Thanks Paul.
I purchased an inexpensive single-bevel Japanese knife for making knifewalls. One can hold it perfectly vertical when using the straight side against the guide. They do come in left and right bevels. Of course a fellow can grind his own single bevel blade as well.
When cutting a long board down to multiple shorter lengths for a project with a crosscut saw, I have a hard time not splintering both ends badly. Do you reccomend using a knife wall when cutting a long board into multiple lengths as well? Should a knife wall be used with crosscut panel saw as well?
Yes, definitely. Look at the first episode of the tool drawer organizer and look for the question by John Sherman in the comments area for that video as well as the answers.
Make two knifewall all around the board and saw between them.
Space them a little more than the kerf width.
I first used a knife for marking purposes when I was a teenager working with my step-father in his cabinet-makers shop.
The ONLY time i used a knife to mark the work was when I was cutting plywood and wanted to avoid tear-out. For that purpose, the knife mark worked very well.
Only after watching this channel in the past few years have I learned the many benefits of using the knife as a marking tool. Now, I use this technique in my shop every day and it has improved my work.
I’m still learning at 70 year of age.
Thanks!
Czemu tutaj pokazuje sie wegierskie forum?
Why is the Hungarian forum shown here?
How do you make a knifewall on a big wide board? I’m using a slab for the workbench and the combo gauge will not reach the width of the board.
Scribe the first several inches with the combination square. Then take a straight edge (can be metal or wood, or even another board that is known to be straight) and reference it off the scribed knife wall, and extend the knife wall across the board.
Hi Jeff,
Paul says:
You can clamp a straight edge, either wood or metal onto wide boards.
Kind Regards,
Izzy
ha, I was cutting a piece of plywood with my grandson and explained to him why i was using a knife first to stop tear out. I took the time to show him both ways . I’m not sure it sunk in but i’m glad you showed me as i use it always now. Thanks again !