Can an aluminium shooting board guide rail abrade the edge of a shooting plane?
Welcome! / Forums / General Woodworking Discussions / Tools and Tool Maintenance/Restoration / Can an aluminium shooting board guide rail abrade the edge of a shooting plane?
- This topic has 15 replies, 4 voices, and was last updated 2 years, 9 months ago by
 Sven-Olof Jansson.
-
AuthorPosts
-
 1 October 2021 at 10:39 pm #730962
Being quite reliant on my shooting planes, I am bit concerned about the below, and would really welcome views.
There’s a lip along the upper edge of the sole on one of my shooting planes. Most prominent at the front of the sole, the lip rides snugly on top the shooting board’s guide rail.
[attachment file=”730963″]
The edge of the sole looks in cross section a bit like a U-beam turned 90 degrees. It’s the upper limb, which is a bit sharp, that rests on top of the guide rail; while the lower limb is rounded over, which also in accordance with the profile of the guide rail.
[attachment file=”730964″]
The guide rail is non-magnetic, and I assume it’s out of aluminium or some alloy thereof.
[attachment file=”730965″]
There’s a 0.3 mm play between the sole and the guide.
When shooting, I press the work piece against the fence and then push it up against the vertical face of the plane, in front of the plane. I have a tendency to take off more of the piece close to the fence, particularly for wide edges.
Should I be bothered by this, grind the edge flush, put some spacer beneath the guide rail so that its edge is above the plane’s, or perhaps make a new shooting board with a non metallic guide?
Many thanks
Attachments:
You must be logged in to view attached files.2 October 2021 at 4:49 am #730995You might consider replacing your aluminum fence with either one of the slippery tropical hardwoods, boxwood, or with one of the slick plastics like UHMW oR HDPE polyethylene, or for a harder fence , acetal (Delrin) I’ve used all three and found acetal was the most durable and stable , but none of them will harm your plane. Acetal is often used as bearing surfaces in harsh environments.. You could probably adjust to zero clearance. A little dry lube, paste wax, or light oil and it’s as slippery as ice.
Be careful if you use hardwoods. Some like cocobolo contain abrasive silica.All three plastics can be shaped with woodworking tools although acetal usually requires carbide edged tools to get right. It dulls O1 rather quickly and requires super sharp edges. . Some plastics suppliers like TAP plastics will do simple cutting for you. Acetal commonly comes in black or white. The black will match your bed better. Just don’t use flathead fasteners. The cone shape can split acetal.
You aren’t the first who has come across the fit issue on veritas chute planes.
YouTube guru Matt Eastly did a video on making a ramped shooting board using what looks like HDPE for the bed and fence for the plane chute.Watch to the end for his solution and you will smile at the do-it- yourself tutorial involving trueing his veritas shooting plane edge in a milling machine.
-
This reply was modified 2 years, 9 months ago by
Larry Geib.
Attachments:
You must be logged in to view attached files.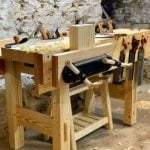 2 October 2021 at 7:40 pm #731083
Sven, my Veritas board came with a plastic strip (UHMW whatever) attached to the inside of the guide rail. It’s the same material lining the bottom of the track (not great durability, in my opinion, but it’s slick enough and keeps things moving). Tough to tell from your photo, but looks like yours might be bare metal? Might be worth asking Veritas about in either case. That abrasion is something they would have caught in development and/or will want to address in the future. No one tops them in quality control.
Attachments:
You must be logged in to view attached files.
2 October 2021 at 8:25 pm #731088Many thanks Larry! You are the polymath of WWMC.
Happily, I found provider of cut to measure acetal. Once past the weekend, I’ll contact them. Their home page informs on a bit of delivery times; hence I wonder if the below suggestion can be something as a temporary solution.
To assure square to the surface cut, I made the below guide. Basically a strip of beech with quite strong magnets running in a groove, and a strip of brass along the bottom, it holds chisel backs very firmly. The brass has not harmed the chisel edges, but, please may ask:
Is there a risk that it would abrade the edge of the shooting plane?
[attachment file=”731089″]
There is some space available along the width of the shooting plane guide, allowing for adhering a brass strip to the rail, and still be able to run the plane. The strip is a meagre 1/32″ taller than the edge of the plane, as to why hope the brass will not abrade the plane edge.
[attachment file=”731090″]
If you can put up with a final question:
Would epoxy glue and using two wedged pieces of wood to give pressure, be good enough to hold the strip?
[attachment file=”731091″]
Is it very impertinent to ask why Mr. Eastly needs a shooting board, given his access to machines; or could it be that the Bosch cross cut and mitre saw isn’t sufficiently accurate?
Attachments:
You must be logged in to view attached files.
2 October 2021 at 8:46 pm #731095Hej Matt,
There were UHMW tapes provided along with the plane guide and fence that I bought; but as far as I remember, the instruction guide had it that the tape were to go on the bottom of the guide, not the moveable rail. Anyway, after having succeeded in getting the guide, to say nothing of the fence, in place, I of course failed with the UHMW tape. So the plane edge runs against the bare metal of the rail.
Actually, I don’t find friction to be too bothering when shooting. “The oiled rag in a can/tin” works OK, but obviously not to prevent abrasion.
Doesn’t it seem reasonable to assume that Veritas are aware of how Mr. Eastly resolved the very same issue? (Please see the video Mr Larry Geib provided here).
2 October 2021 at 10:44 pm #731116I think ME actually stumps for Veritas or at least has some kind of connection with them, so who knows – maybe you’ll see a “Shooting Plane Mk II” hit the market soon. For my own part, I just chuck my No. 8 from the ‘20s in my shooting board like a heathen.
Funny you mention that about ME’s miter saw. In fact, I have personal experience with that fancy Bosch model and can tell you it does have accuracy issues (it’s due to the otherwise clever glide mechanism that expands the crosscut capacity without taking up a ton of room behind the saw as is the case with a traditional sliding miter saw). A great idea in theory, but in practice it loses the angle at the far reaches of its capacity. For what it’s worth, I now use a more traditional DeWalt that is preposterously huge, but cuts like it’s laser-guided. Still, to your broader question of “why” I can also tell you nothing gives me a better miter joint than one trimmed in a shooting board.
Before making any modifications, may I suggest that you contact Lee Valley, show them the photos, and ask for suggestions? Their support is excellent. There is a chance that they know of this and have something in hand that will remedy the problem. I have to add, just to be cantankerous, LV has been making poor tool choices in recent years, but they still have good support.
3 October 2021 at 5:58 pm #731215Thanks Ed!
Done so. Even if Lee Valley don’t have a remedy, it is perhaps a good thing to inform them on the issue.
12 October 2021 at 9:30 pm #732348Larry,
A really good friend found me two pieces of acetal plastic. I’ll use the shorter one for a new shooting board. It is 20 mm thick, which I can live with, but it would be welcome to have 2″ off.
If I were to run it through the thicknesser, would that spell the end of its blades? There is a minute snipe and some of those cutter marks on and off called chatter.
Attachments:
You must be logged in to view attached files.13 October 2021 at 2:05 am #732372Sven. I’m no machinist or expert in working plastic , but The short answer is if your blades are carbide or HSS it shouldn’t be an issue for the small amount you are doing.
acetal isn’t particularly abrasive, so it won’t do any more damage to your planer knives than a stout hardwood, and will do less damage than those woods with a high silica content. It will do way less damage than something like plywood or MDF. Treat acetal like you were working African Blackwood or ebony. The same guidelines apply. Sharp tools, light cuts.In production situations carbide tooling is often used to extend cutter life, but a sharp HSS blade will cut through Acetal like butter. All bets are off if the acetal you have is impregnated with glass fibers ( most isn’t) . Then expect some dulling.
The real issues with acetal are that the blades you use should be really sharp to begin with. Dull blades and heavy cuts will heat up the plastic and that causes it to swell and deflect, making accurate cutting impossible. But if you take light cuts and if your planer has a slow feed rate, select that. Acetal is a thermoplastic, so heating it up will get your cutters gummy. Also, dull blades will sound terrible as they whack at the plastic.
Don’t worry,to much about planer marks. Acetal sands and deburrs nicely, unlike most plastics.
If you are trying to get it thin, either hot glue it or use double faced tape to hold it down to a substrate. That deflection thing again.
Make sure you use a good extractor. The shavings will float around in the air and stick to everything with static electricity. Also, there will be some formaldehyde given off. Cut in a well ventilated area.
Commercial machining uses air or cutting fluid to keep the plastic cool, but go slow and you probably won’t have an issue.And if you are going to tap threads in it, use a size slightly over the recommended steel sizes. I find wire sizes are often ‘tweener sizes to normal tap drills. Delrin doesn’t like being forced in tension. Taps often have negative or neutral cutting edges, and acetal likes a nice positive rake.
Hope that helps.
Have you considered using JB Kwik weld to patch and fill the wear on the plane sole? One option is to fill, then work it back to the proper size, probably with a file and abrasives. Another option is to place your trust in a mold release of some kind, apply the JB Kwik, and place the plane into the chute so that you cast an exact fit. That could go horribly wrong, obviously, but a continuous layer of wide tape or creased paper might do the trick? Another alternative is Bondo. We used to patch fixtures in the shop all the time with Bondo. Usually, we would overfill the defect, wait for partial hardening, trim with a cutting implement while still soft but very well along setting. The goal is to take as much off as possible but still be too large, let it really set, and have a minimum left to sand to the exact shape and size.
13 October 2021 at 8:01 pm #732464Ever so many thanks Larry!
Your reply helped a lot. I ran the piece through the thicknesser, after first resawing it on a table saw. Both worked very well; only the very needed extractor got its hose clogged up by the chips – well, they were more like shavings rolled together into narrow straws. Nothing to it but to do without the extractor. Thankfully, this activity didn’t take place in the workshop, but in what was once a cowshed, at a beneficial temperature of just above freezing.
Working with the acetal plastic has been quite pleasant, while at the same time really intimidating. You mentioned ebony; my thoughts have been on bog oak. There’s no texture, it is homogenously black, and it will be very difficult to get a new piece, should failure be the outcome. Even cutting off a test piece felt a bit.
I used a 5 mm brad point and a 6 mm thread. The flat head screw went down as if through a metal thread, but there never was a really distinct stop to turning. Supposedly, that means that I should use longest screws possible, several of them, and stick to the flat heads?
Attachments:
You must be logged in to view attached files.
13 October 2021 at 8:30 pm #732467Many thanks Ed!
The way this issue with the edge of the plane’s sole is going, your kind suggestion may very well be what I will try. Should it go to pot, there is a backup plan[e].
Lee-Valley replied somewhat formal, by sending a copy of the manual on how to assemble the track and the rail; a bit like presenting the layout for an umbrella to someone soaked by an unexpected rain shower, perhaps?
A number of mechanical shops have not been able to assist. At one, which I visited, they were very questioning because of having being burgled yesterday. Tomorrow, I hope for luck with a company that is a components provider to the airplane industry. Perhaps they will take pity, and mill that edge parallel with the vertical face?
Attachments:
You must be logged in to view attached files.15 October 2021 at 11:31 am #732665[postquote quote=732464]
When I mentioned an extractor I was thinking 4” or larger pipe, but the shavings can still wrap around the impeller in a single stage unit. The shed was a good idea.
Here is a screw head guide I picked at random.
https://www.fastenersuperstore.com/fastener-guides/screws-head-stylesFlat head in the USA means a screw that presents a flat surface that you see and is countersunk, usually at a 82° cone.
I don’t recommend those screws in any plastic with the possible exception of hard nylon or UHMW which will give. Most plastics can develop stress cracks when presented with a wedge.Any of the fasteners that present a flat surface to the plastic will work, including button head, pan head, cheese head, truss head, etc. you can sink them into the work with a larger hole if they protrude too much.
You might jump up a size in Metric threads. I’m clueless what the options are in Europe. All I see here is 1mm pitch with 6 mm screws. Look into whatever metric pitch is used in cast iron. Here that’s usually 1/4-20, closer to 1.25 mm pitch. You have to jump to 8 mm screws to find that pitch here in metric.
At least use the longest threads that fit and make sure your tap doesn’t bottom out. If you can, drill deep enough that the full length of your screws have fully formed threads. Otherwise you risk stripping them. Consider a nut on the back side, or the sex bolt/Chicago screw/ barrel bolt option.While it may have felt like aluminum and was originally developed as a easy machiring alternative to aluminum and Zamac (Zinc aluminum, magnesium and copper alloy ), it doesn’t have the shear strength or tensile strength of those metals. The listed shear strength for Delrin is 11K psi and aluminum is 27K psi. zamac is in the 41K range, depending on exact alloy.
Tensile strength is similar. Delrin is around 14K psi and aluminum 31K psi. At 14k psi, it can be compared to Oregon ash or American black Cherry. Most other acetals spec lower, because most are copolymers. It’s like the difference between a single malt and a blended whiskey. 😉
So you might consider going up a size in thread size and/or thread pitch.
If you are just trying to keep the sole of your shooting board down, consider VHB double faced tape instead of screws. 3M makes it.
I guess I lucky here when it comes to finding acetal The largest employer in Oregon is Intel, which has a huge chip plant. They and their subcontractors use literally tons of the stuff for jigs and fixtures. It just takes a few minutes of dumpster diving to get strips for things like shoot boards. They are usually glad to lower their landfill costs.
-
This reply was modified 2 years, 9 months ago by
15 October 2021 at 8:16 pm #732740Thanks again Larry,
Sorry about the confusion on screw heads. What I meant, and hope the photo shows, is a head with a flat wide bottom: a button or a truss head perhaps, locally also marketed as furniture screws.
[attachment file=”732741″]
I will go for a new shooting board with acetal plastic sole and side rail. I can easily get the tape you mentioned (thanks for the suggestion) and will use it. The side rail is to be adjustable, and hopefully 6 screws will hold it secured. I’m afraid I’m stuck with the m6 x1, but I have those at sufficient length to screw them into both the acetal sole and the underlying form plywood.
Attachments:
You must be logged in to view attached files. -
This reply was modified 2 years, 9 months ago by
-
AuthorPosts
- You must be logged in to reply to this topic.