Cutting a circular depression – how to?
Welcome! / Forums / General Woodworking Discussions / Woodworking Methods and Techniques / Cutting a circular depression – how to?
- This topic has 13 replies, 8 voices, and was last updated 4 years, 11 months ago by
Ed.
-
AuthorPosts
-
Hi,
I want to cut a circle in a piece of oak that is 18mm thick, as shown in the attached picture. the larger circle is 96mm in diameter and 5mm deep. The smaller 40mm and a further 5mm deep.
As the edges will be visible, I need them to be clean and crisp. To remove the waste I would probably use a router plane.The smaller circle might be possible with a forstner bit.
Can anyone suggest a tool / method of doing this other than using a CNC?Thanks.
Keith
Attachments:
You must be logged in to view attached files.
Hello Keith,
maybe a circular cutter could be an approach: https://www.fine-tools.com/kreisschneider.html
Hope that helps,
E.
 19 August 2019 at 10:04 pm #600902
Hi Keith,
Done this using a power router, a circle guide, and a suitable guide bushing and router bit. I’ve had two problems with this method.
1. Finding a suitable circle guide. UJK offers a plastic board with pre-cut holes, but not beyond 85 mm in diameter. So I have used holesaws, as Ecky suggested, to cut out the guides from.
2. Some guide bushing dimensions (the more useful ones) are not available in metrics, but that can be overcome by cutting your own guidesOne should be able to get to what you want by using:
a) holesaw set to 114 mm to cut the wider circle guide, a 24 mm guide bushing, a 6 mm cutting router bit to create the 96 mm wide hole
b) holesaw of 58 mm for the other circle guide, and same guide bushing and bit, to create the 40 mm hole
c) The circle guides need to be of same length and width, with the corners cut off from the one with the 58 mm hole
d) Centre the 58 mm piece on top of the 114 mm, and secure it with screws
e) Put the two on top of the workpiece, and clamp the free corners of the 114 mm to the workpiece
f) Rout the smaller hole in two goes of 5 mm each.
g) Unscrew the upper circle guide, which should leave the wider centred, and route the 5 mm depth.The routing will produce loads of dust that will be blocked by the guides. Having an excavator attached to the router or a very frequently used vacuum cleaner, is more or less necessary.
Attached is a too didactic .pdf made for someone with no insight into woodworking.
https://www.axminster.co.uk/armeg-adjustable-hole-cutter-40-to-200mm-952812
An alternative method could perhaps be to laminate three pieces together: one being the bottom, the next the 40 mm hole one, and on top the 96 mm. The holes could probably be cut with a coping or fret saw.?
[attachment file=”600903″]
-
This reply was modified 4 years, 11 months ago by
 Sven-Olof Jansson.
-
This reply was modified 4 years, 11 months ago by Sven-Olof Jansson. Reason: Addition
Attachments:
You must be logged in to view attached files.20 August 2019 at 1:09 am #600948They could also be chiseled out with an appropriately curved gouge and a steady hand and a bit of patience.
Hi Ecky,
Thanks. I have seen that. What put me off was the hole in the middle caused by the drill which I had not planned on having.
Dictum have a hand version https://www.dictum.com/en/cylindrical-tapered-cutters-bakk/hole-cutter-with-knob-handle-small-716163
which might also do the job.
RegardsKeith
Darmstadt, Germany
Thanks for the ideas.
I think I am going to have a go at the CNC router first as I have free access to one.
The Dictum solution mentioned above will be the second choice.
Doing it all by hand as deanbecker suggests will probably require more patience and practice than I currectly have available.Regards
Keith
20 August 2019 at 5:43 pm #601129One more, Keith.
There are Forster bits available relatively inexpensively for both sizes. I see a carbide bladed 95mm with a 12 mm shank for $17.23 – ( three day free shipping from Hong Kong in the USA ) with a small center point and there are plenty in the smaller sizes.
Drill the large hole, then grind the center point off the smaller bit and drill that hole.i have had good success in a drill press ( pillar drill) with a pointless Forster. I used a pointless Forster to excavate most of strike plate depressions and such in commercial situations. I’ve even done that hole with a bit brace using a hole in some 1/4” ply with the hole predrilled as a guide. That largest hole I’ve done in a bit brace is around 2 1/4” for lock holes , but larger should be possible by hand. Use a sharp Forster with a point, not a screw snail and press lightly.
A true Forster bit doesn’t really require a center point when used in a drill press. The outside rim will guide it. I keep a 1” one around to create rectangular depressions with overlapping holes on occasion. It’s a quick way to clear most of the waste for a sharpening stone holder, for instance.
Finish with some minor cleanup of the bottom of the holes with a hand router.
[attachment file=”601130″]
Attachments:
You must be logged in to view attached files.21 August 2019 at 2:58 am #601282One question that may affect the way to approach this is whether or not you will need to do this again.
If the illustration showed one of many holes, or if the project is one that others may ask you to make for them, then I would suggest to use a couple of templates. That will at least keep the layout and marking consistent, regardless of which method you end up using.Personally, I would look at the equipment around me and choose the least complicated route (which for me would be two square pieces of 6mm plywood, with circles cut exactly in their centres, but slightly oversize to allow me to use a router, straight bit and guide bushes).
I must admit that I did not know that forstner bits went as far as 95 mm.
It might just work.
hat I am trying to make is shown below. If the prototype works, I will probably make a few more in different
woods and finishes. Apologies for the green plastic bottle. I could not find anything better in Sketchup.Attachments:
You must be logged in to view attached files.Larry,
I realised that I already had some similiar as yet unused Forstner bits but only up to a diameter of 40mm, so I took them for a test drive.
The results are sobering.
On the first picture you can see the results of drilling without a drill press.
The holes marked 7 and 6 were my first attempts with a 40mm bit. I put a lot of weight behind them but was unable to control this at slow speeds.
Holes 1 and 2 were made using the 20mm bit. the quality is still pretty gruesome.
Holes 3, 4 and 5 were made with a 20mm Fisch “Wave Cutter” Forstner bit. On 4 I slipped slightly but the other two look pretty good.
So I will not be ordering the 95mm version as I do not expect any decent results even with a drill press.
The quality of the bits themselves is also very questionable. The shafts not only vary in diameter by almost 0,75 mm, but they appear to be made of a very soft metal. If you look at the other pictures you can see how damaged the shafts are after only a couple of holes. The final picture shows an unused bit from the same series for comparison.
RegardsKeith
Attachments:
You must be logged in to view attached files.This is pretty much standard stuff with electric routers and templates along the lines sven-olof suggests. But in days gone bye, I have also made things like this with an inexpensive hardware store circle cutter in a drill press. You cut the circle as deep as you want and then use chisels and a hand router to make a nice smooth bottom. If you want to go totally the hand tool route, there are very similar adjustable circle cutters that are used in braces. They are sold on ebay. I have a small one that I got somewhere and have not done much with yet. I do not know how large a circle a larger one can produce but it might be worth looking on ebay to see if there is somethiing that can make your sized circle.
26 August 2019 at 7:57 am #602802This one will cut 5” circles. Larger, if you use a longer hex drill rod for the cross piece.
If you use one cutter and offset the crosspiece, you could get close to 10”
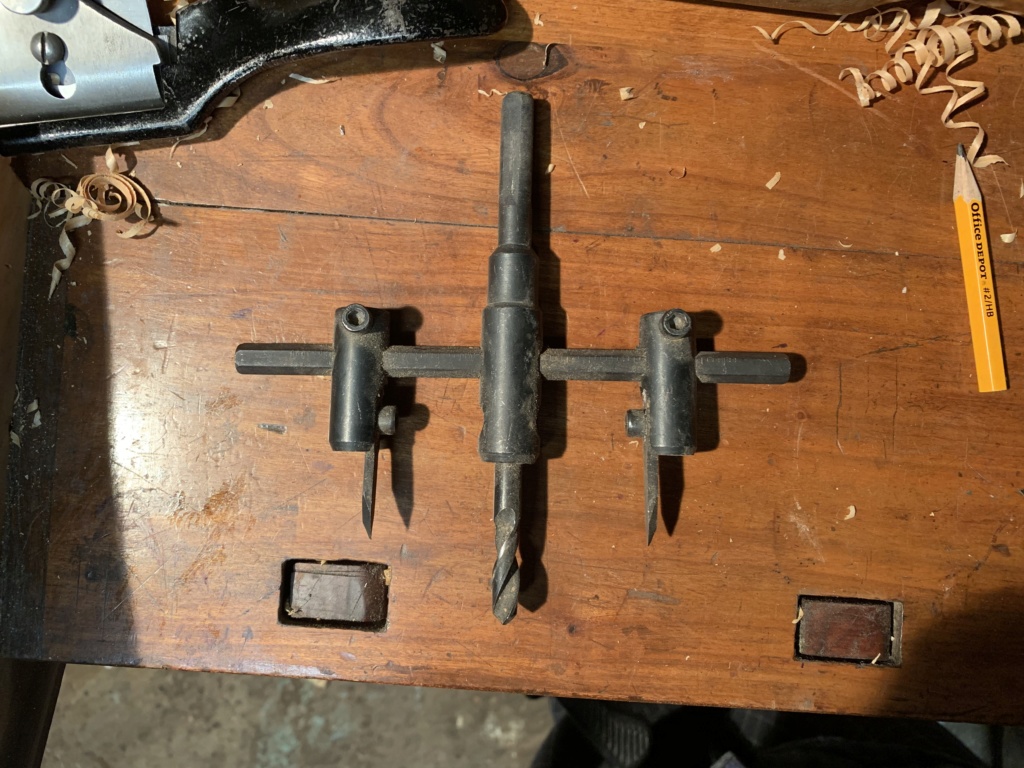
It’s a scary beast even in a drill press rotating at a few hundred rpm. I’d never recommend it to somebody who hasn’t been trained to the hazards of it. Wear a flak suit.
And I think I have an even larger one somewhere. Used it once. I’d never use it again sober.
26 August 2019 at 6:37 pm #602942Larry,
I realised that I already had some similiar as yet unused Forstner bits but only up to a diameter of 40mm, so I took them for a test drive.
The results are sobering.Yeah, which type of Forstner bit you use matters if you try to use them by hand or with an electric hand drill.
They are really intended to be used in a stationary machine.A drill of the Forstner style that worked really well was called a Stanley Powerbore®. They are alas no longer made. And I don’t think they ever came as large as 95mm. I only have a couple left.
It has a long center point, so for bottomed holes you really need two, one with the point ground down to finish the hole. Or use a block of wood with a predrilled hole in it clamped to the work as a guide and a ground off tip. The power bore really needed the long spur tip because it only had one cutter and would run off to the side otherwise.
There is a two cutter version that chair makers use with a brace that is purported to work well made by Stern in Austria
I don’t know where to get them in the Eu, but it is made there. They have a shorter guide point.In the USA you can get them from Diefenbacher tools it is aggressive enough to use by hand.
https://www.diefenbacher.com/Drills.htmNote that both bit styles are more aggressive than Forstner bits made to be used in a drill press.
There is a discussion on how to use them with an extension here:
http://www.greenwoodworking.com/UniversalBitForChairMakingThey only are offered at Diefenbacher to to 1”, which is why I didn’t mention them before.
And chair makers use them with a long extension with a level bubble hung on it to get a steadier bore.as I think of it, I always used a Powerbore in the field with an extension even with an electric drill.
-
This reply was modified 4 years, 11 months ago by
Larry Geib.
Attachments:
You must be logged in to view attached files.Option 1. faceplate on a lathe.
Option 2. Change the design to be a lamination involving layers with holes worked all the way through.
Option 3. Let the damage occur from the center guide of a boring tool, then bore that with, say, 1/4″, and use inlay to cover it. -
This reply was modified 4 years, 11 months ago by
-
AuthorPosts
- You must be logged in to reply to this topic.