Pictures of your progress building the Wall Clock
Welcome! / Forums / Project Series / Wallclock / Pictures of your progress building the Wall Clock
- This topic has 217 replies, 52 voices, and was last updated 9 years ago by
dborn.
-
AuthorPosts
-
For public entertainment I thought we could post pictures of our progress as we build the Wall Clock project.
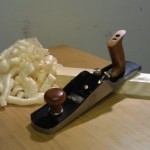
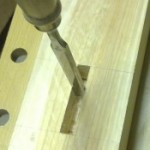
My first pictures is from todays adventure: cutting a housing dadoe.
This is just practice for the real thing coming up later.
Lessons learned so far: keep the chisels as sharp as possible, take small bites with the router plane and aim for the sky when pairing out the middle section. My dadoe got a bit deeper than originally intented before it was all flat.So for your amusement, here are some pics!
Attachments:
You must be logged in to view attached files. 14 November 2012 at 10:29 pm #3208
Well at least you got a start on it mate. I haven’t been to get the timber yet 🙁
Anonymous14 November 2012 at 10:31 pm #3209Thanks Jesper, dado looks neat and tidy buddy, and thanks for the tips.
Nice job 😉
Michael, it should be no problem with a chisel. Just take thin shavings and check the depth at the “end” of the dado very often. The surface finish is not important as long as the mating piece has a good reference area and extends square when seated in the dado.
Good luck, and if in doubt, practice your method on some scrap 🙂
@Alvaro: I was also intrigued by that solution. Do you know if there is more detailed information about how to make one?
How is the chisel secured in the wooden body?
* Using a wedge in a rectangular hole. This seems a bit difficult to make…
* Drill a round hole slightly smaller than the chisel and drive it in using a mallet. I imagine that this will make the chisel come loose after some usage.Any thoughts?
@Jasper: I did it like you described, using hole slightly smaller than chisel. It holds surprisingly well (I guess because you drive chisel under some angle) and I actually used it very aggressively.
I think it is very well explained on Paul blog, just search for poor man router
@Sinisa: Thanks for the tip. I found the post on Paul’s blog. If anyone else is interested you can find it here:
Paul’s poor man’s routerIf you intend to use it for the Wall Clock housing dadoes you don’t need to make it as big as the one shown in the blog…
Anonymous16 November 2012 at 5:52 pm #3321Another option to using a chisel blade or blade made from an allen key/wrench in wooden router bases is if you use a plough plane blade instead.
Okey so I went shopping for the boards for the Wall Clock project today. I new in advance that the raised panel wasn’t going to be found at the low price wood dealer I went to. The widest board they sell is 118mm (about 4″ 5/8). So I have an alternate plan to find that piece.
Anyways, I found two board with a beautiful curl/ripple pattern on one side. So I picked those hoping they will make a nice clock (or two).
The show face is knot free and I hope to only finish plane it to keep the nice pattern. I’ll spend some time playing with different schemes to get the best look and grain continuity around the different pieces.
So have you guys gotten started and picked out some wood for your clock? 🙂
Attachments:
You must be logged in to view attached files.Anonymous16 November 2012 at 7:54 pm #3327You can always edge joint narrow boards if you’re having difficulty sourcing wider stock, or even rip thicker stock and produce book matched boards for such face work. 😉
-
AuthorPosts
- You must be logged in to reply to this topic.