Preparing and sharpening a woodworking chisel – with Paul Sellers
Welcome! / Forums / General Woodworking Discussions / Woodworking Videos / Preparing and sharpening a woodworking chisel – with Paul Sellers
Tagged: Aldi chisels
- This topic has 30 replies, 14 voices, and was last updated 9 years, 1 month ago by
 anthony taylor.
-
AuthorPosts
-
 19 October 2013 at 9:15 am #20164
Thanks for that Ken I would have missed it I was telling a friend about them I will now send him the link

These seem to be a fantastic bit of kit regardless of the price. I have spent a very happy afternoon flattening and polishing the backs of my new set of chisels whilst helping my son to build a Viking Longship for his History homework. One of the four chisels had a belly to it rather than a concave surface but I was still able to flatten all four chisels this afternoon and polish then to a mirror finish. I’m going to work on the handles tomorrow before giving them a final sharpen and putting them to work.
Paul, I’d just like to say that I’d be more than happy to donate a piece of Oak to you in order to silence the nay-sayers. These are a brilliant set of chisels; I wish I’d known about them earlier. I wouldn’t have bothered with my Rutlands ones. Many thanks for taking the time to let us all know about them. You’re saving me an absolute fortune and making me far more productive at the same time.
22 October 2013 at 7:15 pm #20255Although I did not need any more bevel Edge chisels I went ahead and purchased a set of the Aldi chisels.
Before starting any sharpening I measured the width of each of the chisels at the cutting edge and half way up the blade. As you can see the width at the cutting edge was only a few thousands of an inch away from the size identified on the blade. I think this indicates that a good amount of care has gone into the manufacture.
I then checked the flatness of the chisel backs, all four chisels had concave backs again I would say by design rather than chance.By using a straight edge and feeler gauges I checked the maximum amount of concave in each blade and then how close to the cutting edge and the back of each blade I could get a 0.004″ feeler.I have since flattened the back of each chisel to give a minimum of 1/4″ lapped surface at the cutting edge, sharpened them using diamond plates and Paul’s method and removed the machine marks from the bevel edges.
Has anybody done any fettling of the handles yet, I did not want to do anything I might not like the appearance of.It is quite concerning really that somebody can make tools of that quality for that price, does note bare well for local manufacture.
Attachments:
You must be logged in to view attached files. 22 October 2013 at 8:50 pm #20264
Nice work David. I picked up four sets as I’m going to flatten the backs and sharpen the edges on two, and make trays for them for Christmas presents for my brother-in-law and father-in-law. I’m going to give another shallow bevels for paring, and the last steep angles for chopping. That’ll be a hard but rewarding days work.
I’m going to smooth the handles a lot with a spokeshave and rasp. Don’t worry about the look, David. The important part is comfort!
George.
I’m not 100% sure that the concavity is by design. One of my chisels was quite convex on the back. It took quite a bit of work to flatten. The other three chisels were nice and convex though and it didn’t take long to sort them out. Buying these chisels is a nice excuse to make a nice box to store them in so that’s my next project while I help my son build his model longship.
 23 October 2013 at 3:27 pm #20276
I learn something every time. I’ve been fighting to get the whole back of the blade flat instead of just the working surface.
25 October 2013 at 8:53 pm #20377Hi George I will be interested to see some photos of your chisel handles after modification, other than the finish is a bit rough I do not know what I could do to improve, I could be inspired to copy
26 October 2013 at 6:59 pm #20397Decided to have a go at the Aldi chisel handles what the heck the worst that could happen is a scrap £8 worth of chisels.
I removed the ferrule from the end and was left with a groove and two dimples that were used for holding the ferrule on, I sanded the handle down which has resulted in a much smoother finish. I do not know if it would be better to shorten the handle to remove the groove and the dimples. May be a problem as I do not know how far the tang of the chisel protrudes into the handle, or to just round the edges of the groove. Once that is sorted I will stain and wax the handles
I am open to suggestionsAttachments:
You must be logged in to view attached files. 28 October 2013 at 4:59 pm #20472
I have now moved on to next stage I have adjusted the shape at the handle end to remove the groove, I think if I could be sure that I would not hit the chisel tang I would shorten the handles , when compared to my other chisels the handles on the Aldi ones are the longest.
What finish would I use to get a finish similar to the Ashley Iles one in the photo.Attachments:
You must be logged in to view attached files.
Hi David,
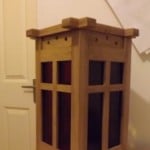
Those are looking really nice. How much of the handle would you like to remove? I can’t see that the tang would go right the way up into the handle so you’ve probably got some room to work with. Personally, I like them the way they are – I just sanded the handles down to get rids of the plastic like finish and give a more positive feel – but then, I’ve nothing to compare against. I’ve just spent the day making a nice box to put my new chisels in so they can now start to earn their keep. 😉
Attachments:
You must be logged in to view attached files. -
AuthorPosts
- You must be logged in to reply to this topic.