Stanley No 4 Gap Between Frog And Plane
Welcome! / Forums / General Woodworking Discussions / Tools and Tool Maintenance/Restoration / Stanley No 4 Gap Between Frog And Plane
Tagged: Bailey # 4, Plane Tuning
- This topic has 12 replies, 8 voices, and was last updated 10 months, 4 weeks ago by
Gregory Blake.
-
AuthorPosts
-
 21 December 2022 at 5:04 pm #784299
Hi Folks,
I am a novice woodworker still learning my tools. I have a vintage Stanley No 4 that I have not been able to true up an edge or plane a full width shaving with. I seem to always have a rise on the left side when planing an edge, even though the blade seems parallel to the throat. I decided to take the plane apart and noticed that there is a 1 mm or so gap between the front edge bevel of the frog and the plane. Could this be the problem? Is it something I can fix?Thanks for your help and Happy Holidays!!!
Best, Matt
Attachments:
You must be logged in to view attached files.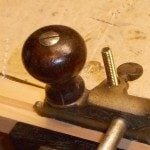 21 December 2022 at 9:51 pm #784332
Thank you, Harold! Yeah, I need to revisit the restoring the bench plane video, although I don’t recall the issue I’m experiencing being addressed. I will look at Paul’s related videos as well.
Regards, Matt
21 December 2022 at 10:48 pm #784338Is that the installed position of the frog in your third picture?
That seems to be very far back. I generally have the front edge of my frogs sitting almost on top of the mouth opening.
With the frog that far back, you may be running into issues with the iron contacting the mouth of the plane itself.
22 December 2022 at 12:37 am #784350Thanks, Austin! I’ve tried the frog at various settings. In fact, if I move the frog too close to the mouth it creates a gap behind the iron and the iron itself will hit the toe side of the mouth. So I guess there’s a sweet spot in between. Still, I think the issue is how the frog sits on the mount, because with the screws removed, it will rock back and forth instead of sit level no matter how it’s positioned.
By contrast, I have a Record no. 4 that needs a fair bit of tlc, but the frog sits pretty snug on the mount.
Matt
22 December 2022 at 12:58 am #784353An update: I see now that when the edge of the iron is parallel to the mouth in the top down view, the iron is higher on the right side when you look down the sole of the plane. So this is what is causing my issues. The question is what might be causing the iron to be ineven?
Matt
Attachments:
You must be logged in to view attached files.22 December 2022 at 1:51 am #784358Is this a pre-lateral adjuster Stanley? You mentioned you are novice, have you set the lateral adjustment of the iron?
I haven’t run into a “rocking” frog personally. My next step would be to examine the underside of the frog and the bed for damage. You may have a small burr somewhere that is interfering with the frog seating. If yes, you should be able to file the damage away fairly easily.
It’s possible the plane body and frog are from two different planes and aren’t a mated pair. Inspect the frog and bed and confirm both are flat.
22 December 2022 at 1:56 am #784359Thanks again, Austin, I’m using the lateral adjustment to get the plane parallel with the mouth, and scrutinizing that is what made me realize the iron isn’t parallel in the other plane.
I’ve been looking for a bump,or something on the bed, but haven’t found anything yet. I’m also wondering if the frog and plane are mismatched.
I’ll keep digging.
Matt
 22 December 2022 at 11:05 am #784387
Hi Matt,
Not that the list below has eliminated my talent for edge-planing out of square, and apologies if I’m kicking in already wide open doors.
1. A plane edge square to the side of the blade isn’t a strict requirement, but it helps a little.
2. A thin strip of wood can be used to check that the blade edge is parallel to the width of the sole. I first adjust by visual inspection and tapping with a hammer. When believing the blade is set, I retract it just beneath the mouth; to subsequently advance it until the strip of wood catches when pulled over the edge’s corners. Then I tap until there’s an equal minimal catch. As elaborate as this procedure might seem, it saves time for me, as there’s less need for adjusting out of square planing.
3. Would it be worthwhile to inspect the flatness of the sole, along and across, and particularly around the mouth?
I’m having trouble seeing the discrepancy (“out of plane in the second plane” ) with the photos that were provided. The photo with the blade parallel to sides of the mouth is clear, but not the other.
Keep in mind that a perfect plane will move the edge out of square depending upon how it is used. When learning to plane, it is common to unintentionally apply downward pressure, especially if the plane isn’t really sharp, or to apply a twisting or rocking force to the plane, which will lead to changing the squareness.
There are planing methods that will remove the tilt. When I reduce an edge, I typically remove the bulk and then adjust back to square because big adjustments do tend to brng the edge out of square quite easily.
So, there may not be anything wrong with the plane….
27 March 2023 at 4:37 am #796175Hi Matt. It’s a late reply to your post regarding the frog gap issue, but I have had a similiar issue with a Rapier 600. During the resoration I discovered that there was a fairly severe rocking motion of the frog when seated in the body. I did not use the plane previously, so I don’t know if the operation was affected. To fix it, I milled the bottom mounting surface of the frog to even up the mating surfaces. Of course that required milling both sides of the frog so I could square it in the vise. I cannot remember how much I had to take off the one side, but the pads were definitely uneven . Even though it looks like there is a lot of metal in the frog, there actually isn’t much there at all, so I was very careful not to take too much off. The frog now sits nicely solid on the body and plane performs very well.
Maybe this will help you out, if you haven’t found a solution yet.28 March 2023 at 1:57 am #796276Mathew,
Your frog isn’t defective or anything. That was the design of the frog assembly between 1878 and 1904 ( or 1902).
There was no forward machined area for the frog to sit on. I have a 1904-Ish number 4c that is made the same way.
It works fine, but is fiddler to Mount correctly. Subsequent methods have a rib to help align the frog.Patrick’s supertool site has some info on four of the frog mounting methods Stanley used over the years.
http://www.supertool.com/StanleyBG/stan1.htmTry turning the frog a bit before you tighten down the 2 frog mounting screws. Sometime what appears to be square isn’t.
1 September 2023 at 12:16 pm #812010Either the frog is sitting high on the side with the gap or the frog is sitting skewed in the plane body. On all of my Stanley planes I line up the bed of the frog with the rear of the mouth to form a continuous ramp for the iron all the way through to the sole. You can use a small steel ruler to check for straight alignment. I would check the mouth to make sure it is square to the sides of the plane. I’ve seen several that aren’t. If needed you can square up the mouth with some light filing.
Next clean off all of the oil from the frog and plane body. Use a Sharpy to color the mating surfaces on the frog and body then seat the frog in the plane and slide the frog back and forth. This will rub off the Sharpy ink and show you whether or not the frog is fully seated on both sides. It may be that you have to use a metal scraper to slightly lower the mounting platform on the side where the ink rubs off until the frog sits evenly from side to side. Just take it slow and constantly check alignment until everything seats and properly lines up.
-
AuthorPosts
- You must be logged in to reply to this topic.