@igor
Forum Replies Created
-
AuthorPosts
-
12 September 2018 at 9:09 am #551355
Thanks Ben!
Yes, I understand it is usually done by taking the inlay down to the wood surface. However, as I’m considering working with silver, I’d try to avoid silver dust as much as I can; I’m thinking of some longer lines of silver embedded in the wood.
I was just wondering of the pro’s and cons of using hardened scrapers; probably will give it a go to find out by my own experience.
Cheers, Igor
28 March 2018 at 3:12 pm #512152Thanks Michael.
I checked Fastenal, just for the record; their “thumbscrews” or “spade head” screws seem only available in steel or stainless steel, I could not find brass options..
8 March 2018 at 11:54 am #493027Thanks everybody, good feedback. Adding “shouldered” to the search helped find more matches for these types of thumb screws!
I’m not searching for a replacement on any tool or so, I want to use these types of screws for some purpose-specific planes I’m building, metric M3/M4 and up to approx. 1 inch long (2~3 cm)..
17 January 2018 at 3:45 pm #441154There is some inside curve work on the frame saw making videos that Paul published here: https://woodworkingmasterclasses.com/videos/making-frame-saw/ where Paul uses a combination of chisels, spokeshave and card scraper. Draw the curve on the wood, saw square to the line in 1-inch (-ish) increments, remove the waste with your chisel and smooth the curve with chisel. spokeshave, scraper.
17 January 2018 at 3:30 pm #441136From the picture it seems to me that when you cut them to half, there would still be a fair amount of straight stock in those.. Seems to me you would still be able to use that for drawer fronts, door panels and the like.
8 November 2017 at 5:44 pm #359683Thank you Dave!
These are exactly the kind of gauges I tried to describe, so it is called ‘in-cannel’.. Never too old to learn a thing or two! The article you mentioned also gives a good hint as to how these are used indeed!
I think I will hold on to the set, and continue to scavenge for some out-cannel gouges. I have enough designs in mind where both types of gauges will be able to support me!
Thanks, cheers, Igor
-
This reply was modified 6 years, 5 months ago by
Igor Kerstges.
22 May 2017 at 12:52 pm #312165Hi!
This is quite extensively explained for boat-building masts and spars, have a look at: http://www.boat-building.org/learn-skills/index.php/en/wood/making-wooden-spars/
The instructions show the use of a ‘spar gauge’ which is explained in more detail here: http://www.pettigrews.org.uk/lm/page030a.htm
Hope this helps..
24 August 2016 at 1:46 pm #139640I have a slightly different question regarding sawing of cherry..
Rift <–> Quarter? How much of a difference shows when deciding on getting the best out of cherry wood? Does cherry show medullary rays when quarter sawn or are these not prominent in cherry at all? Are there any other aspects to consider when deciding on sawing methods for cherry?
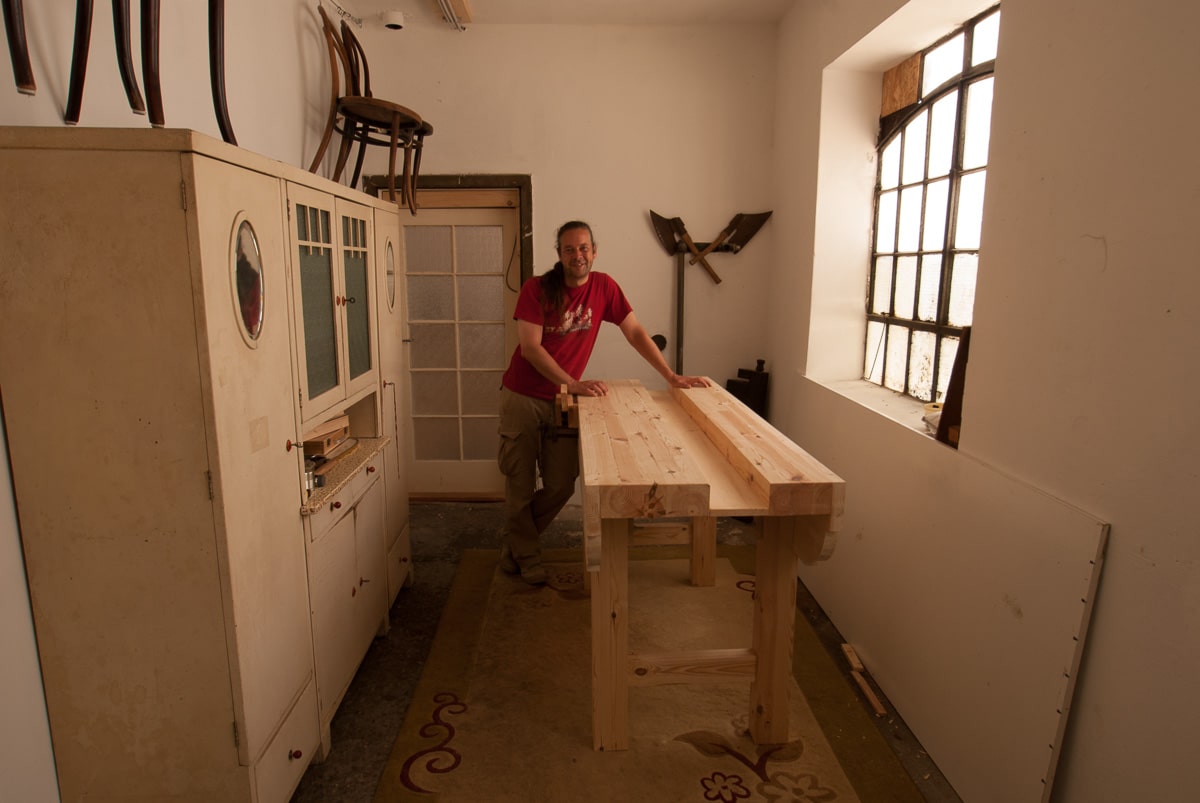
6 July 2016 at 11:00 am #138274Hi all!
I have mentioned in several posts on these forums already: I have started (and now completed) my own workbench. My bench is inspired on the showcase by Paul and I love it.
I’m not a professional woodworker, but rather an amateur like many in this community. All my life I have been working with wood (scars from childhood prove how I learned-by-doing) and recently I have ‘bitten the bullet’ to rent a workshop here in Vienna. My initial intention was to renovate the shop for motorcycle customisation and maintenance. During the initial year of renovating the shop, I was yet again building with wood and while the official regulations for motorcycle mechanics pretty soon showcased that I would not be able to pursue that avenue, the alternative offered itself to me and I feel now that woodworking is the real deal. During my last visit back home (in Holland), I collected what was left of my father’s handtools and some pieces of oak that have been stored for decades and I recently also found an acquaintance who had lumber of local exotics (cherry, walnut and some beautiful plum-veneer) which he cannot work anymore due to age- and illness.
Slowly but gradually, everything seems moving forward nicely. I have now started negotiations with my current (and supportive) employer to reduce the scope of my full-time job in order to make more time available for my woodworking endeavours. All the while, I’m sketching all the ideas from my head and barely find enough time to transfer all thoughts onto paper. The output indicates however that I will be furniture maker of some sorts. Of course, at age 50, I cannot make up for the past but I will acquire skills and experience as I ‘feel my way into’ woodworking.
I too feel passionate about sharing my experiences and endeavours and results with the public, especially with a younger generation. For the purpose of which I have created my own blog: https://woodworker.life/ where I will try to share-, show- and respond to anybody who is interested in this passion.
Cheers, Igor

-
This reply was modified 7 years, 10 months ago by
20 June 2016 at 2:41 pm #137967Not to worry, the bench has it’s scars from day one already.. I’m considering to make an insert from some hard wood where the saw always runs next to the vise..
For the picture to show up in a post, I first type my post and include my file to attach. After it has been uploaded, I then open the picture in my browser to find the link which I copy to the clip-board. I then edit my post, I place the cursor where I want the picture to appear. Choose the IMG button and paste the link in the dialog that appears.
Save it and voila! 🙂
17 June 2016 at 8:02 am #137896Sneak peek:
All in all the grain changing was a pain but manageable. I needed to take the planing through stages of rough planing (square and twist) through fine planing (flatness) and -with more than usual effort- smoothing. Special attention to a very fine plane setting for smoothing operation.
For clearing the resin build-up I let it harden (somewhat) on the plane over-night and cleaned the plane sole in the morning on sandpaper. Worked best for me..
I will add some more with details after the weekend.
Attachments:
You must be logged in to view attached files.31 May 2016 at 8:16 am #137508Thanks Ed, much appreciated! I have decided to order the Veritas cutter and will report back when I’ve tried a first with it! Cheers, Igor
30 May 2016 at 2:58 pm #137502Hi David, thanks for your input. I read through Paul’s post and I like what I see there. Unfortunately I don’t think I’m equipped to grind that much off an allen wrench of the approximate size I’m looking at. Cheers, Igor
30 May 2016 at 11:07 am #137494Hi James,
You will want to pay detailed attention to the edge of the cutting iron which should be 90 degrees (I believe this is what raze599 also suggested in his response):
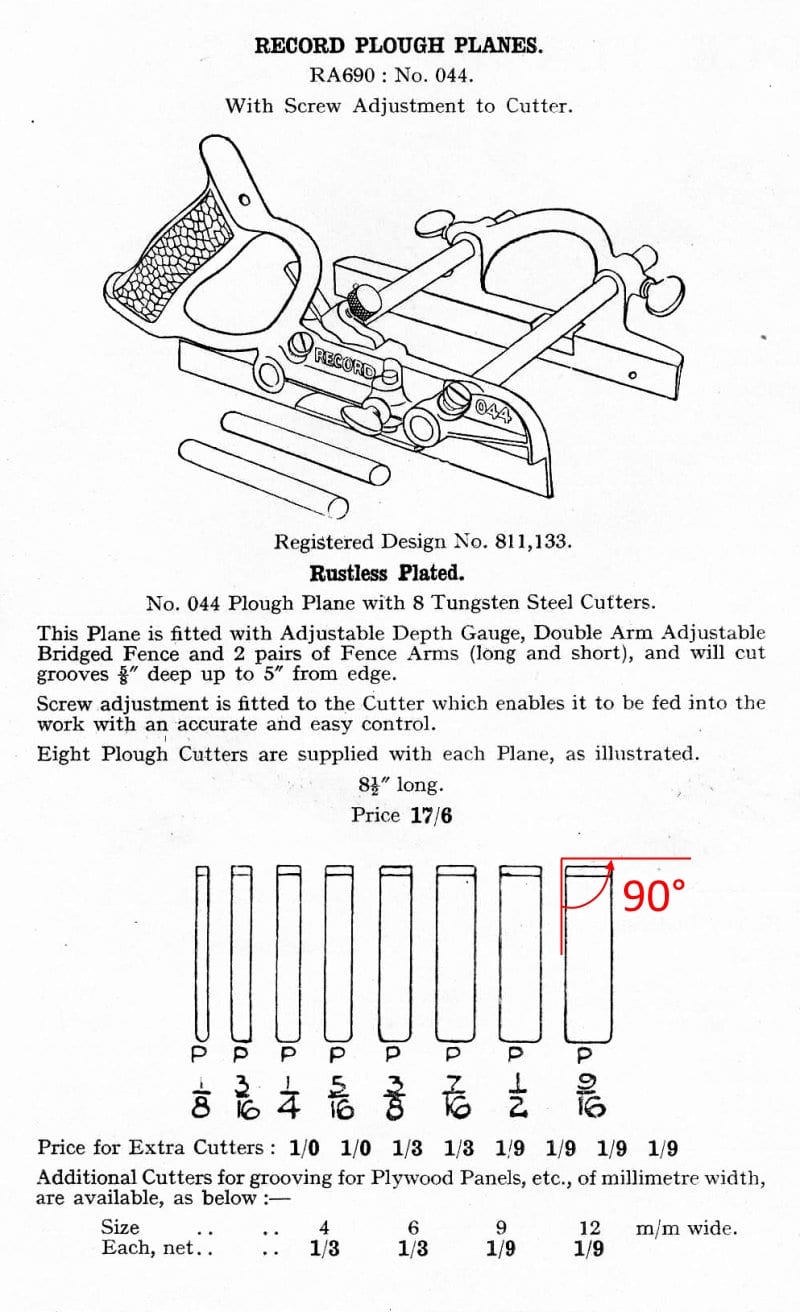
(Image courtesy of record-planes.com)Any deviation will make the plane want to wander like you describe..
-
This reply was modified 6 years, 5 months ago by
-
AuthorPosts

