Quiet mortising
Welcome! / Forums / General Woodworking Discussions / Woodworking Methods and Techniques / Quiet mortising
Tagged: Sound
- This topic has 16 replies, 6 voices, and was last updated 6 years, 1 month ago by
Larry Geib.
-
AuthorPosts
-
Hi All,
I have my workbench in the shared basement of a 4 unit condo in NJ. I’m not on the bottom floor above the basement so the noise I make concerns me as the couple who live there almost certainly put up with any banging, sawing and even planing sounds.
I’m working on the tool chest project and now need to cut 12 mortices, which I’m sure will make quite a racket if I chose to go at it with only the chisel. My groves are cut and everything is marked up and ready to go.
I’m considering this time boring out the waste with a brace and bit to make it a quiet exercise and then paring the sides and ends. I would probably use the PS chisel guide when using the brace and also doing the paring of the mortise sides, since I would like some exactness in this project.
Does anyone have any experience with this method? I’ve always cut mortices with only the chisel. Any tips, recommendations, things to avoid or even don’t attempt it would be welcome. Sizes of bit relative to the 1/4″ grove etc.
Looking forward to everyone’s opinions on this.
Best regards and many thanks,
PaulPS: I may chose to wait until the 1st floor guys are not around and have at it with the chisel. That’s another option.
-
This topic was modified 6 years, 1 month ago by
prbayliss.
 17 March 2018 at 3:10 pm #498997
I must admit I’ve always wondered why Paul or many others chop out mortises using only a chisel. It seems to makes sense to mark a drill bit to the required depth and drill out the centers (using a hand drill of course) ensuring you leave a good 3 mil round the edge, where you then use your chisel to par down creeping up on your lines.
You can still use a guide for the paring ensuring the sides are straight and to the line.Quicker, certainly quieter and surely not compromising on accuracy and still staying true to hand wood working, so why not?
I’d be interested what others think.

there’s nothing wrong with boring holes with a brace and bit to save time in my opinion, you don’t have to follow paul’s methods exactly how he does it, as long as you are careful not to go over your lines, however it shouldn’t take long with a bevel edge chisel to cut a mortise hole, if I was really concerend about noise, I’d use the brace and bit then pair it down using pauls mortise jig.
17 March 2018 at 8:04 pm #499121Too loud? Just wear earplugs 🙂
More seriously, it would depend on what species you are cutting the Mortise in. Eastern White or Sugar pines would be a breeze.
Some hardwoods like cherry wouldn’t be much of a problem, either.itll just be slower.
I’d avoid woods with pronounced early and late wood.I see a potential move to an urban high rise site when I get too old to push a lawnmower, so Just for grins, I took a piece of EWP and made a 1/4” x 1 1/4” x 1” mortise which took about 5 minutes with the tools shown below. I did use a battery powered drill and a Brad point bit to make 3 holes to take waste. Not perfect, but ok for a first try without any guides.
If I were doing it on a regular basis, I’d make a hooked tool to clean out the mortise instead of the screw driver. ( think Paul made one out of a paint can opener)
And I think a pig sticker chisel with a paring grind would be a perfect tool. The big handle would help.https://i62.servimg.com/u/f62/11/36/05/99/1cb01910.jpg

Dont make any guide too tall or it would get in the way when you bear down over the work.
And you will help yourself if your chisel is ground for paring ( say, 20° with another 3-4° microbevel) it will take less force to move wood. Have the work low so you can get your body over it.( I did ok on my 35” high bench) Resist temptation to pry with that chisel, and use another for that purpose. That’s why the screwdriver is there.
The ultimate in Quiet mortissing, of course, is a Barnes foot powered machine. I actually used one of these in a joinery making sash when I was first starting out.
We didn’t need no stinking electrons.About the last 5 minutes shows how it works. If you are a machinist, you could make one from an arbor press.
-
This reply was modified 6 years, 1 month ago by
-
This reply was modified 6 years, 1 month ago by
22 March 2018 at 5:54 am #505195I thought about this a little more, and tried using a doweling jig to drill most of the waste out. The Guide drills holes straight and true in sizes to 1/2” or even bigger. You can split two other holes and the drill bit won’t wander.
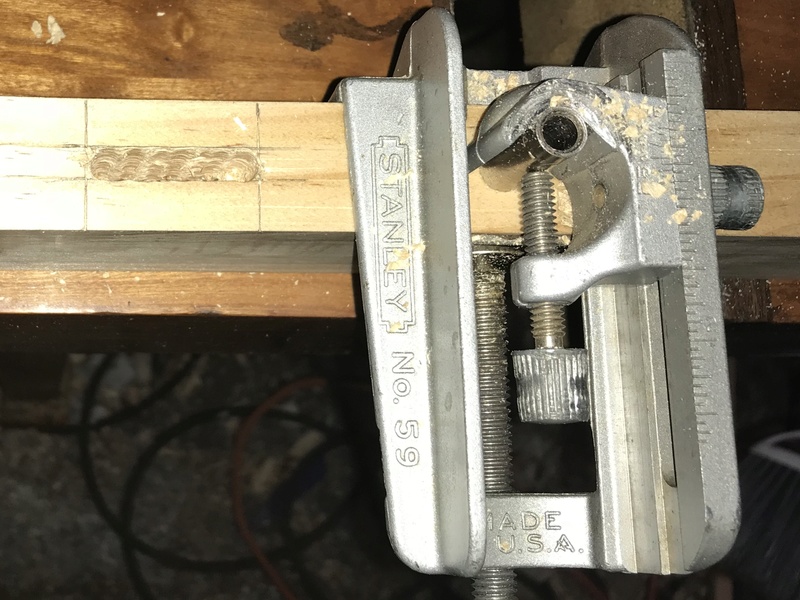
Mine is a Stanley 59, which I see is available on the auction sites for anywhere from $12 to $60 depending on condition and number of drill sleeves that come with it ( Grainger and others still sell guide sleeves that will work, or use a shaft bushing). Other styles are still being made, but this is the one I have.
Use the hand or electric drill of your choice, but a battery powered one makes it a couple minute job. ( I used a Brad point bit)
From this point, paring and cleanup with or without Paul’s guide is no big deal.
No hammering needed.
-
This reply was modified 6 years, 1 month ago by
-
This reply was modified 6 years, 1 month ago by
I think you could do this with Paul’s chiseling guide, too. The dowel jig aligns both directions, but we only care about one, which would be guided by Paul’s jig. You need a little care at the ends, of course.
I’d consider making Paul’s jig plus a 1/16″ spacer, then select a drill bit that is 1/8″ smaller than the mortise you want to make. If you have a fine selection of bits, you may find you can use a 1/32″ spacer and go down 1/16″ on the bit size. Put the spacer against Paul’s guide, drill the holes, remove the spacer, and either pare via the guide or pare freehand. The point of the spacer is to give you material to pare. This may be faster than the fancy dowel jig.
@lorenzojose how did you post a photo? All of the upload buttons have disappeared? Or is that a link out to elsewhere? The site is somewhat useless without photo uploads.I like Ed’s sugestion of a pre-emptive screaming plunge router.
But seriously.
It might be useful to put your workbench feet onto rubber pads to help isolate the sound from the building structure. If the bench touches the wall move it a little bit away from it. That way the sound travels less effectively into and through the building structure. Think of the rubber underfloors that are sometimes used to stop sounds like lady’s heels from travelling from floor to floor through the floor in high-end apartments.The only thing that deadens sound is mass. But sharp sounds like lady’s heels travel well through the structure if it transfers well into that structure. Any added wall finish is only likely to improve the quality of the sound in the room and be an unnecessary expense especially if your bench is not isolated.
You could dull the sound further by not using a claw hammer on a steel backed chisel, or using a rubber mallet instead of a wooden one on wood/plastic backed chisels
Also make sure any ducts, vents, or conduits between the basement and your neighbours are closed. As voids allow for sound to pass through.
22 March 2018 at 4:49 pm #505591@ed I used the jig because it easily allows you to overlap the drilled holes and neatly hog more wood out. While I did have success paring waste with just drilling and push-paring in pine, any harder woods gets more dificult without overlapping the holes. And I found drilling the 5-6 overlapped holes was actually quicker than trying to guide the drill freehand, even with sliding the jig for each hole. I agree using a slightly smaller drill ( still looking for a 7/32 bushing) or slightly oversizing the tenon is the way to go. Then paring with paul’s Jig Would still be the same as if you were mortisng with a hammer and 1/4” chisel.
To answer your question, I had to host the image offsite to post it. The edit window still has the IMG button. Just tap on it and get prompted to insert the url. You do have to find your own place to host the image. I notice old posts are losing their images on the site anyway. I guess they are trying to pare down the server storage. Seems odd in the era of increasingly cheaper server storage. Perhaps the web is monetizing that, but the site is losing a valuable resource.
Ah, I completely agree! Even when I’ve done this on the drill press, it can be hard to overlap the holes and you’re right overlapping helps. A forstner bit is easier, but then it’s hard to use a guide. If a jig is too pricey or hard to find, I’d give Paul’s guide a try, but otherwise I agree that there are real advantages to the drill guide.
I hope the site is just broken rather than changing. Without image uploads, it is 10x harder to communicate and deleting old images destroys old discussions.
Thank you everyone for the replies.
The wood that I’m using is walnut, so certainly quite a bit harder than most pines, certainly not as tough as something like hickory. Like I said in the original post, I’ve cut all my mortises with only chisels before, including hickory which was really hard work.
The cause for my concern was that I find myself working on projects much more frequently. I get on really well with my neighbors and they are very accommodating, but I don’t want to push it for that exact reason.
I did make the bottom to the PS tool chest over the weekend, so 6 M&T joints (I’m using 2 solid pine panels in the bottom) which i shall be gluing up this coming weekend. It worked great with the brace and a 1/4″ auger bit and was super quiet. Paring the sides was pretty straightforward with the jig, which I had to cut down a little to clear the bolster of my chisels.
Overlapping the holes went mostly well with only a couple slightly too far or too close. Too close was actually worse than too far apart because the bit took a path into an existing hole.
Sharpness on the chisel for paring was certainly key and I used several sizes in the process. What seemed to work the best was using a 1/8 chisel to gently pry and break any walls between the holes. Clearing the waste out after drilling with that chisel also made things easier.
That all said everything came out super square, and nice and neat. I’ll use the technique again for certain as it was practically silent. This evening I planed the frames level and it’s all looking very nice.
I wish that I could post pictures as communication is a bit limited without showing how they came out.
Many thank again,
Best regards,
Paul@reuser Thanks for the dampening advise. I may see if I can find some rubber floor tiles that I can put under the bench. The floor is concrete. The bench is isolated from walls so that’s not an issue. I have considered putting some glass wool bats between the basement ceiling and their floor. Do you think this would dampen noise.
And darn, I guess that I’ll have to stop using that claw hammer :). I have used several. Wood mallets, Wood is good for a while, but currently the hard end of a Thor 710R.
Best,
PaulLet’s see if this works…
FYI: This picture was from before this evening and the nice plane gouge on the left is now no more.
Best,
Paul-
This reply was modified 6 years, 1 month ago by
-
This reply was modified 6 years, 1 month ago by
-
This reply was modified 6 years, 1 month ago by
-
This reply was modified 6 years, 1 month ago by
23 March 2018 at 4:54 am #506027I have considered putting some glass wool bats between the basement ceiling and their floor. Do you think this would dampen noise
Rather than rehashing what’s been posted already, browse through this thread to see suggestions folks have made, including professional guidelines on soundproofing.
Hi Paul
As usual Larry’s advice on the other thread is really good, with documents and everything.
As I understand it, glass-wool will only reduce the resonance withing the room (i.e. the time that the sound bounces around the room). I dont think it will reduce room-to-room transmission all that well as it is low mass. Also some types of glass-wool have fibres that are really bad for your lungs. If you are committed enough to add to the basement, it’s worth mentioning that you can get stud/partion wall and ceiling systems that are rated by the manufacturers for sound-drop.
-
This topic was modified 6 years, 1 month ago by
-
AuthorPosts


- You must be logged in to reply to this topic.