How To Make The World’s Best Router Plane: Episode 2
Posted 29 October 2021
This is an episode in a free series. Want to watch it? It is free to do so, you just need to log into the site, and you can enjoy this video and many other videos we think you will love.
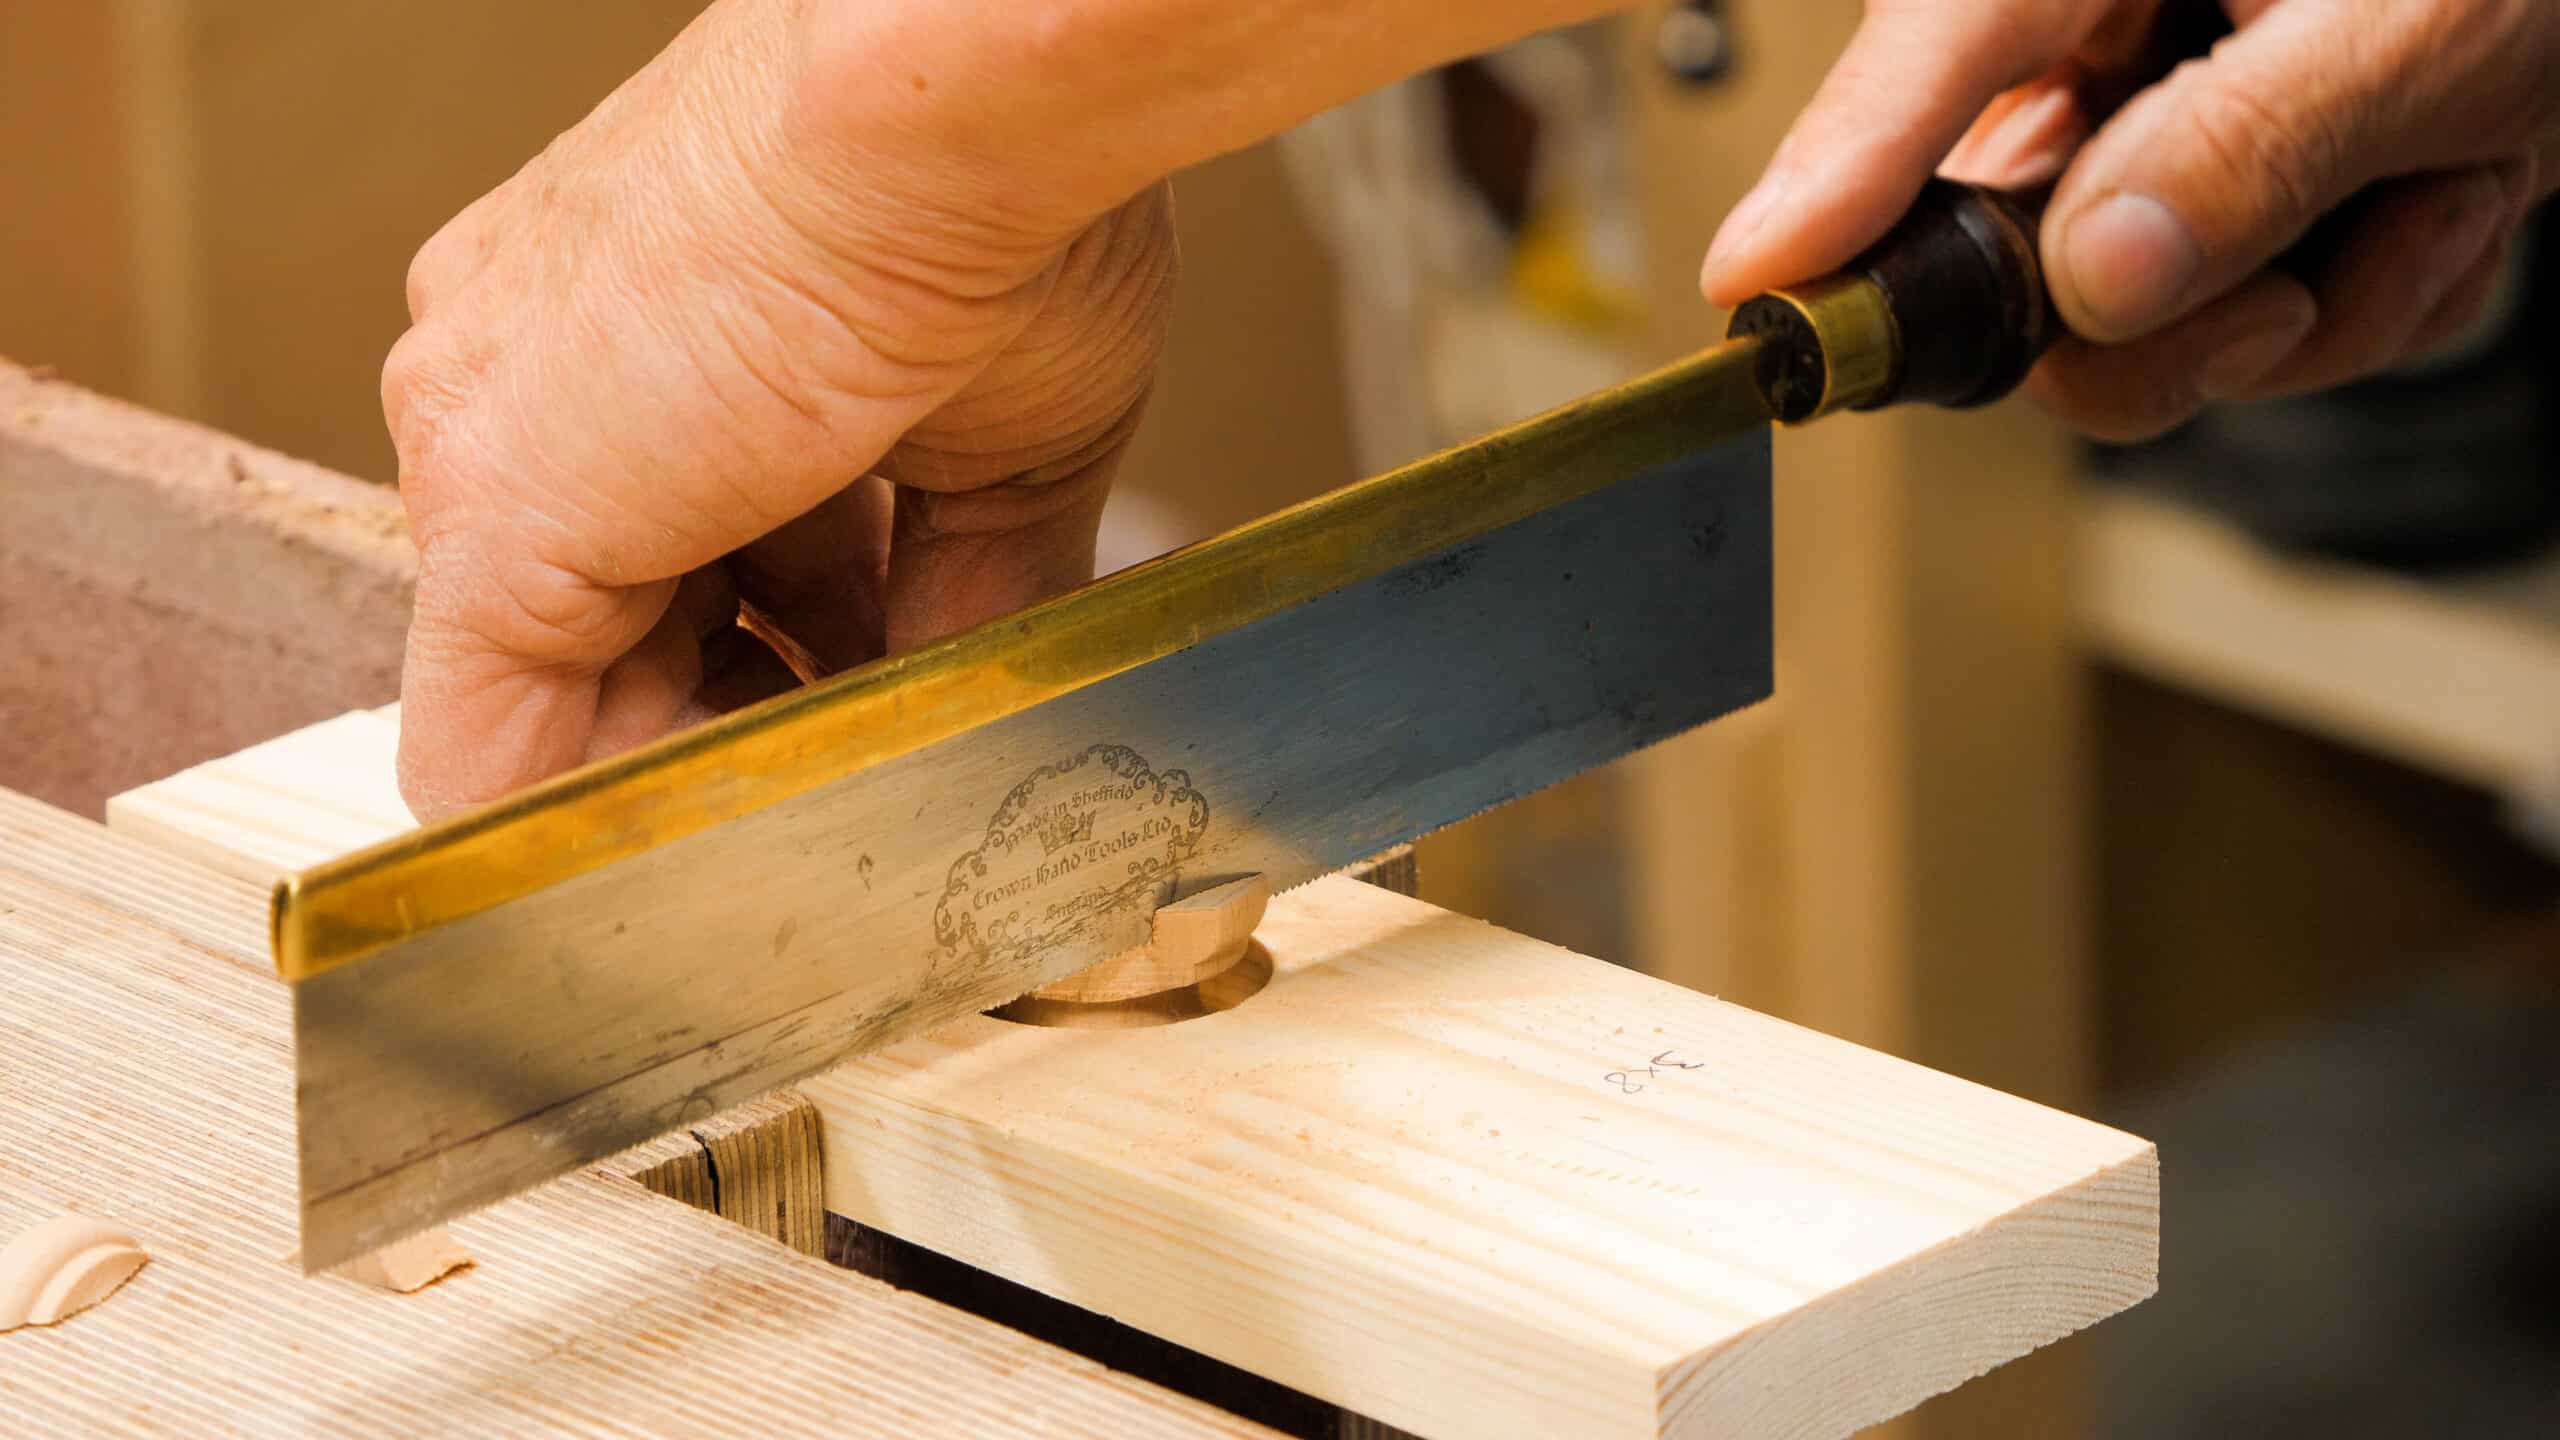
In this final episode, we go all the way from creating the handles to making the cutting iron and the retainer bar, installing the components, and finishing the plane with a shellac finish. It’s simple step-by-step for everything to take out the mysteries of metalworking, and the magic result is your very own hand-made, finished router plane. We do hope that you will enjoy the success of making such a fine woodworking tool as your own fully adjustable hand router plane for a lifetime of use. We believe that this is the best router plane in the world. Enjoy it!
Amazing. Thanks Paul!
Great idea and design.
Just order the thumb nuts
Thank You!
Great video, I can’t wait to make this.
What a gift to give to your community of woodworking enthusiasts. I knew your router plane would indeed be ‘the best in the world’. Your ethos of passing the gift of knowledge onwards is gratefully received Paul, truly. I know it means alot to you too.
Congratulations to your team also, the production and presentation is always 1st class, more so in these two videos though.
Your videos and projects have helped me out of a very dark period in my life this last couple of years. Taking up woodworking has been valuable escape.
Keep up the fabulous work. Thank you. Health and happiness to all. Gary, Lincoln, U.K.
I just passed on your kind words to the rest of the team.
I always learn something valuable from you, Paul. Excellent presentation.
May I ask you a question about the shellac finish. I am probably wrong, but I though shellac would not be robust enough on handles that will get a lot of use. I have been using linseed oil and mineral turps. What do you think?
Best regards from Australia,
John Baker.
Excellent!
Thank you very much indeed!!!
I bow to your 50 years experience, but I would cool the blade in oil to make it less brittle and pop it in the oven at 220C for an hour or so. Surely your blade is still brittle or did I miss something?
One of your best videos so far. I really fancy making one even though I got stung on eBay for my, admittedly very nice, Stanley no71.
Thank you for your amazing contribution to society. Its a joy to watch.
Paul says: I often will use peanut oil or some similar vegetable oil but water quenching also works and that’s what I generally do. I wanted to show what I generally do and never had a problem.
I too was expecting an annealing step, like he did in a video from many years ago where he made a plane iron for a small wooden plane he uses to shape the seat of a chair.
Most tool steel is sold in an annealed state to make it easily shaped.
Augusto
I had the same thought, but your idea is better. I thought moving the top 50 degree back & extending the dado for the blade alongside the hole. Your idea of drill the large hole at 50 degrees would allow you to support the blade all the way through the plane.
Paul, is this unnecessary? Maybe overkill?
Thanks for a great video. I looked for others teaching how to make a router plane & yours is best by far
I was wondering about tempering too. My guess would be that because you’re taking off such thin amounts of wood with 10mm of steel you’ll have little worry of the brittleness causing any issues because there’s too much material to snap, that and when it’s thin for the edge you’ll hopefully have a sharp enough edge to cut rather than snap. Only times you might run into trouble is if you try to hog off too much in one go
The O in O2 stands for an oil hardening steel. It needs to be oil hardened to develop the specified properties.
I can’t find a site that says exactly what happens if you water harden it but it appears the grains could become large and tear out of the sharpened edge ?
I’ll be finishing my Router tomorrow… I made the mistake of ordering High Speed Steel. No file or Hacksaw would touch it. I have had to an angle grind the notches, and bench grinder to make the blade. Made from a piece of Spalted Australian Red Gum. Not quite the beauty of your Beech, but very pleasing to look at. BLO and bees wax. Ditto above comment. Great presentation and video work. Thank you Paul.
cobberpete, If you bought oil hardened (O-1) high speed steel that is not annealed (not soft), you can heat it in an oven at 400° for an hour, then turn off the oven and let it cool in the oven for another hour or until it is cool to soften it.
Once it has been annealed you will be able to saw, file and drill it.
After you have shaped it, you will then harden it by heating it to a dull red..(anti magnetic) and quench in vegetable oil to
re-harden it.
Gary Mercer, He said he bought high speed steel, not O1. Those are altogether two different animals.
High speed steel is made to withstand the high temperatures encountered cutting and machining metal. Depending on the exact formulation (and there are many) it will retain much of its hardness up to near red heat. Altering the characteristics (hardness and temper) of HSS is not generally within the home guy’s capabilities.
Hi there from Portugal,
Big Thank you to Master @Paul Sellers, and teem
Question: Will the big centrar hole drill at 50º gives better support to the blade?
Obrigado(Thank you)
I didn’t leave this in the right place…
Augusto
I had the same thought, but your idea is better. I thought moving the top 50 degree back & extending the dado for the blade alongside the hole. Your idea of drill the large hole at 50 degrees would allow you to support the blade all the way through the plane.
Paul, is this unnecessary? Maybe overkill?
Thanks for a great video. I looked for others teaching how to make a router plane & yours is best by far
To drill a hole at 50 degrees you could just make a longer piece of the 50 degree mounting block and then clamp the sacrificial piece to the surface and then drill it with a forstner bit. You would need to clamp a block to the rear as well preferably of similar density to the base as one edge of the forstner bit will emerge first. If you want to do this on a drill press cutting the rear block to the correct angle will help in mounting unless you have a tilting table.
Cutting the grove for the blade will be a bit more of a challenge though.
If you cut the grove slightly too wide a bodge might be to coat the edges with epoxy resin and then press the cutting blade in having wrapped it in one layer of cling film so you can get it out again when the resin has set
I built this and had the same thought. However, I stuck with Paul’s instructions and after drilling the large hole at 90 degrees… the plane works beautifully! I did need to chisel out an extension of the hole at the bottom, so I could see the work better, but the blade seems to be very stable with the 90 degree hole.
Lenny
I have a Veritas router plane that I bought four years ago, but I will make one of these as soon as I can get the steel for the cutter. I’m sure I will use this one much more often at last.
Thank you very much, Paul and team.
I’ve been making do with your poor-man’s-router-plane since I saw that video. Works just fine, but the adjust-ability leaves much to be desired. One of these planes is going to have to be my next tool making project.
Thank you for all you do.
I had the same problem… but I fixed it. All it took was some furniture wax on the groove for the blade and voila!
Is there a printable plan for the main body and for the cutting Iron too?
Oops – Sorry Just found it.
Just beautiful, thank you Paul. Made my day watching you craft that beautiful tool. I feel better for having watched it,
Splendid!
Brilliant Paul, many thanks for sharing this design and process, Cheers, Marc
Thank you!
Elegant piece of work loaded with useful techniques. Thanks for producing and posting it.
One point of note on pairing down the diameter of the knob base. If you have a drill press handy you could mount a screw-bolt centered on the bottom of the knob and then mount it in your drill press chuck. Starting with 80-grit sandpaper you can hog off a lot of wood quickly to whatever shape you want.
Beautiful. I love this project. I started mine and have it up through episode 1. Now I will finish it this weekend with this episode 2. The project video team does a superb job at filming & editing. I really like how the video flowed very nicely and some of the simpler parts move quicker. First rate woodworking videos. Great job to everyone and big thanks to all.
Thank you for the lovely feedback. I shared your comments with the rest of the team.
Thanks Paul. Just excellent.
Paul didn’t explicitly mention that the knob clapping jig has a slot on one side (our left, his right) from end to center hole that allows it to be squeezed tight around the knob. Might not be obvious to all viewers.
Ah . He did explain later in the video. Sorry I jumped the gun.
Didn’t see you temper the blade after hardening ? Why?
Thanks Paul, you have opened my eyes again.
I never would have thought of doing this on my own.
Really nice, thanks.
Thanks Paul .I love your work
Thank you Paul, this is one project that I’ll be doing soon. Superb videos. *****
For the handle modifications you could install a stud in the handle then install the unit in a drill press to spin the handle. I’ve done this before as I don’t have a lathe.
Any idea when the metal parts kit will be available?
We are working on it now. It’ll be available after Christmas.
I bought the stainless steel M6 thumb nuts on line at Accu Limited. They arrived in a week and are beautiful!
For people that don’t want to attempt the heat treating of the metal, the end result looks quite a bit like a mortice chisel. So perhaps using a 10mm or 3/8 mortice chisel and cutting it up to suit may be an option? This would be at greater expense of course and you may need an angle grinder to cut it. Not sure that a drill and hacksaw would work on a hardened chisel. Some mortice chisels are not exactly square section though so the holder would need to be shaped to suit. Anyway just another option.
I suspect the problem will be cutting the groves for the adjuster without softening the chisel first which rather defeats the objective.
If you went this route you could use a chisel from your local second hand tool shop. They normally have some in poor condition for a few pounds. That’s how I made my scraper – brought a chisel with a good handle but the cutting edge looked like it had been used to cut nails only £2. Then reground the edge to 90 degrees and cleaned up the blade & handle.
I thought the same thing,
I did this exploration after reading the other reply and his concern about softening the metal to cut a notch. I’d think chisels handle areas are not heat treated.
I checked my drawer of junk chisels (40?), I found they all widened into large and round sections. EXCEPT one, 9 mm wide, 80 MM to a collar, and then it tapers F to Back & side to side. So I need to work out some
Thanks Paul, that will save money as routers have gotten really costly!
Your an amazing craftsman. Thank you for your teaching techniques. You make things look so simple.
You have a very relaxed manner about you.
Hi Paul,
another beautiful video.
Thanks to you and the gang for all of your hard work.
I’m really looking forward to giving this a go!
kindest regards,
Benjamin Ross.
Loved the video. Could have done without the background music at the end.
Thank you Paul for all your excellent work and the values of craftsmanship that you demonstrate.
I like making my own tools, as much as possible, and this router plane design is brilliant. It is easily modifiable (grip, wood, irons, etc.), and the fine adjuster is genius. So simple, so perfect. I have a small and a medium Veritas router plane, and I like them. I think I will like Paul’s router plane a lot more. Thank you for sharing this for free, that is astoundingly generous.
Forgot to mention the excellence of the cinematography. The close-ups are great.
You’re an absolute legend…thank you Paul
Thank you Paul. This is one of the best gifts. Bless you
Brilliant
Thanks for the tutorial, looks like a real quality tool. I’ve been looking for a hand router after watching your videos, but as you say prices have shot up. After watching this, I’m going to give it a go. Really appreciate you passing on your knowledge, I’ve learnt a lot.
May I ask about that lovely little brush? It looks rather interesting.
These videos are an absolute delight to watch, your craftsmanship is second to none! You’re a great teacher, thank you so much for everything you have taught me.
Kind regards!!
Hi
Its called a Chinese Hake Brush – very Inexpensive
Paul spoke about it Waaaaayyyy Back
Maybe instead of the split washer, what about Belleville conical washer? An example is at
https://www.mcmaster.com/9712K62/
They are only $5.22 for 12.
If one is too stiff, stack two, pointy end to pointy end to halve the stiffness. Stacking them by nesting doubles the stiffness.
Belleville has a cleaner look and doesn’t cut into anything. It don’t stock split washers so I have to buy one or the other.
I’m in the process of gathering the timber and hardware to start this project, but being in New Zealand I’m finding that things that seem to be readily available from big-box stores in the UK/USA are either just not available here, or only from difficult-to-find specialist retailers, or only in extremely limited sizes. One such are hanger bolts — I can only get quite short ones (50mm) and those have only about 20mm of M6 thread.
I thought I might just try M6 threaded rod, which is much easier to come by. My question is, should I use threaded inserts, or thread the hole in the wood (probably oak), or just screw the threaded rod into a 5mm hole?
My concern about the threaded inserts is that they’re quite short and may well not remain square, and I don’t know how well they’d resist pulling pressure.
For what it’s worth, this is the route I intend to take tomorrow.
I have the rod, and I have the metal thingies that crew onto the rod and have pointy bits on the top to dig into the wood (terrible description, sorry), so I can make round wooden bits to screw down the crossbar. I had one of those knurled bolt things in my biscuit tin of odds and ends, but not three…
What I did in the end was drill 5mm holes in the oak, started off the thread for just a few turns with a 6mm tap, and then drove an M6 bolt in and out a few times to create the rest of the thread. That gives me a good firm hold on the M6 threaded rod.
Cutting the whole thread with the tap alone worked, but it created a fairly loose, sloppy thread. It was fine for getting it started though, and it made seating the threaded rod in the hole a lot easier.
I initially drove the M6 threaded rod by clamping it in a battery drill, as Paul demonstrated with his hanger bolts, but I could not avoid minor damage to the threads that way. Not enough to make them unusable, but enough to make screwing on the thumb-nuts feel “gritty”. (Maybe I could clean up the damaged threads with an M6 threading die?)
However, by screwing a hex-socketed cap-nut to the end of the rod, I could just drive it with an Allen key and then unscrew the cap-nut afterwards, which got the rod firmly in place without any damage at all to the threads.
In the kit Paul sells the wood screw “screw bolt” mine have a socket in the top of them that takes a T 15 torx bit.
The screw bolts in my kit also had Torx sockets in the end. Helped with the instillation.
I am using some maple I had in my wood stack for my plane body. I am having a hard time finding knobs big enough. I have some small ones but I am sure they will not suffice.
What is the angle of the blade? The drawing shows 25 degrees, but the video says 25 and 30 degrees.
Thanks
Jeff
The angle of the blade is 25 degrees and then is sharpened to 30. This gives you less surface area to sharpen.
So the blade gets sharpened to 25 first and then a secondary bevel is added at 30? This seems to be a departure from previous advice on Paul’s video about not needing secondary bevels. At some point, wouldn’t the 30 secondary get too excessive and then require the blade to be reground to 25? Seems like it would be best to just sharpen it like Paul does a chisel which would basically be like his poor man’s router concept.
I appreciate any help on clarifying the blade angle.
Thanks
It’s a router not a chisel, just do 25 primary and 30 secondary and then use it. You need relief at the back of the cutting edge on routers.
My forte is metalwork, still a newbie with woodworking. It’s great to see you sharing the wealth with this knowledge too. Good on you! Thanks.
Thank you very much indeed for your selfless struggle to teach others.
Thank you Paul for this great project! It’s the perfection made router!
Thank you for one more piece of help to self-empower oneself. Just two remarks:
1. It would probably be interesting to study the ideal working speed of the metal cutting saw blades that were used. A trained and experienced metalworker taught me that, in general, everybody works them at too high speeds, which can damage them and does not give a satisfying sawing experience. This seems to have been the case here.
2. Why was the metal drilled without oil? That would be very standard as far as I know, and in my limited experience it simplifies metal drilling enormously. You don’t necessarily need dedicated drilling oil. General purpose houshold oil is still much better than no oil at all.
Thank you to Paul and all the amazing team that help this project grows and to be so important to the community.
You are very special to us. Thank you for being there! ♥️
I found some O1 Tool Steel online fairly cheap and found it came already hardened. I have very little experience with metal working. I have confidence I can get the 25 degree bevel but I am not sure about the slots for the adjuster. Does anyone with more metal working experience have any suggestions or should I cut my losses and look for unhardened pieces?
You can anneal the steel, which will soften it. Then after working it to shape, you harden it as Paul shows. Oil or water will work for this small part. To anneal, heat the metal with a torch until orange red and keep it there for a few minutes. Then it must be cooled slowly. I would heat a larger mass of steel along with the part you are annealing. When hot enough, bury both in vermiculite making sure they remain in contact. Let cool for a day. Vermiculite is available at garden stores and online. More detailed information on annealing is available online.
Thanks for the reply Bret, I double checked my order and realized I’d gotten HSS not O1 Tool Steel. Looks like annealing that is a bit trickier so I’ll cut my losses and re-order (and pay closer attention to the description)
Thank you so much Paul. Your approach to woodworking has truly changed my life. I love the idea of making your own tools. I would love to see a series of videos showing us how to make traditional wooden coffin, jack, and jointer planes out of one piece just like the masters of old. Thank you for all of your knowledge and expertise.
What a nice tool and what a high-quality production of it’s making. It’s on the list of things to do because it is ‘simple’. Thank you, Paul and gang. I have some pieces of apple and oak that need to dry up which would make suitable ‘platforms’ for this.
Awesome! Thanks Paul for bringing this terrific idea and design to us. I will definitely make one or more to use in my future woodworking projects. I hope that you do decide to offer the kit for the metal parts. I am very interested in that so that I can focus on just making the wood parts with my choice(s) of wood. And thanks for all that you do. You have brought me great joy.
Shouldn’t Paul have tempered that steel after hardening it? The hardening process results in very brittle material that will easily chip or break.
I was going to make the same comment about annealing the cutter. Good thing he didn’t drop it and let us see a blade shatter when it hit the ground. 2 hours in the oven at 300F would make it much more durable. I am sure he knows this, most likely got left on the editing room floor. Great video! Already built mine out of a piece of barn flooring from a 200 year old Pennsylvania barn that I helped renovate.
Ive been wanting a router plane for so long now, I’m in my 20’s saving for a house and the cost of them it’s just too much. I’m lucky I have some great tools I have been gifted and bought cheap from car boot sales but I have never seen a router plane laying around! Thanks for the build and designs I love how there’s so much room for personalising! Thank you Paul and the team.
This is really a superb teaching video, I have learned about technique of using a jig to get 90 degree drilling. Now I have to source the metal as I have a lovely piece of timber ready to go.
Oh dear, instead of putting the price of handtools up on ebay, Paul is now going to cause a price crash just as I was about to sell my Stanley router 😉
Brilliant, thanks for that!
The process really speaks to my heart. I think I will make one as a gift to my son as a legacy tool.
Thanks for all the hard work.
Clear, detailed and fascinating, as always. One question: what was the tool you used to knock the centres out of the adjustment notches on the blade? Was it a cold chisel?
I asked Paul and he said he used the end of a screw driver.
@Paul, this is simply wonderful! Thank you!
@Team, consider making a documentary on Paul, then talk to Netflix. You will do a great job!
These videos are the reason why my wife refers to you as uncle Paul. Thank you for the knowledge.
That’s lovely to hear!
Question: in a previous video (plane making) after heating and quenching his steel, Paul also baked it in the oven for an hour. Is this necessary here? If not, why not?
Question: What kind of torch is that in case I wanted to look for one, what are the key words or important details?
I asked Paul about the additional baking and why he did it previous tool making projects but not in this one and this was his answer:
I often do not temper edge tools especially small ones because they leave me with a harder cutting edge.
Tempering does condition steel and does take out the extreme hardness and allows it to keep a restorable edge. That said it is often shortening the steel. I prefer the harder edge because I am using diamonds to sharpen. For instance just to show the value of it I just created 20 tenons and many housing dados and only just sharpened the plane for the second time so that is good edge retention.
Wow Thanks Paul what a beautiful plane
I am having difficulty finding 6mm hanger bolts. Any suggestions?
Try Amazon.com
Why didn’t you use your spokeshave on the curves
For the Euro’s out there; I found all hardware bits online from a source called rvspaleis.nl
Ordered in small quantities and was delivered very quick.
To screw the hanger bolts on the upstand and particularly on the base (where you have to be careful not to go too deep) you could thread a connector nut to the M6 end of a hanger bolt, than screw it in place and to its correct depth with an allen key. You can even use a little jig to keep it nice and square to the surface.
The connectur nut unscrews easy enough when the bolt is set. This should give you more control than using the drill as Paul does and avoid any risk of damaging the threads in that drill chuck.
Thank you Paul and team for your work and inspiration !
Paul, what an inspirational pair of instructional videos! I can do this! Thank you.
I may be misssing something (probably): wouldn’t the cutting iron have to sit a bit proud of the dado as opposed to flushe in order for the clamp to have any effect? That is, if the iron is flush, the clamp wouldn’t touch it. ???
Thanks for everything Paul – I discovered you while in COVID lockdown in Australia and you helped keep me sane! You’ve really inspired me to get into this wonderful craft. Cheers – Rich
Richard Spicko
You right, the iron must be slightly proud; otherwise the holding bar will not exercise any pressure on it.
In episode 1at about the time mark 21’48”, Paul says the gauge is set to slightly under the 10 mm iron thickness.
My question is: why are there two adjusting notches on the cutter? Thank you for the great content. Your videos are so well done. You make it all seem so easy.
Two notches on the blade-shank?
I think that it’s mentioned somewhere in the script…..
Anyway, it allows a greater effective length and a deeper setting of the cutter to be selected without requiring an extended threaded shank if it just had one connection.
Two notches like this were also used by the Edward Preston routers.
Inspirational – At 78 years old, and declining health, your videos are uplifting and the camera work is beyond excellent. I plan to make one very soon. At least the base frame until the kit comes out after Christmas (?).
In between, I will look on-line for the hardware. I may try to forge a blade from an old Craftsman Wrench. I acquired some sections of light rail for my hardened steel anvil here in Phoenix, AZ. There are lots of comments about hardening and tempering (which can be learned online); however your video showed the coloration to grey tempering of the cutting section needed for a great edge. The two slots appear to be options for the edge to extend to a greater range. Quenching in oil, water or softening in vermiculite each have their places in Black Smithing. With the new metal formulations available (some using chrome) and charts on coloration of tempering and methods of various oils and water, a person could look into Black Smithing a blade from an old Craftsman Wrench, a grinder, sander, and diamond plate sharpers for use in the same manner. Lot of work – but enjoyable. Inspirational video to learn new skills from a Master at his craft.
Many thanks to Paul and all of the Team. Thanks to all who made comments.
God Bless each of you and your families.
Thank you for your lovely message. I passed on your kind words to the rest of the team. We are working on sourcing the components on a large scale so that a kit will be available to purchase after Christmas.
I hope you’ve applied for a patent for this.
I haven’t read all the comments in detail so apologies if this has been asked and answered, but I would like to know if a gas barbeque could get the metal hot enough for the blade hardening. I think I would keep the metal longer than the finished blade length so it can be held in the flame comfortably, using gloves and multi-grips as Paul does. Will it work though?
Wonderful videos. It is nice to see someone work with hand tools. It is a lost art. Technique can be very critical.
I was wondering does the blade sit slightly higher than the slot so the metal bar tension fixes it in place? In most of the video it appeared you were making it even.
If you listen to Paul in the first video, he tells you to set your marking gauge for depth to “ just slightly under” the thickness of the cutter bar. (21:45 of first video)
Dear Paul,
yesterday I finished the router plane almost exactly carried out according to your design. The body is made from ash and the knobs from teak, both reclaimed. In a first test it performed really nice (even if the iron was sharp but not hardened, which will happen as soon as I know which torch to buy): The plane is very lightweight, but sturdy. It glides almost frictionless on the workpiece and I could maneuver better and cut more diagonally inside narrow grooves and small recesses than with my Veritas as long as they are not too deep. The design is well thought through and balanced as for example all the bolts and nuts are used in different places and for different purposes but have all the same size. It was much fun, somehow challenging and a lot of learning during the making. Thank you very much for sharing with us.
During the making, especially when buying material, I made some experiences and gathered information which maybe are quite common and well known for others, but for me it wasn´t and it took me a while to get there. However, I would like to share them in order to make it easier for some, especially when they are located in Germany, but not only. Also some questions occurred and I am looking forward to the answers.
Steel: The O1 steel is in Germany better known as DIN 1.2510 (100MnCrW4) and it has a very close relative: O2 resp. DIN 1.2842 (90MnCrV8) which is, so was my impression, easier to get as square rod, but has the exact same properties as the 1.2510, including the hardening process and achievable hardness.
Connector Nuts: They are called “Hülsenmutter” in Germany and are available with a flat head with a nice big hexagon socket at my local Hornbach (a big hardware store chain in Germany) as single parts. Be aware that at least at Hornbach they have a diameter of slightly below 15 mm instead of 17 mm.
Hanger Bolts: They are called “Stockschraube” and are available also at Hornbach as single parts with a hexagon socket (so you can use an allen wrench and do not need to clamp it into the dill chucks). The bolts from Hornbach (and all others I found so far) have a quite big gap between the two different thread types, so I cut the M6 thread further downwards to the wood thread for the depth adjustment bolt.
Thumb Nuts: They are called “Rändelmutter- hohe Form” and are available at Hornbach and Bauhaus (another big hardware store chain) as single parts. By the way, my local Bauhaus did not have the connector nuts with a flat head (only countersunk) and the bolts M6x60 (only M6x80).
Wooden Handles: At first I could not find handles which were long enough and had a big enough diameter at the same time. So I made handles by myself with a drilling machine, rasps and files, which worked pretty well if you are no too forceful. After finishing my own handles I found and ordered a pair of wooden knobs for sauna glass doors already for the next plane. But in direct comparison I found out that they maybe are too big even for my quite big hands and the self-made knobs have just the right size. But the pair costs only 10€ including shipment is for some maybe worth a try. I will try them on the next plane to see if there is any long term benefit with bigger handles.
Borehole: In Germany diameter 35 mm is more common than 32 mm and therefore the drill bits are easier and sometimes even cheaper to get, if you do not already have one. However, if you use 35 mm don´t forget to move the center of the borehole 1.5 mm towards the front, so that the embedding of the iron is not weakened.
I hope this helps the one or other. Finally, I have some questions myself:
Paul, if you would move the center bore more to the front, the embedding of the would be stronger and the rasped relief would not be necessary. Why did you not do this, what are the disadvantages? Clogging or poor view of the workpiece edge when retracting the plane or anything else?
Could someone in Germany recommend a suitable and good torch for hardening, which features should it have?
As I could not find until today not even a single person nearby Mainz who is using hand tools, could you please raise your hands, so that I know that I am not alone here? Maybe we could even get in contact, at the latest after the pandemic.
Stay safe and healthy. Best Regards,
Thomas
Hi Thomas,
Where did you find 10mm square rods of steel 1.2842 in Germany? I find only 10 mm x 12 mm bars offered.
.Greetings from the countryside near Bremerhaven
Hi Friedrich,
the dealer asked me not to publish his name in this blog, as he does not want to have too many requests for small quantities. But I will send you a private message, so that I can help you without breaking my promise. 😉
Greetings back into my former home region,
Thomas
I forgot. There is another dealer who has 1.2510/1.2842 10×10x500mm on stock: Dollinger + Rumbacher (www.doru-gmbh.de). They are also on Ebay, but there not with 10×10, so you have to contact them directly.
Thanks for this information. Very helpful.
Going to make one of these. Is there links anywhere to purchase the hardware? I must have missed it
Sorry I meant in the US. Thanks for all the information and video
Hi
Thanks Paul am working my way through this wee fun project. Would never have thought of doing this before.
Am using some teak that I picked up a while back which should turn out quite nice – my main issue is marking the wood so I can see it clearly, on lighter wood no problem with standard pencils – is there any advice on marking dark wood you could share?
Many thanks for all the wonderful and relaxing videos 🙂
Ian
I asked Paul about marking on darker woods and he didn’t think there would be a problem. However, he suggested that if it isn’t clear using a white pencil.
What elements shall the metal parts kit promised as available after Christmas?
We will give you an update soon.
Beautiful work. Mine is currently work in progress. I am wondering if there is an update on the metal parts kit. There must be a known demand before deciding on making the kit or not.
Thanks so much for this amazing design Paul and team. I have maple, cherry and ash on hand (unfortunately no beech at present). Wondering which would be best out of those three? Thanks
I asked Joseph and he said:
All three would work but if I had to pick one, maple.
I have received the hardware kit and am very pleased with it. I began my build and am finished apart from attaching the wooden knobs. However I have a problem with the adjustment mechanism it lowers the cutter easily but jams when I try to raise the cutter. Paul any ideas on how it could be settled to run smoothly in both directions love all your videos thanks in advance Anthony
Meant to say fettled not settled
I wish UK would come back in the EU (I have fond memories about working with our alter ego from British CAA).
Router kit import:
Added delay (18 days from entry onto the Belgian territory), handling (15 EUR) and custom duties (12.77 Eur) now.
Sigh.
I will start it very soon now.
THANK YOU MR SELLERS!! i am going to have a go at this just as soon as i can find me a peace of wood i like, hey paul we are the same age i was born in sept 20 of 1950, you are a true master craftsman, thanks again. 30 years in the marine corps, just about wore me out, now i can relax with my wood.
I started woodworking from scratch exactly three years ago. I’ve learnt everything from internet, mainly from youtube. The more I have learnt the more I have become keen on hand tools.
Nowadays I’m building jewelry boxes.
I found Paul Sellers and his vids quite early. This router plane haunted me some months, I so wanted to both build it AND use it. Paul’s way of presenting is very clear and inspiring, he almost convinced me I could make the blade of the plane myself… But the blade, that kept me away from trying to build my router plane.
But then I found out that blade and other iron can be bought as a kit. I ordered the kit and two weeks later I became a happy owner of a self-made router plane. It’s not only the most beautiful tool I have, it’s also working!
Thank you for your work!