Picture Frames: Episode 2
Posted 1 October 2014
This is an episode in a paid series. Want to watch it? You just need to sign up as a paid member, and you can enjoy this video and many other videos we think you will love.
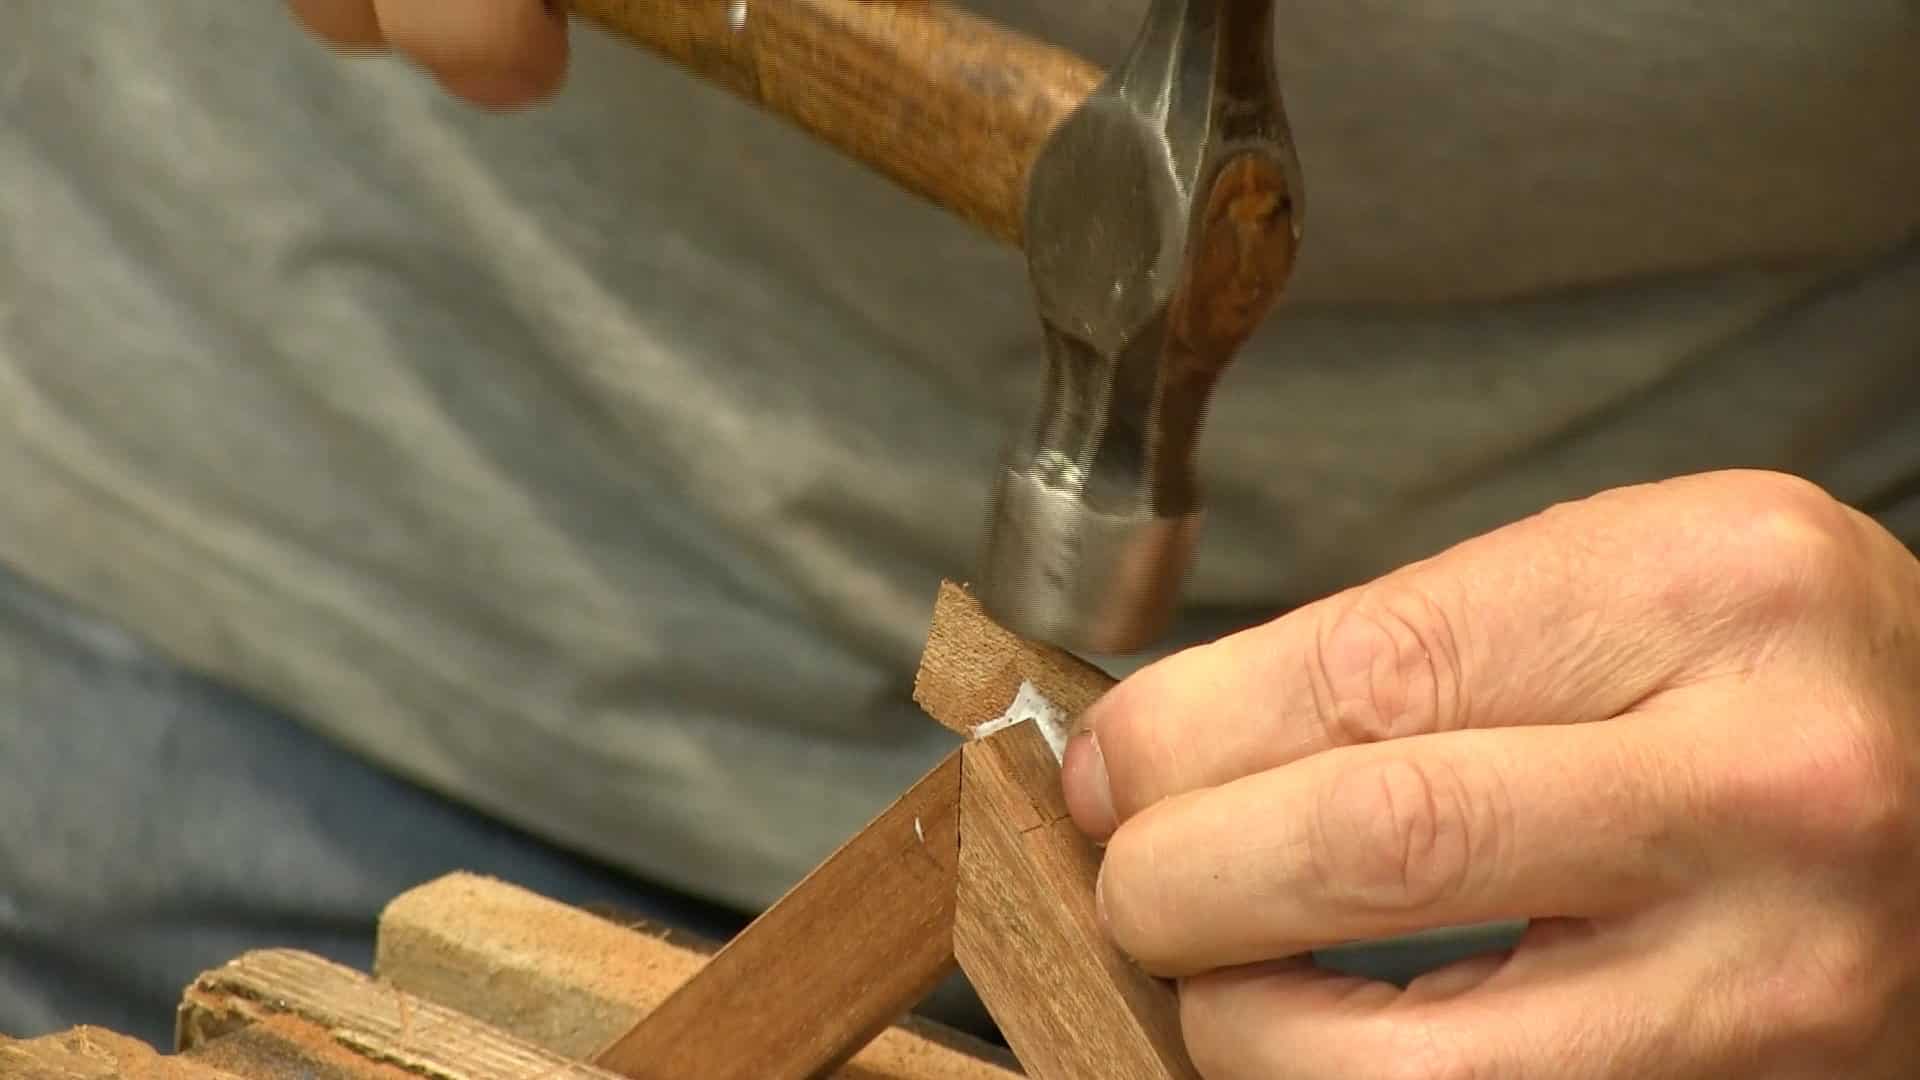
In this episode, Paul cuts and fits dovetailed splines in each corner which strengthen the mitre. Then it’s time to glue up the corners, making sure they are nice and tight. There are a few step to follow to make sure there is no discrepancy, so that everything lines up when you come to the final corners. That’s your basic frame finished!
Paul another great video, I can’t wait to start some of these and looking forward to some of your “decorative” touches as well.
Steve
I might start making up a bunch of frames for Christmas presents? Thanks.
Verry interresting and needed project, so.. thank you, Paul.
Just for practice – I’ve just tried to cut splines from pine. I’ve used Veritas 14ppi dovetail saw. It’s very hard to cut splines thin as the saw blade. Also, it’s hard to put it into the frame without brake them. Maybe pine is not the best material for this… I have to try oak maybe… 🙂
Really like the methods! Quick question about order…anybody see potential drawbacks to clamping the frame using a strap clamp (which I find effective and easy), ensuring proper miters, gluing it all together, and then cutting all the dovetail spline kerfs on the glued and secure miters?
I feel it would give me more time for the glue-ups.
I would like to get some guidance this too. The frames I’ve made so far have been glued and band clamped and splines put in when the glue is cured. I use a shooting board to make the mitres, and, the thing I like about the band clamp is that you can do a dry fit to check them and get them perfect before going near the glue bottle.
Bill
Bill, I tried this and failed. The problem was that the end grain glue joint was far to fragile and would break apart while trying to insert the splines. I even tried sizing the joint first with a 50/50 mix of PCA/water—no go. The other issue is that the glue can prevent the miter from seating all the way which means you have to resaw the kerf which cause failure because of stress on an unsupported joint. I suggest using Paul’s method and using an extended open time glue (I think TiteBond II is one) so you don’t have to rush as much. Personally, I use hot hide glue and it’s great. It has the extended open time and reversibility that allows me to relax and work quickly, but not frenetically. It also has MANY other advantages too. A glue pot can be an investment, but a combination of a regular hot plate, a cheap pot, Mason jar and thermometer can be a great low-cost substitute. There are lots of articles and YouTube videos out there on the subject. Good luck.
Great instructions. I made my first frame last night and it turned out very nice.
I found a somewhat finger safe way to trim a shim for the thickness of the saw kerf. Place your plane in the vice upside down, put two fingers on the shim, and push it over the blade with a scrap of wood. Worked great for me and your fingers never come in contact with the blade of the plane.
Ray W
gotta love that man, what skill. I learn so much everytime I whatch.
Another enjoyable video, I am self taught at framing and have made most of the mistakes to be made. So it was great to watch Paul who showed us the way to do it I perticularly enjoyed the micro adjustments,
I will watch the next part tomorrow can’t wait.
Larry.
Can this method be used to make a little bigger mirror frames? Let’s say, 100cm x 6cm? Is this joint strong enough to hold a mirror of this size? Or what kind of joint is better for this?
Thanks
I just wonder if I need to check the frame for square when gluing up?
How do you fix an open joint after gluing like the one at 29:57? I like to fix on the spline hole done earlier but I don’t think that it would work on the end of a mitre.
It would be nice to know how to deal with those kinds of things (since it happens to me more than I would like).
Think this one may have just needed planing, but the main possible method would be to cut a thin (often wedged) piece to fit in the gap that has corresponding grain. This is then glued in place and planed. I think that answers your question.
Best, Phil
Maybe I missed it in one of three videos. How and or what method is being used to hold everything(glass, picture, backer board) into the frame?
Hi Brian,
It’s not included in this series, but I recall it is included in the mirror project.
Wesley
I’ll check it out.
Thank you.
I just made a pair of frames using your techniques and I wanted to share an idea I had to make the splines seat a little easier. I expect my splines come off the saw a little rougher and less consistent than those of Mr. Sellers, so I had a hard time getting them to seat even after using my plane to thin the leading edge.
I placed some 180 grit sandpaper on the bench top and slightly lifted one long edge of the spline, then ran it back and forth until the spline was the appropriate thickness. This had an added benefit of smoothing the saw marks on the spline and really made a difference when it came time to glue-up. It saved me some gray hairs and expletives while salvaging a few splines I cut just a little too fat.
Could you use this same technique to make window frames? Would it be strong enough? Would the saw curves/splines need to be thicker?
Hi Rob,
I passed your question on to Paul and his answer is below:
No, it’s a completely different joint with different functionality, this would have no structural strength for something the weight of glass.
Kind regards,
Izzy
I am laughing to myself thinking of being able to accurately cut splines like that. Oh well perhaps I will surprise myself! You never know until you try.
By far the scariest build I have done to date, worried that I wouldn’t get 45 degree corners. I made sure the members were same size for each dimension, and made sure I had 90 degree angles on each miter, the other way. The splines part was even scarier.
It turned out beautiful!!!