Pictures of your progress building the Wall Clock
Welcome! / Forums / Project Series / Wallclock / Pictures of your progress building the Wall Clock
- This topic has 217 replies, 52 voices, and was last updated 9 years ago by
dborn.
-
AuthorPosts
-
 8 December 2012 at 7:13 pm #4409
Hi Juryaan
That looks really good What process did you use for finishing it with?
David

Thank you David,
i must say i am very proud of it myself too.
Just received Paul’s book and dvd’s and i hope to make the projects of that course also.
Never thought this would be so addictive.
I finished the clock with Danish oil and some furniture wax.
Applied the oil with an old shirt and the wax with 0000 steelwol and then i sort of buffed the wax with a shoe brush.
I honestly didn’t exactly knew if i was doing it correctly ,
but i saw a video of Paul where he also used a shoe brush on a box he made .
I just tried it and i think it came out nice.
9 December 2012 at 7:15 pm #4433I have done all but insert the clock, for I ordered from http://www.klockit.com. Inexpensive, so I am not sure how well they will work. I started out using some old rough-sawn poplar which I have on hand. I planed it down, but it is discolored in places. So I replaced the worst pieces with kiln-dried poplar. Because of the discolorations, I will probably use milk paint. That is something have wanted to try for some time.
To Paul – I have really enjoyed this project. The videos are very educational and well done.The process is addictive. From the posted comments, it seems to be pretty well accepted. I would like to attend the New Legacy school at some point. Also, all of the clocks posted in the forum have turned out well and reflect the diversity among woodworkers in finishing their work.
Richard Kurshan
Attachments:
You must be logged in to view attached files. 9 December 2012 at 8:19 pm #4438
My clock is assembled and waiting for a finish. I am ashamed to admit it, but I had to resort to power tools to create the cove molding. I used my old portable table saw to cut the cove using a method I found on the internet. It worked well but I do not recommend it! Very dangerous and messy! Now I’m looking into molding planes and a gouge.
Attachments:
You must be logged in to view attached files.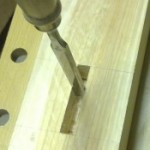 9 December 2012 at 10:22 pm #4443
This is my first attempt at working with hand tools and I am finding it very enjoyable, although, somewhat frustrating at how difficult it is to handle what seems to be such a basic exercise. Such as cutting with a handsaw, especially when it comes to ripping. My rips, and to some extent my crosscuts, all angle in to the left. Unsure what I am doing wrong there.
Pictures of my first dado joints made by hand. Overdid it on one that was originally too tight. By the time I finished it had some gaps.
Attachments:
You must be logged in to view attached files. 9 December 2012 at 11:12 pm #4445
Hello Vince and anyone else having the same experiences. Each housing dado is a learning experience and if worst comes to worst, bin ’em and start over. I feel proud of you for starting. I know how it feels and I know what it takes so press in and press on. Remember that the project is not what’s important but the process. Remember that it’s not what you make but how you make it. Get rid of false expectations and see that this is a course and you are right t the beginning. You may not be the problem, it could well be the saw or the wood or a combination. Even most new saws are junkers. I encourage you to consider the saw as the likely problem. Unless you bought a good saw, well set and sharp, you are going to have problems. There is not a tenon saw in Home Depot or B&Q that is suited to this work, so therefore it could well be the saw. Let me know which saw you are using. Send me pics as close up of the saw’s teeth as you can get. Above all, don’t be discouraged.
10 December 2012 at 2:56 pm #4477I am using an old Disston saw I got at an auction. The teeth were in bad shape and, for that matter, still are after sharpening them. Would you suggest filing them all down and starting over? Or I could always just buy a new saw, but I like using old tools. I like the history.
Attachments:
You must be logged in to view attached files.Anonymous10 December 2012 at 3:13 pm #4482Hey guys, no disrespect to anyone, but we are getting way off topic. It would be nice to keep it for the progress on your clocks.
Sorry guys I just hate threads going off topic. 🙂
I modified it slightly. It’s a little shorter, and probably not as wide. The top and bottom pieces are 8″x5″. It is about 12.5″ tall. I intend for these to be desk/mantel clocks as opposed to hanging wall clocks.
I don’t have the clock inserts yet, they’re still on their way. I did two of them, one in poplar, and a second in mahogany. Not perfect, but it was a great way to spend a Friday and Saturday off.
Attachments:
You must be logged in to view attached files. -
AuthorPosts
- You must be logged in to reply to this topic.