@cobhhive
Forum Replies Created
-
AuthorPosts
-

Hello again Pepperpot.
When I did my bevels I just cut the pieces square and then beveled them with the spokeshave by eye. It’s much more fun than doing it the “easy” way and you’ll be learning to “feel”. Also if you think about it, because of the splay in the seat back the bevel is slightly different in the middle than in the sides of the curve.
And I think the chair is plenty strong enough without the vertical supports mentioned. The angle of the seat back “triangulates” it once everything is screwed together.
I hope you’re enjoying it. D.
 Photos?
I used a flat spokeshave, I’ve never tried a round one but the flat one seems to work ok. I do have to adjust the cut quite deep on tight inside curves and of course there is a limit.
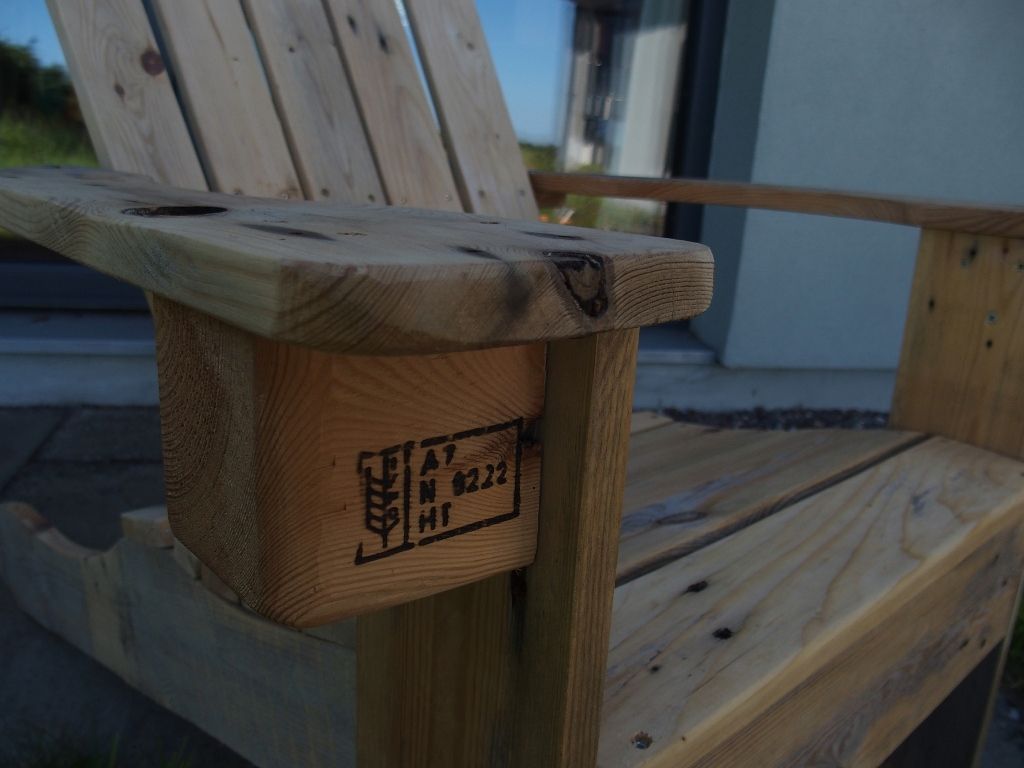
@kamikazekrieger: I’m jealous of the Americans’ and the mainland Europeans’ access to relatively cheap and varied timber but here in Ireland almost all of the wood available is imported and consequently quite expensive. Even for something like spruce. A few euro soon adds up especially when I’m not sure if my projects are going to turn out ok. I’m enthusiastic about “finding” wood in whatever way I can. However I am fussy about the pallets I use. I only pick clean fresh new ones and only HT marked (see picture).
-
This reply was modified 6 years, 11 months ago by
 cobhhive.
-
This reply was modified 6 years, 11 months ago by cobhhive.
-
This reply was modified 6 years, 11 months ago by cobhhive.
-
This reply was modified 6 years, 11 months ago by cobhhive.
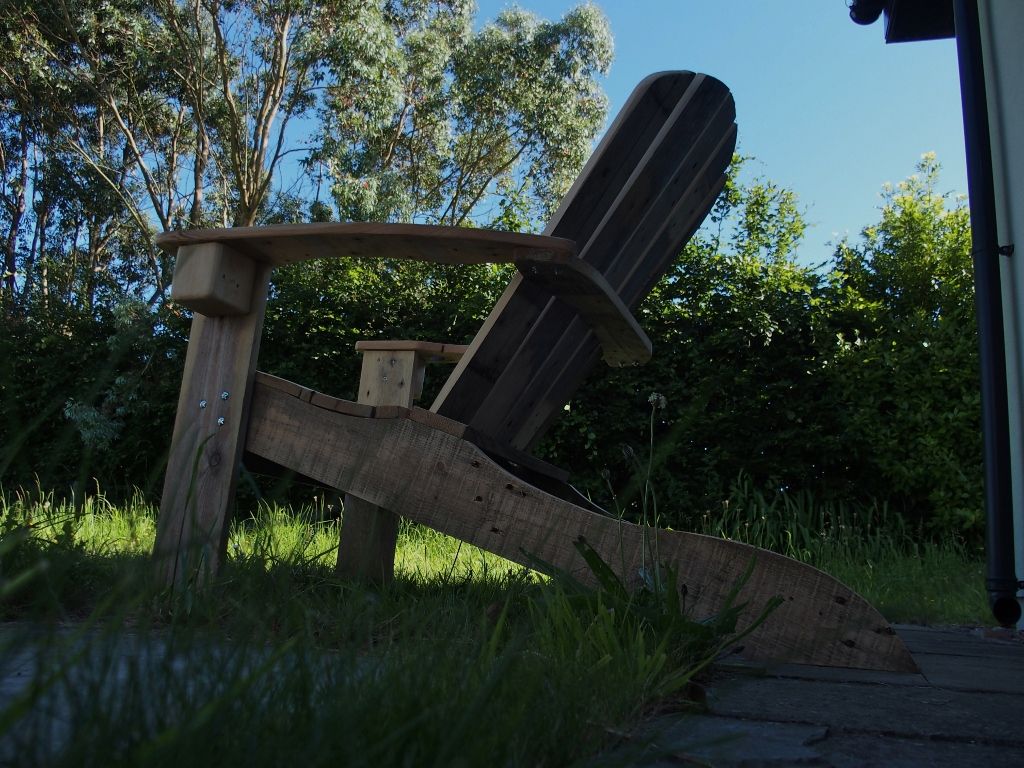
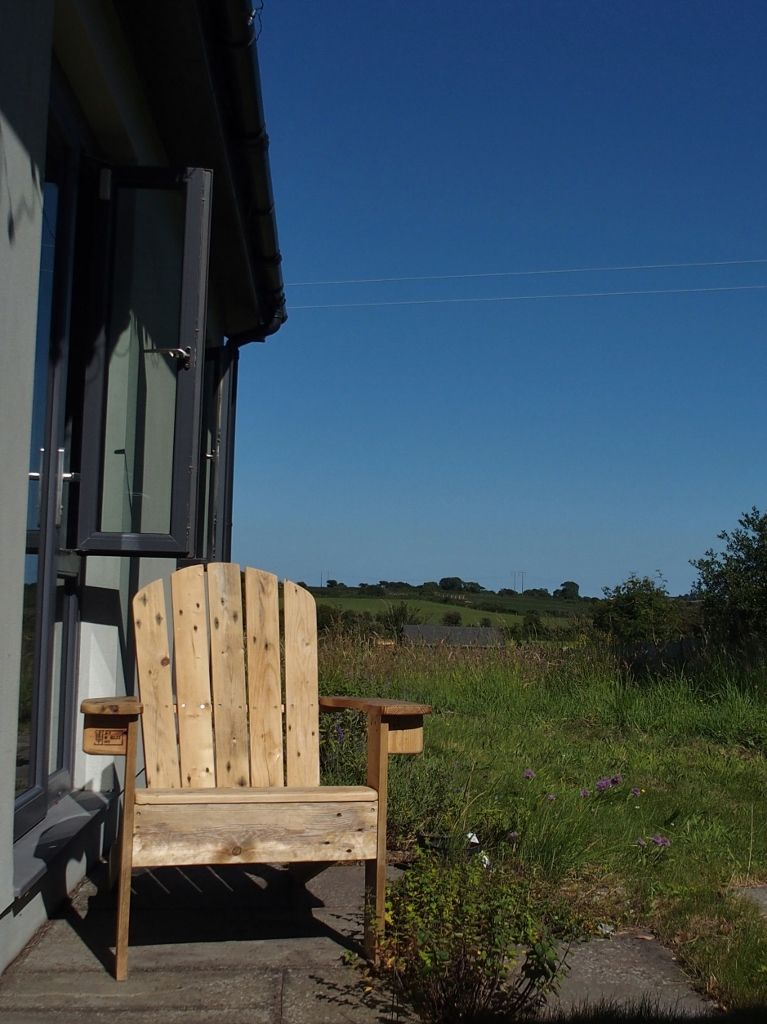
I am already thinking about a next project, an “Adirondack”-chair for a friend. It seems easy enough. I found an old online article from august 2005 from popular woodworking.
Plans can be found here: Norm Abram’s Adirondack chairWie geht’s Pepperpot? This is cool. I’m also a beginner (for a long time!) and don’t have a proper bench and for most of my time didn’t have much space either. I just recently made this very same chair for my wife. She loved the type since visiting the east coast of north America but the type of chair is expensive and hard to find here. It’s very comfortable, my wife loves it and I had a great time making it, learning so much especially “reading the grain”.
The cost of materials was some sand paper and screws and roofing bolts, maybe 3€. The pallet wood I got for free. I decided not to try and disguise that it is an old pallet. You can seen the old nail holes and I only fully planed it where it needed to be. I even made a point of showing the pallet stamp where I used the blocks as arm brackets.
I used a power sander but otherwise laughed at all the power tools “needed” in the article. A few years ago I would have been intimidated and thought it wouldn’t be possible without a room full of appliances but since finding Paul Sellers I have a confidence that I can do (and learn) far more than I previously thought I could with a limited set of tools, space and skills.
I finished the scallops (inside curves) with a spokeshave after cutting cross grain to the depth of the cut (at the deepest part) and chopping out with an axe. A mallet and chisel would be fine too if you can secure the wood. Cutting with a coping saw sounds a bit slow; there’s about 4 metres of scallops. Paul show how to do an inside arc in the bookshelf series: https://woodworkingmasterclasses.com/2014/02/bookshelves-episode-5/
You might notice that the boards for the seat are wider than the plan because I was not inclined to rip down my boards to size but it would make a more contoured seat if they were narrower. I also made the back legs longer to make the seat more level.
If I could offer advice it would be to lay out your side pieces on the floor to get your angles worked out. The article doesn’t state that the front legs are vertical but it helps if you know that.
Coincidentally I have just bought an Ece frame saw with a rip, cross, turning and “farmer” blade and I love it. I’m not used to it yet but it doesn’t seem to bind as much as my panel saws.
Your projects so far are great. Keep your mistakes, it’ll be wonderful to see how much you’ve improved in a couple of years. When I started first I used a saw bench/stool that had a tool box under it. I would sit on it with the work! It had an oval hole in the top that a clamp could fit through which was very useful for example if you wanted the whole edge to over hang the top.
Good luck with your learning.
Hello Draske,
Paul (and the team?) very helpfully designed his workbench series to be made without a bench or vice and goes ahead and does it. He gives very useful tips on all the work arounds in the videos.
I’m a beginner too and I’ve decided to make a similar bench. I’m looking forward to a solid bench and vice instead of a bolt on vice, workmate, kitchen counter and other not quite right soloutions that limit me.
[quote quote=138522]I wonder if that Tyzack name is the same one in ‘W.Tyzack & Turner’, purveyors of fine saws with beautifully hand-crafted wooden handles?
If ol’ Mr.Tyzack were around today to see what they’re producing in his name![/quote]
Ha ha. It would be interesting to see if he’d continue to make very expensive hand made tools or if he’d bow to the pressure (or be pleased) to go with mass manufacuturing (if he were still around). I know I’m glad, to a certain extent, that I’m able to afford the mass produced things that if they were hand made would be way out of my means.
Thanks for the idea for bolts. I actually have a few around in one of my junk boxes.
I suppose I posted about this saw because I was interested in the way it was made/put together. It occured to me that maybe the handle was moulded to the blade? In two pieces perhaps with the roll pins just to locate one half and then the two halves bonded together.
I have another saw which had a really horrible plastic handle that I hated. I removed it to find that the blade had pieces of tubing welded into it that the saw bolts passed through. The only ways it could have been made was to mould it on or have two halves stuck together.
Perhaps this tyzack was one of these experimental methods?
Thanks for the replies. It’s very much appreciated. Thanks Matt, it does seem at least like an unusual way to attach a saw handle! I suppose I was wondering about the engineering side of the design. It does seem like a good way to make sure that the holes in the blade are filled by the retainers and the saw is rock solid that way ie: the handle doesn’t rock up and down. I can’t figure out how it was meant to clamp the blade in the handle though and that’s where it’s loose; side to side. Without taking it apart I don’t know if the pins go into the handle on the other side of the blade plate.
Thanks also Alan, I did try drving the pins in more and stopped myself for that reason; was I likely to drive the handle apart if the pins were all the way to the bottom of their holes. Mentioning shims though has given me an idea to try shiming between the blade and handle. I would prefer to keep the plastic and I’ve found it more comfortable than some of the wooden ones that I’ve used but I suppose I’d also prefer a saw that works too.
I’ll keep you posted. It might be some use to someone else who has one of these apparently odd tools!Attachments:
You must be logged in to view attached files.
[quote quote=138090]That discoloration on the sole of the 078 may have come from sitting for too long on nonslip rubber shelf liner. I’ve seen similar from that cause.
[/quote]
That’s kind of what I thought, maybe slightly damp textured material, rusted and the rust cleaned off?
-
This reply was modified 6 years, 11 months ago by
-
AuthorPosts
 Photos?