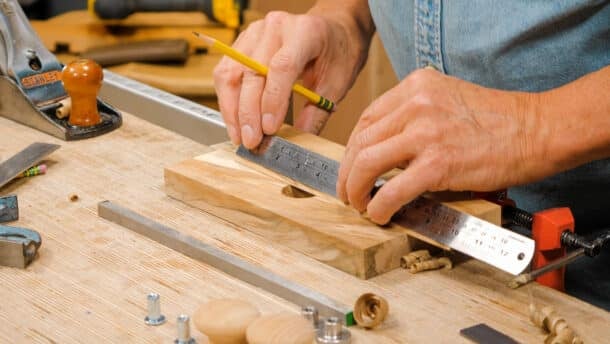
How To Make The World’s Best Router Plane
Posted 22 October 2021

This is the introduction for a free series. Want to watch the whole thing? It is free to do so, you just need to log into the site, and you can enjoy this series and many other videos we think you will love.
Can a homemade wooden router plane give you what an all-metal one gives you? It absolutely can!
Paul has wanted to answer the need for a low-cost hand router plane that does not, in any way, take second place to any of the established ones made by Stanley and Record in the last century. Neither does it compromise on the utility offered by any of the high-end expensive ones.
Excellent one Paul – look forward to making this one
Thank you Sir, I’ve been holding on not to give in to free market absurd… you know, there is one of those router planes you have bought for a bit more of 10 pounds in an outrageous 1000 pounds bid on ebay…
I’m deeply grateful for your practical common sense and feel proud of following your teachings.
Greetings from Chile
Why to compare the ultimately priced collector’s piece from ebay auction?
There are some router planes by Veritas on the market at a reasonable price, although they are certainly not cheap.
And with all due respect u-tube is full of videos about shop made router planes which look much better than this one.
@Alexey – I did a quick scan of several pages of other videos, found only 1 other that looks nicer than this at equivalent format (meaning no custom machined metal parts), and that one had the right-angle blade instead of Paul’s 50 degree angle.
Keep in mind this is accessible for the home gamer. Making a 90 degree bent blade plus a housing/base that can handle the additional stressors is a good jump in wood quality required plus workmanship to maintain integrity so it doesn’t crack apart under loads.
If you find other models/designs you prefer, that’s totally your choice, have fun out there! It’s all just community learning and growing.
Alexey Marinchev, is the glass half empty.
Making a router plane is an achievement in itself. Looking better than the one on this site, I did not know that planes actually had a Beauty Quest. Router Plane Model of the Year award must be, sorry I missed the modeling.
Not sure why one would want to can the model here. The company is great, Paul Sellers is an absolute wizard of woodworking and if the plane is good enough for him then it is certainly good enough for me.
I might make one and enter it in the beauty quest. Teak or ebony would turn some planes on their head.
I know, I know sarcasm is the lowest form of wit, but I am great at it.
For me beauty of a tool is secondary (or tertiary?) functionality being first. In this case fun building it is the secondary “goal”. 😉
I bought the hardware kit and built it SLOWLY during a couple of week ends using with scrap beech. GREAT FUN and not much difficult. Thanks, Paul.
Goooooooooaaaaaaaaallll l!!!!!!!
You are every REAL woodworker’s dream mentor! Blessings on you from America’s heartland: rural Ohio.
Really made my day. Stanley and Record 71’s are now priced for collectors and despite looking for ages have always been very expensive. So happy to have a design that allows proper micro adjustment that I can make for myself. Ordering bits now. Thank you so much.
Thank you Paul for sharing your knowledge with us. I can’t wait to make this!
I am looking forward to making it!! Thank you very much, Paul!! You are such an inspiration!!
Oooohhh!! This is going to be wonderful!! I have been waiting for this tool! I can already see that the inclined iron will be albe to give more powerful strokes than the not so poor man’s router. It will also be easier to sharpen. Great!!
Let me watch the video now; I’m sure the team has done a superb job as always.
Thank you for creating this tutorial and plans, I look forward to building this plane very soon.
Is there any reason NOT to cut a “mouth” at the front of the plane to prevent catching shavings under the front edge?
Stronger and allows for use on narrow edges without the bridge piece you need with the metal ones plus you can make a second (3rd and 4th) and transfer the component parts for such work or make two, three and four for peanuts anyway now.
Would the blade work better bevel up? Even with the 25 degree bevel down its hard to use to trim shoulders.
@NGreene, bevel up would increase the angle of presentation to somewhere around 70-80 degrees.
Lovely. Thanks so much.
Looks like a good design Mr. Sellers. I’m already going through my scrap bin looking for some nice pieces to use. It looks like I can get everything on Amazon. The only questionable item is the iron. It looks like they offer high speed steel which is probably good, I just don’t have any experience heat treating it. I’d rather use 1095. Thanks for looking out for us!
Timothy Earll ,
You probably don’t want high speed steel. Generally this comes hard and it can’t be annealed easily in the home shop unless you have an annealing furnace.
O1 is oil hardening steel and it is readily available on Amazon though I can’t find 10mm or 3/8″ square. You can get it from outfits in NA like KBC Tools or MSC Direct though. I made several cutters much like this one based on Paul’s earlier suggestions for a plough plane. The O1 can be shaped with a file and hacksaw then hardened and tempered but is is very shape stable. For custom hand tools it would be hard to beat. It’s good to have on hand in a wood shop anyway and small pieces can be done with a MAP torch or in BBQ charcoal.
1095 is knife steel and it might work very well also.
I really want to do this project. However, the downside is the tool steel and where to buy it. You can’t just buy a small chunk and usually at least 36″ long. It’s expensive. And where to get is difficult. At least for me. Looks like only on line. It’s not like you can run down to your local HD.
I just ordered 10mm square 200mm long blanks for $5 each from Amazon. Got the hardware from McMaster Carr. Looking forward to the second video for this router.
Would someone please post a link to where to get he steel on Amazon or elsewhere: so far no luck on this and it’s rather a deal-breaker… Thanks.
onlinemetals.com has exactly what you need, now that is State Side,
Can you provide a link to Amazon for the blade stock please. Much appreciate it. Cheers!
Yes, McMaster Carr sells 3/8 by 3/8 O1 tool steel rods. Their website is technical so I called and spoke with someone right away. They gave me the item number for ordering and I ordered an 18” long 3/8 x 3/8 square rod. I don’t need it all but now I have some extra for a plane or another router. You will have to create an account with them.
Do you think 1045 steel would work for this also? I’m not finding square bars of O1 or 1095 here in Brazil.
1045 is too low in carbon to hold an edge. You would be continuously sharpening it. 1075, 1084 or 1095 would work.
This is awsome and gives me an idea to make a stanley no 66 beader in this fashion. I have used one and the fence stop does not stay inplace under heavy use. With a little ingenuity this might be more versitile, with making a more stout fence.
I am very much looking forward to making this tool. Thank you Paul!
Dear Mr. Sellers, I admire Your desing. It’s so simple, but effective. A few months ago I made three router planes, using allen keys as irons, and they suits me very well (they have depth adjusters and depth stops), but I want to build one from Your desing – You can’t have enough router planes. Watching Your video I started to wonder if it wouldn’t be easier, to make housing for the iron first on one face, make all holes for screws (while it is still rectangular), and then saw and plane at a 50-degree angle face, that will be glued to the main body? After that holes have to been deepen, but I think making a housing for the iron will be easier. Of course this block will have other dimensions – I think 25x30mm for the block that You made in video. Please tell me what do You think?
Allen or Hex keys are not a bad steel. However, they are only hardened to C45 versus a good plane iron or chisel to the high Rockwell C50s or C60. Check the specs at https://itpbolt.com/wp-content/uploads/2015/08/Alloy-Steel-Hex-Keys-Bits.pdf or you have assess see spec ASME B18.3-1998.
The spec says Allen keys are to be made from alloy steel, but it is not specific. They have a heat treatment of quenching and then tempering. So it might be possible to heat the key cherry red and oil quench to harden it. Heating in a preheated oven to ~300°F for an hour would temper it down to a less brittle hardness. Try it out on a spare key first, of course. I might try re-heat treating a key. See if a file will cut it or just skate across to check if the hardness increased.
Actually, I think You got me wrong. My allen key routers are fine and they suit me very well. Also with sharpness and edge durability. As I was watching 1st episode of this series, I thought that making the top block might be easier.
Wonderful – have been switching over to wooden planes in my work and was just thinking about looking into wooden routers the other day. Will take this as a sign to start building.
For those lamenting difficulty of accessing tool steel (in the US anyway), I might suggest McMaster Carr – they have you covered for every size, shape, and variety. I would definitely go with O1 over HSS for this. I’d go with O1 over just about anything for hand tools, really, including the much-overhyped A2.
Thank you, I’ve been having trouble finding a source for the steel. McMasterCarr looks like the best and biggest playground ever 🙂
They charge about $27 for an 18″ length of 3/8″ x 3/8″ O1 steel, which is enough to make 3 or 4 plane irons. Most DIY router plane plans use commercial plane irons, which have the wrong shape for this plane. I like Paul’s idea of a fine adjuster and will give it a try.
Thanks for the McMaster Carr suggestion. I found the same bar that Pat Brown called out further down in the comments.
https://www.mcmaster.com/9516K99/https://www.mcmaster.com/9516K99/
Thanks Paul!
I have ordered the material and can’t wait to get started.
What a wonderful gift! Thank you Paul.
All components are readily available here in Germany, with one exception. I cannot locate 10mm x 10mm O1 Steel. It is very common in other dimensions, for knife makeing. If anybody can give me a hint where to get this, I would appreciate it.
I was thinking if it would be a good idea to make an asymmetric plane (longer on one side) for tendons?
I can’t help with where to buy 10 mm square O1 steel in Germany (it’s readily available in the UK), but in case it helps your search, it’s known by quite a lot of different names over here, not just “O1 tool steel”. These include “ground flat stock”, “gauge plate”, “O1 tool steel”, “AISI 01”, “Werkstoff nr. 1.2510”, “ISO 100MnCrW4”, “JIS SKS3”, and probably several other standards have other numbers for it too. Failing that, I’m sure you could get away with some other oil hardening tool steel.
I guess some of the UK suppliers may be willing to ship to Germany, but I’d be surprised if there isn’t a local company who can supply it.
Thank you Alan, this was very helpful. I found a supplier by using one of your search terms. I have never really worked with steel. Very excited about this project.
Dear Alan,
try to look for 1.2842. It is almost exactly the same like 1.2510 (often distributors don’t even make any difference between these two) and in Germany much better available in square shape (“Vierkant” in german) than 1.2510, which often only comes in round shape.
Best Regards,
Thomas
Yeah like Alan below, I’m not of particular help but don’t get hung up on “O1” verbatim. You just want an oil-hardening tool steel (manufactures should tell you how the steel is to be treated) – avoid water-hardening and air-hardening steels.
As an alternative to seeking out purpose-made pieces of steel in small quantities, which inevitably will be expensive, why not re-purpose a modern “Mortise Chisel?”
These chisels that I have in mind differ from the older mortise chisels that had a purpose-made tapering profile and it’s the sort of thing that is often found second-hand, usually with a plastic handle. They were forged with straight and squared edges…… consequently they had a tendency to bind in a deep mortise, where they older ones remained free.
Provided that the blade has the required size and rectangular cross section they should work, at the expense of sacrificing a second-rate tool.
The blade could be cut to length, worked to suit this project and if necessary, re-tempered.
Regarding the chisel idea – the Narex mortice chisel I have doesn’t have a square pair of faces about the whole thing, it’s tapered everywhere to “Ease waste removal”. Blooming frustrating if you ask me as it doesn’t reference anything!! If you were to pursue this, you’d want to double check you had bought something actually square and parallel.
Will this work with flatter cutting irons as well?
A few months back I managed to buy more than a dozen old plane irons very cheap, some of which have parallel back and front faces. I was thinking about cutting narrower strips from them and reuse in a self-made router plane – and now the perfect recipe arrived!
Used a Alan key of the correct size when I made my router two years ago. Good quality steel ground to fine edge.
Brilliant. Lovely tool. Can’t wait to whip a couple up!
I’d think repurposing an old chisel or different irons is definitely a viable route – field ingenuity and resourcefulness is how we grow as craftspeople. Only thing to watch for is overheating the steel while you’re reshaping the steel into a cutter. To that end, I’m very interested to see how Paul and team go about the making of the iron here – I’m hopeful it’s covered in some detail.
I’ve just watched first episode of your new router build, i’ve been looking for second hand router but out of my price range, so so glad i didn’t manage to by one yours looks absolute quality and better and the thought of making a few myself is so exciting i cant wait to build one any chance you could mention were we could buy the parts from.
Thanks again Paul for everything you do.
Sean
Thanks Paul and crew, great project can’t wait to start my own. Just ordered the needed parts. I was wondering if you have given any thought of making a plough plane in the future? That would be another wonderful tool to build to go along with rebate plane and this router. Thanks again for all the great projects and teaching.
I’m looking forward to getting stuck into this project. However, I feel slightly daunted by the metalwork aspect of the project, and finding cost-effective tool grade steel. I’m speculating…. an open question to whomever, might the use of a plough plane blade with the notches already cut such as these Ray Iles ones https://www.workshopheaven.com/ray-iles-plough-plane-cutters-ri012-record-044.html be a viable option?
Greg, I think the problem you’ll run into using a plow plane blade like the one you mention is chatter. The design peculiarity of this router has the blade extending quite far forward from the last point-of-contact with the sole of the plane. Paul’s 10mm square stock is going to remain rigid at the cutting edge because of its thickness. Something like a 3 mil thick blade would honestly probably be okay for light work, but I’d worry that it might flex enough to be unpleasant in a heavy cut. Your overall idea of using a ready-made iron, though, is a good one – I just might suggest going the route that others have mentioned and look for a mortise chisel (they’re going to be very thick in cross-section). Cutting a notch out of hardened steel is going to be a bit of work, but you can do it.
Paul and team – amazing stuff. Any news on when the hardware kits might be available?
What are the capture nuts you used for the handles.
Stunning
As it was a rainy afternoon here in south wales I spent a couple of hours in the shed making one of these.
Luckily I have a little lathe so I can make the thumb screws, studs, etc.
I found an old piece of 3/8″ sq Victorian carbon steel in my bits box, and some brass knobs.
I made the depth adjuster so it can be turned over to get another 25mm depth rather than grinding two slots in the cutter bit.
I was kindly sent some old bottles french polish which just needed a drop of meths to loosen it up, so that went on as a sealer.
Thank you Paul, I might make another as a xmas prezzy for the son-in-law.
That’s fantastic – talk about building from scratch. I’ve thought about adding a small metal lathe for hardware to my shop. At the moment I lack the space as much as anything else.
What is Victorian carbon steel? Or are you just so lucky you have antique tool steel from the 1800s in your stock!?
Yes, exactly that, a piece of old high carbon tool steel, before HSS.
I’ve been looking at it for a few years and finally found a use for it.
Hard as hell before it’s tempered, it takes a razor edge.
I have a few short pieces ground up as lathe tools.
I’ve heard it said that old steel is ‘first use’ as it’s never been recycled, it is straight from the ore and may be purer?
Thanks you Uncle Paul!
I’ve been using a poor man’s router plane for a while. It works beautifully but as others mentioned it’s hard to fine tune the depth!
I love this design and I’m surprised no one thought of this sooner !
So instead of buying one of a metal router plane from LN/ Veritas, I think I can get 34 pieces of 2x4x10 timber in Malaysia, which is like 1/2 year worth of weekend projects for me !
Fantastic project can’t wait to get started.
In the UK you can get Silver steel from suppliers for model engineers.
Try Collegeengineering.co.uk
Livestream models.co.uk
Mkmetals.co.uk
A standard length is 13″ long
When heat treating ,when warm dip in borax then to cherry red ,quench in oil , the borax will stop black scale forming
I just finished mine this weekend but sadly, I just cannot get it to work very well. Despite being very careful about getting a nice tight fit to the channel, the blade moves to much on me during the cuts. I kept the entire length of the channel intact and did not flair out the ends near the base as shown in the video. Since the blade channel is not very long, I wanted to keep as much of the wood walls intact as I could. I made a second steel blade holder to double the thickness to see if that would help but it didn’t. I will keep trying but I’m not sure what to try next.
For reference, I spent about $45 on the O1 steel and hanger bolts. I had thumbnuts on hand and I could not find the barrel nuts. Instead of the barrel nuts for the handles, I tapped them with 1/4-20 threads and it worked out great. No holes needed in tops. I also turned handles on a benchtop lathe which saved some costs too. Another idea is just to eliminate the handles altogether. Handles are definitely needed for the thin base metal router planes where there is not much to grab. Not necessarily needed for a thick base of wood like this router has.
Maybe Paul could do a follow up video where he could show what could go wrong or problems he encountered when making all the prototypes? I would like to hear how others made out when making this router plane. Maybe I just messed up and should try again but I am baffled at this point because I did not stray from the plans and I kept my work very accurate.
The DIY wooden router plane shown by Wood By Wright is another very nice design and may be a better option for me. The only thing I would need to add to his design is a thumb nut adjuster to the top of the blade block holder.
Many options out there if you might be having trouble like me so just keep at it and have fun with it.
Did you kept he iron slightly protruding from the groove, otherwise the iron holder will not exercise any pressure on the iron.
If the iron is not protruding, place a shim (a shaving?) in the groove.
I search for online sources of the hardware in Pauls Parts list. The best deal I found that met all the specs, was the cheapest, all stainless steel and definitely cheapest shipping was from BELMETRIC.COM. I have no connection to BELMETRIC just trying to provide some help.
I have listed the parts list from my order and shipping costs .
5 x HNG6X60SS – Hanger Bolt Stainless Steel (HNG6X60SS) = $2.60
2 x NSLEEVESL6SS – Oval Head Slotted Sleeve Nut (NSLEEVESL6SS) = $3.70
3 x NTHUMB6SS – Thumb Nut Stainless Steel (NTHUMB6SS) = $11.46
——————————————————
Sub-Total: $17.76
Flat Rate (USPS First Class) (By Weight): $6.29
Total: $24.05
Still looking for the best price on tool steel. Found a reasonable price for an 18″ length of just over $20 but shipping was almost $30. Now looking for local source at steel suppliers and machine shops.
One comments said they found a tool steel source on Amazon that was reasonable but I have found nothing reasonable there. Any info on a reasonable on line source would be appreciated
AMAZON. ENTER 10MM STEEL BAR. FOUND 10X10X300MM FOR LESS THAN £6.
bleddy marvelous
I’m haven’t found a good source for the thumb screws/adjusters here in the U.S. Grainger has them but they’re ridiculously priced. Any other sources?
https://www.belmetric.com/knurled-thumb-nuts-c-563_578_1301/nthumb6ss-thumb-nut-stainless-steel-p-7866.html?zenid=6dvesmqcuvtder72vbdfmn8bd2
Also available here:
https://www.jwwinco.com/en-us/products/2.2-Tensioning-clamping-with-handles/Knurled-screws-nuts/DIN-466-Steel-Knurled-Nuts-with-Tapped-Through-Bore?artikelnr=466-M2.5&gclid=CjwKCAjwzt6LBhBeEiwAbPGOgZeEW2_YO9CU5RSQ41HoZIUhkg0vkr3fUBXBXk-8iM4vaO4rJd-AAxoCSrgQAvD_BwE#d1%3Du(0c49c7b3-a2d5-4127-b6ac-792d414b1606)
These are blackened finish fo about 1/3 the price. You can remove the blackening with your favorite rust removing compound for a plain steel finish
I’m showing an order total of $115 for these parts from McMaster-Carr. The most expensive pieces are the 5 threaded studs, at almost $9 each. Does this sound right?
I can get a 150mm piece of 6 mm Allthread at my local hardware store for under $10, which will do just as well as the studs and will do all you need and more. Just drill a 5 mm hole and thread them in. I think pauL even shows them being used on one of his planes.
Not right! I got a pack of five for about that price, from McMaster-Carr. They also have an Imperial measure thumb knob in brass and steel.
Here are parts numbers for the components I bought from McMaster.
9516K99 One Tight-Tolerance Oil-Hardening O1 Tool Steel Bar, 3/8″ Thick, 3/8″ Wide, 1-1/2 Feet Long
(Enough for four blades)
5125K21 Three Brass Knob with 1/4″-20 Threaded Through Hole, 3/4″ Head Diameter
90207A309. One Low-Carbon Steel Bar, 3/16″ Thick, 3/4″ Width, 1/2′ Length
8910K263 One (package of 10) Steel Wood Screw Threaded Stud, Black Oxide, 1/4″ Screw By 1/4″-20
Stud, 2-1/2″ Long
The total amount was $47 excluding tax and shipping, of which $26 was for the tool steel. The hanger bolts package was $7.83, or 78 cents per item.
I’ve noticed quite a few are struggling to find a good source for the steel. If you could find an old mortise chisel at a good price, you could probably cut that to fit. Just a thought.
I found the O1 tool steel bar at McMaster – Carr. See below.
Tight-Tolerance Oil-Hardening O1 Tool Steel Bar 3/8″ Thick, 3/8″ Wide, 1-1/2 Feet Long – 9516K99
1 each 26.62
Shipping 7.05
Tax 1.60
Total $35.27
This is long enough to make 4 cutters.
I love this idea, Paul, thank you for thinking of it! Thought you folks might get a kick out of this: couldn’t find the thumb nuts in local hardwares, so had a look on Amazon.ca to see what i might find. One vendor will sell me 10 for $8 Canadian. The very next listing thinks i should give them $500 Canadian for 25. Its a crazy world.
Anyone know of sources for the hardware in australia? especially the thumn nuts?
For those in Canada, I found out that McMaster-Carr is not shipping here unless you are a school or business due to the high cost and complexity for them to ship here (I did the order online, and they cancelled it the next day). I recommend Mr. Metal for those in the GTA. Prices were similar to McMaster-Carr, but delivery is cheaper.
I am excited about tackling this project, and of course I want it to look nice, being that it is a lifetime tool. I really like the look of the spalted beech , but that wood is not easy to find here in Houston, Texas (any kind of beech really). What other hardwood would be a good (second best etc.) choice? I realize that it can be made from any wood, including plywood. But there must be some that are better than others.
Hi David,
Have you checked Clark’s Hardwood for beech recently? They have a pretty large stack of rough European beech in next to the much more expensive curly/birdseye maple. Haven’t seen spalted material there in a year or two, but you should be able to get enough beech to make quite a few router planes.
I’ll check them out. I know they had milled beech in common dimensions but not rough. Thanks for the tip.
See link below for British Knobs very similar to that used by Paul. The dimensions in their drawing on the website indicates the projection is only 1/2 inch tall. I confirmed with Woodpeckers Crafts that the drawing has a typo and the projection is actually
1-1/2 inch tall. Price: $0.68 each. Not sure of the wood type.
https://woodpeckerscrafts.com/shop/?search_query=knbbr-134
I used 2″ knobs from Etsy shop: TheKnobieHouse.
And reworked them like Paul.
Dear Paul,
yesterday I finished the router plane almost exactly carried out according to your design. The body is made from ash and the knobs from teak, both reclaimed. In a first test it performed really nice (even if the iron was sharp but not hardened, which will happen as soon as I know which torch to buy): The plane is very lightweight, but sturdy. It glides almost frictionless on the workpiece and I could maneuver better and cut more diagonally inside narrow grooves and small recesses than with my Veritas as long as they are not too deep. The design is well thought through and balanced as for example all the bolts and nuts are used in different places and for different purposes but have all the same size. It was much fun, somehow challenging and a lot of learning during the making. Thank you very much for sharing with us.
During the making, especially when buying material, I made some experiences and gathered information which maybe are quite common and well known for others, but for me it wasn´t and it took me a while to get there. However, I would like to share them in order to make it easier for some, especially when they are located in Germany, but not only. Also some questions occurred and I am looking forward to the answers.
Steel: The O1 steel is in Germany better known as DIN 1.2510 (100MnCrW4) and it has a very close relative: O2 resp. DIN 1.2842 (90MnCrV8) which is, so was my impression, easier to get as square rod, but has the exact same properties as the 1.2510, including the hardening process and achievable hardness.
Connector Nuts: They are called “Hülsenmutter” in Germany and are available with a flat head with a nice big hexagon socket at my local Hornbach (a big hardware store chain in Germany) as single parts. Be aware that at least at Hornbach they have a diameter of slightly below 15 mm instead of 17 mm.
Hanger Bolts: They are called “Stockschraube” and are available also at Hornbach as single parts with a hexagon socket (so you can use an allen wrench and do not need to clamp it into the dill chucks). The bolts from Hornbach (and all others I found so far) have a quite big gap between the two different thread types, so I cut the M6 thread further downwards to the wood thread for the depth adjustment bolt.
Thumb Nuts: They are called “Rändelmutter- hohe Form” and are available at Hornbach and Bauhaus (another big hardware store chain) as single parts. By the way, my local Bauhaus did not have the connector nuts with a flat head (only countersunk) and the bolts M6x60 (only M6x80).
Wooden Handles: At first I could not find handles which were long enough and had a big enough diameter at the same time. So I made handles by myself with a drilling machine, rasps and files, which worked pretty well if you are no too forceful. After finishing my own handles I found and ordered a pair of wooden knobs for sauna glass doors already for the next plane. But in direct comparison I found out that they maybe are too big even for my quite big hands and the self-made knobs have just the right size. But the pair costs only 10€ including shipment is for some maybe worth a try. I will try them on the next plane to see if there is any long term benefit with bigger handles.
Borehole: In Germany diameter 35 mm is more common than 32 mm and therefore the drill bits are easier and sometimes even cheaper to get, if you do not already have one. However, if you use 35 mm don´t forget to move the center of the borehole 1.5 mm towards the front, so that the embedding of the iron is not weakened.
I hope this helps the one or other. Finally, I have some questions myself:
Paul, if you would move the center bore more to the front, the embedding of the would be stronger and the rasped relief would not be necessary. Why did you not do this, what are the disadvantages? Clogging or poor view of the workpiece edge when retracting the plane or anything else?
Could someone in Germany recommend a suitable and good torch for hardening, which features should it have?
As I could not find until today not even a single person nearby Mainz who is using hand tools, could you please raise your hands, so that I know that I am not alone here? Maybe we could even get in contact, at the latest after the pandemic.
Stay safe and healthy. Best Regards,
Thomas
Even the old Stanley router plane is getting out of reach. But even if you can afford one, there is nothing like the feeling of using a tool you made yourself. Thanks, Paul.
I noticed on your latest project that behind you on your storage bench are three sizes of router planes, or so it appears. Also, you used a full-sized router plane, but with a 1/4th inch blade, instead of 3/8th inch. Could you provide the dimensions for the smaller planes that you have made and the sizing for the metal parts? Also, could you indicate whether the 3/8th and 1/4th sized blades are sufficient in your view for the full sized plane?
I would be interested in making different sized planes and your specifications would be helpful.
As with many of our projects Paul has come up with a design which is scaleable. Paul has experimented with different sizes of router plane using his design. While Paul may talk about them in a blog post we do not plan to release drawings, cut list or metal parts for these other sizes. I understand you may just want a few measurements but we feel that to avoid inaccuracies and confusion we would need to give a full technical drawing and hardware list.
Hello,
just finished my one and it think it’s a great and very helpfull project for checking the own skills. I tried the best and was pretty happy how it came out, but there is still a problem with the cutting motion with my first outcome. If i use it straight in the dadoo it seems to have a chopping motion and the tendency to dig into the wood slightly. If I change it to a skewed cutting motion I get very good result on fir for example. I thought the 10×10 blade should be sturdy enough but now I’m not sure what might be the reason for chopping behavoiur. Rechecked all the measurements and the angles and they are OK (50°, 25° on the blade). Anyone an idea what might be the reason for this? This would be very helpfull. Looking forward to make some more. I made my one in hornbeam.
Hi Stephan, did you grind a secondary 30 degree bevel on the iron? The written instructions do not mention it as far as I can see but Paul talks about it briefly at the end of the second video. I know I did a quick test run with mine before I saw that detail and mine dug in also, with the extra bevel it works great. May just be coincidence but well worth a try. Stick with it, the end result is indeed an awesome tool, mine cuts like a dream.
Hi All, is there a good reason for having the bevel downwards on the blade in Paul’s router plane? All of the manufacturers of router planes have the bevel facing upwards.
Also, I bought some “tool steel” 10 x10 mm on Amazon UK to make my own blade but it turns out it is HSS Steel and a hacksaw won’t even touch it!
Thanks!
Iain, N Lincolnshire.
Hi Ian,
I’ve got a special HSS steel blade from a local store for the hacksaw – the other one was eaten up by the O1 steel. They cost quite a bit but did work much better and faster and can still be used.
Ian, I think the important thing is the angle that the blade hits the wood. On a store bought router plane, the blade is held vertically and then a little foot comes out at the bottom. That foot needs to be sharpened and the natural place to sharpen it, to get a good cutting angle, is the top. The plane Paul makes here, on the other hand, works in a very different way. It is much like his “poor man’s router plane” he has used a number of times in his videos. (He has a very short video on this poor man’s router plane on youtube. Watch that video to get the basic idea behind what is going on here and how his router plane differs from the usual ones.)In the poor man’s router plane, he boars a hole through a block of wood at about a 45 degree angle (give or take) and then jams a chisel, bevel down, into that hole till it can cut wood. The router plane he makes here is an upgrade of the chisel through the hole poor man’s router. Rather than jamming a chisel (bevel down) through a hole in a piece of wood, he creates a nice bed for the blade to sit on at whatever the angle is, probably about the same as the angle in his poor mans chisel, give or take. And he creates a way to easily raise and lower the blade. His blade is nothing like the blade of a traditional router plane. Rather than a vertical blade with a foot coming out, it is just a straight, chisel-like piece of steel beveled much like a normal chisel.
Sanford, your explanation makes sense; thanks!
There may be some confusion because in the diagram on page 2 the bevel is clearly facing up, but in all the other illustrations it is bevel down.
Here in Ontario, Canada it is a challenge to find O1 Tool Steel bar. I ended up buying ½” x ½” precision ground but the minimum length was 36 inches! It cost with tax over $132 CDN. So, I have LOTS left over if anyone is looking for some in the Southern Ontario region.
Also having a challenge finding wooden knobs that are as big as suggested; the usual offerings are barely over an inch by an inch which is small for my hands. Guess it’s time to get creative and make my own (no lathe).
Blessings on you, Paul. You and your team are a treasure!
You might consider getting a ticket forSaturday before the game. It’s one of the ones that the season ticket holder get priority on their assigned seats.
Sorry, I thought I was texting someone.
Hi Paul, the router plane project is a great idea, but sourcing of the correct hardware materials has become a real headache!. I have expressed interest in purchasing your suggested ‘hardware kit’. Is there any news of when the kits would be made available?
We have been working behind the scenes sourcing the parts and packaging. We just had confirmation of a steel manufacturer that is able to produce the blades on mass. They are saying they could produce them by end of February.
Thanks… I look forward to that!
Matt
US PARTS SOURCE
Primarily for fellow US followers of this blog, I have compiled a list of prices and part numbers for all metal parts needed to build the router plane, sourced from McMaster-Carr.
The hardest part to find on the McMaster web site is the screw cap that holds down the knobs. In the US they are called binding barrels.
Excluding washers, the cost for the products as I bought them is $65.53 excluding taxes and shipping. Since this set of products gives enough tool steel for four blades, and enough hangar bolts for three planes, the cost per plane drops below $50 excluding tax and shipping if you are making multiple planes and use non-stainless steel alternative components. The combined cost of tax and shipping for the whole lot likely will be between $10 and $15 within the US, depending on the state in which you live.
Since Paul is still working on the kit, and since US shipping costs may be high for the kit when it is available, I thought this would be useful for US readers.
I chose to get black oxide stainless steel parts, at a higher cost than otherwise, and brass knobs, because I like the look. The specified binding barrels have a hex key driver and are black oxide SS. The lower cost alternative is plain steel and has a Phillips-slot driver head. That’s a pack of 10, rather than 25.
“Below the line” I have also shown part numbers for black oxide washers and the less costly steel binding barrel option.
BASIC METAL PARTS NEEDED
O1 Tool Steel 3/8” x 3/8” x 18” 9516K99 $26.62
(3) Brass Thumb Knobs 1/4”-20 5125K21. $9.42. These are an Imperial measure equivalent of the Metric knobs that Paul specified.
Steel Bar 3/16” x 3/4” x 6” 8910K283 $3.12
Pack of 10 1/4”-20 x 2.5”black oxide SS hangar bolts 90207A309 $7.83
Pack 25 hex Black oxide SS binding barrels 91851A555 $18.54
Total $ 65.53
OPTIONS
Pack of 10 Binding Barrels 1/4”-20 98002A418. $ 6.49. (Cheaper)
Pack of 100 black oxide flat washers 96765A140 $ 7.70
Pack of 100 black oxide split washers. 92146A621. $6.22
WOOD KNOB SOURCE
I also wanted to share my source for the best wood knob I could find in the US. It is available in four different sizes from Van Dyke”s Restorers. I got two of the 2” knobs
https://www.vandykes.com/restorers-classic-round-stepped- walnut-knob/p/225951/s/02094071/
This is very helpful. Thanks
I made one of these last weekend from ash.i could only find hss steel in 10mm square but I have a small metal belt grinder. I used an angle grinder to cut the bevel and the notches.
https://www.instagram.com/howittjon/p/CYKfFGEr08-/?utm_medium=copy_link
Hi from Stockport 🙂
I just posted qty 6 of O1 3/8″ steel bar x 9″ on ebay. The posting is titled:
3/8″ square bar x 9″, AISI O1 Tool Steel Precision Ground
9″ is enough to make two blades. I’m in Portland, Oregon, so the shipping costs probably only make sense for someone in the lower 48 USA. (I’m also selling some spring steel plates for backsaw making and card scrapers, if interested in a combined shipping rate). I’m not trying to profit here. I just bought a few long pieces from a tool steel supplier to meet the order minimum requirement and am trying to recoup that cost. Cheers!
having recently discovered this possibility, I have signed unto the Blog spot. On signing up there was a question of if I’d be interested in purchasing a kit for making this plow plane. When would that be made available?
We are working on this and we are doing some trial shipping. We will be emailing out everyone who signed up to hear about the kits soon to tell them how they can purchase a kit.
I’m building from the kit. For anyone interested, the kit is a set of first class parts. Looks like they will last a few hundred years. There were no shortcuts taken in these parts. Blade is beveled, sharp, and has the adjustment slots cut.
Question: How far is the upper surface of the blade from the bottom front of the hole? I have the wood cut, shaped, and have the 50 degree slot cut for the blade. I’m ready to attach the upper to the lower. It seems I will have to move the upper wood (blade rest) further back than what it looks like in Paul’s video. If so, OK. But I figured I’d ask in case I had missed something. Thanks.
Hi Paul and team
Just received my router kit and everything looks great.
Thanks Harold
Just finished the router plane build this morning. The kit provided was excellent. I just had to do some minor de-burring of the adjustment slots in the iron, put a good edge on it and man, am I happy with this. I own a few other commercially made router planes (Stanley and Veritas) and this beats them all, hands down. Thank you, Paul!
Dear Paul,
a question if I may on making the top piece that is guiding the blade: In the video, essentially you create the two angled sides (50° and adjacent side, by plane or saw & plane) and the groove on the angeld piece. My idea to simplify was to take square stock, cut a 10mm grove on one side, and then proceed to cutting a 130° angle to create the triangular cross-section. All that’s needed is the height to cut then and one cut only, plus, cutting the grove to right depth should also be simpler on the square stock.
-> Do you think that could be a simplifaction and help others? Or did you go about it this way to ensure the 50° angle for the bedding?
(If I use math right, with a base of 44 mm or 1 3/4″, the cut on the front side with the groove needs to be done at ~ 28 mm in back to the square corner to yield a 50° angle.)
I was contemplating the same procedure. A single cut.
Using the sliding bevel set at 50° on the end grain will give indication of where to cut. The other angle will automatically be 40° . Trigonometry is useful but not necessary here. Although I would do the exercise on a rectangle drawn on a paper to verify any calculation.
Tobias, I made a drawing in the forum entry:
SINGLE CUT IRON SUPPORT – BEST ROUTER IN THE WORLD
Benoît – perfect, I did the exactly that this morning as I was curious how it would work. So yes, ideally take a square stock of about 44x44mm (1 3/4″ – easier when a little over-sized) and then -after the groove is cut- mark 50° off that side at the point. That marked side will be the base, so ensure to mark so it becomes 44mm long.
Worked very well for me, and it’s quite easy to mark the groove side and ends all the way, and also helps to prevent any breaking off of the groove’s walls.
I ordered the parts kit from Paul. Nicely done and reasonably priced! I built from the You Tube videos (no plans available at the time) and made changes which I thought appropriate (or to cover up screwups on my part). The design is reasonably forgiving of my skill level (middle). It does exactly what it is intended to do, smoothly.
Brilliant idea Paul loved making my router and it works beautifully. Well done. Is there no end to your creativity! Thanks so much.
Trevor Hosken
My power drill stripped the screws that I ordered. I can but new ones but I wanted to post this to see if anyone else had a similar problem.
I have had the Torx head damaged on one of the screws. I then
1. made the pilot hole slightly large;
2. waxed the screws;
3. used two nuts tightened one against the other and a wrench to drive/un-drive the screws in the wood I used.
I had the same thing, the torx head just seems too weak to drive the screw in to hard wood, even with wax. I used two of the thumb nuts in the kit and then grips to drive the screw home.
Ok. Thank u.
Ok. Thank u.
I would buy a second kit if it had a 1/4″ by 3/8″ blade. I find that many of the builds I do require a 1/4″ rebate – 3/8″ just won’t do! (My original kit is happily at work handling all the rest of the work…)
Hi, I feel embarrassed to ask but I ordered the router kit but can’t figure out how to take blade out of the plastic container it’s in! Please let me know how to remove
Hold both ends and pull in opposite directions. Its a slip fit with small notches in it to keep it together.
Thanks! I think I’ll have to try harder as it’s not easy!