Laptop Desk: Info Page
Posted 22 June 2017
This is the introductory page for a paid video series. Want to watch more of this project? Select the best option below to get started.
Description
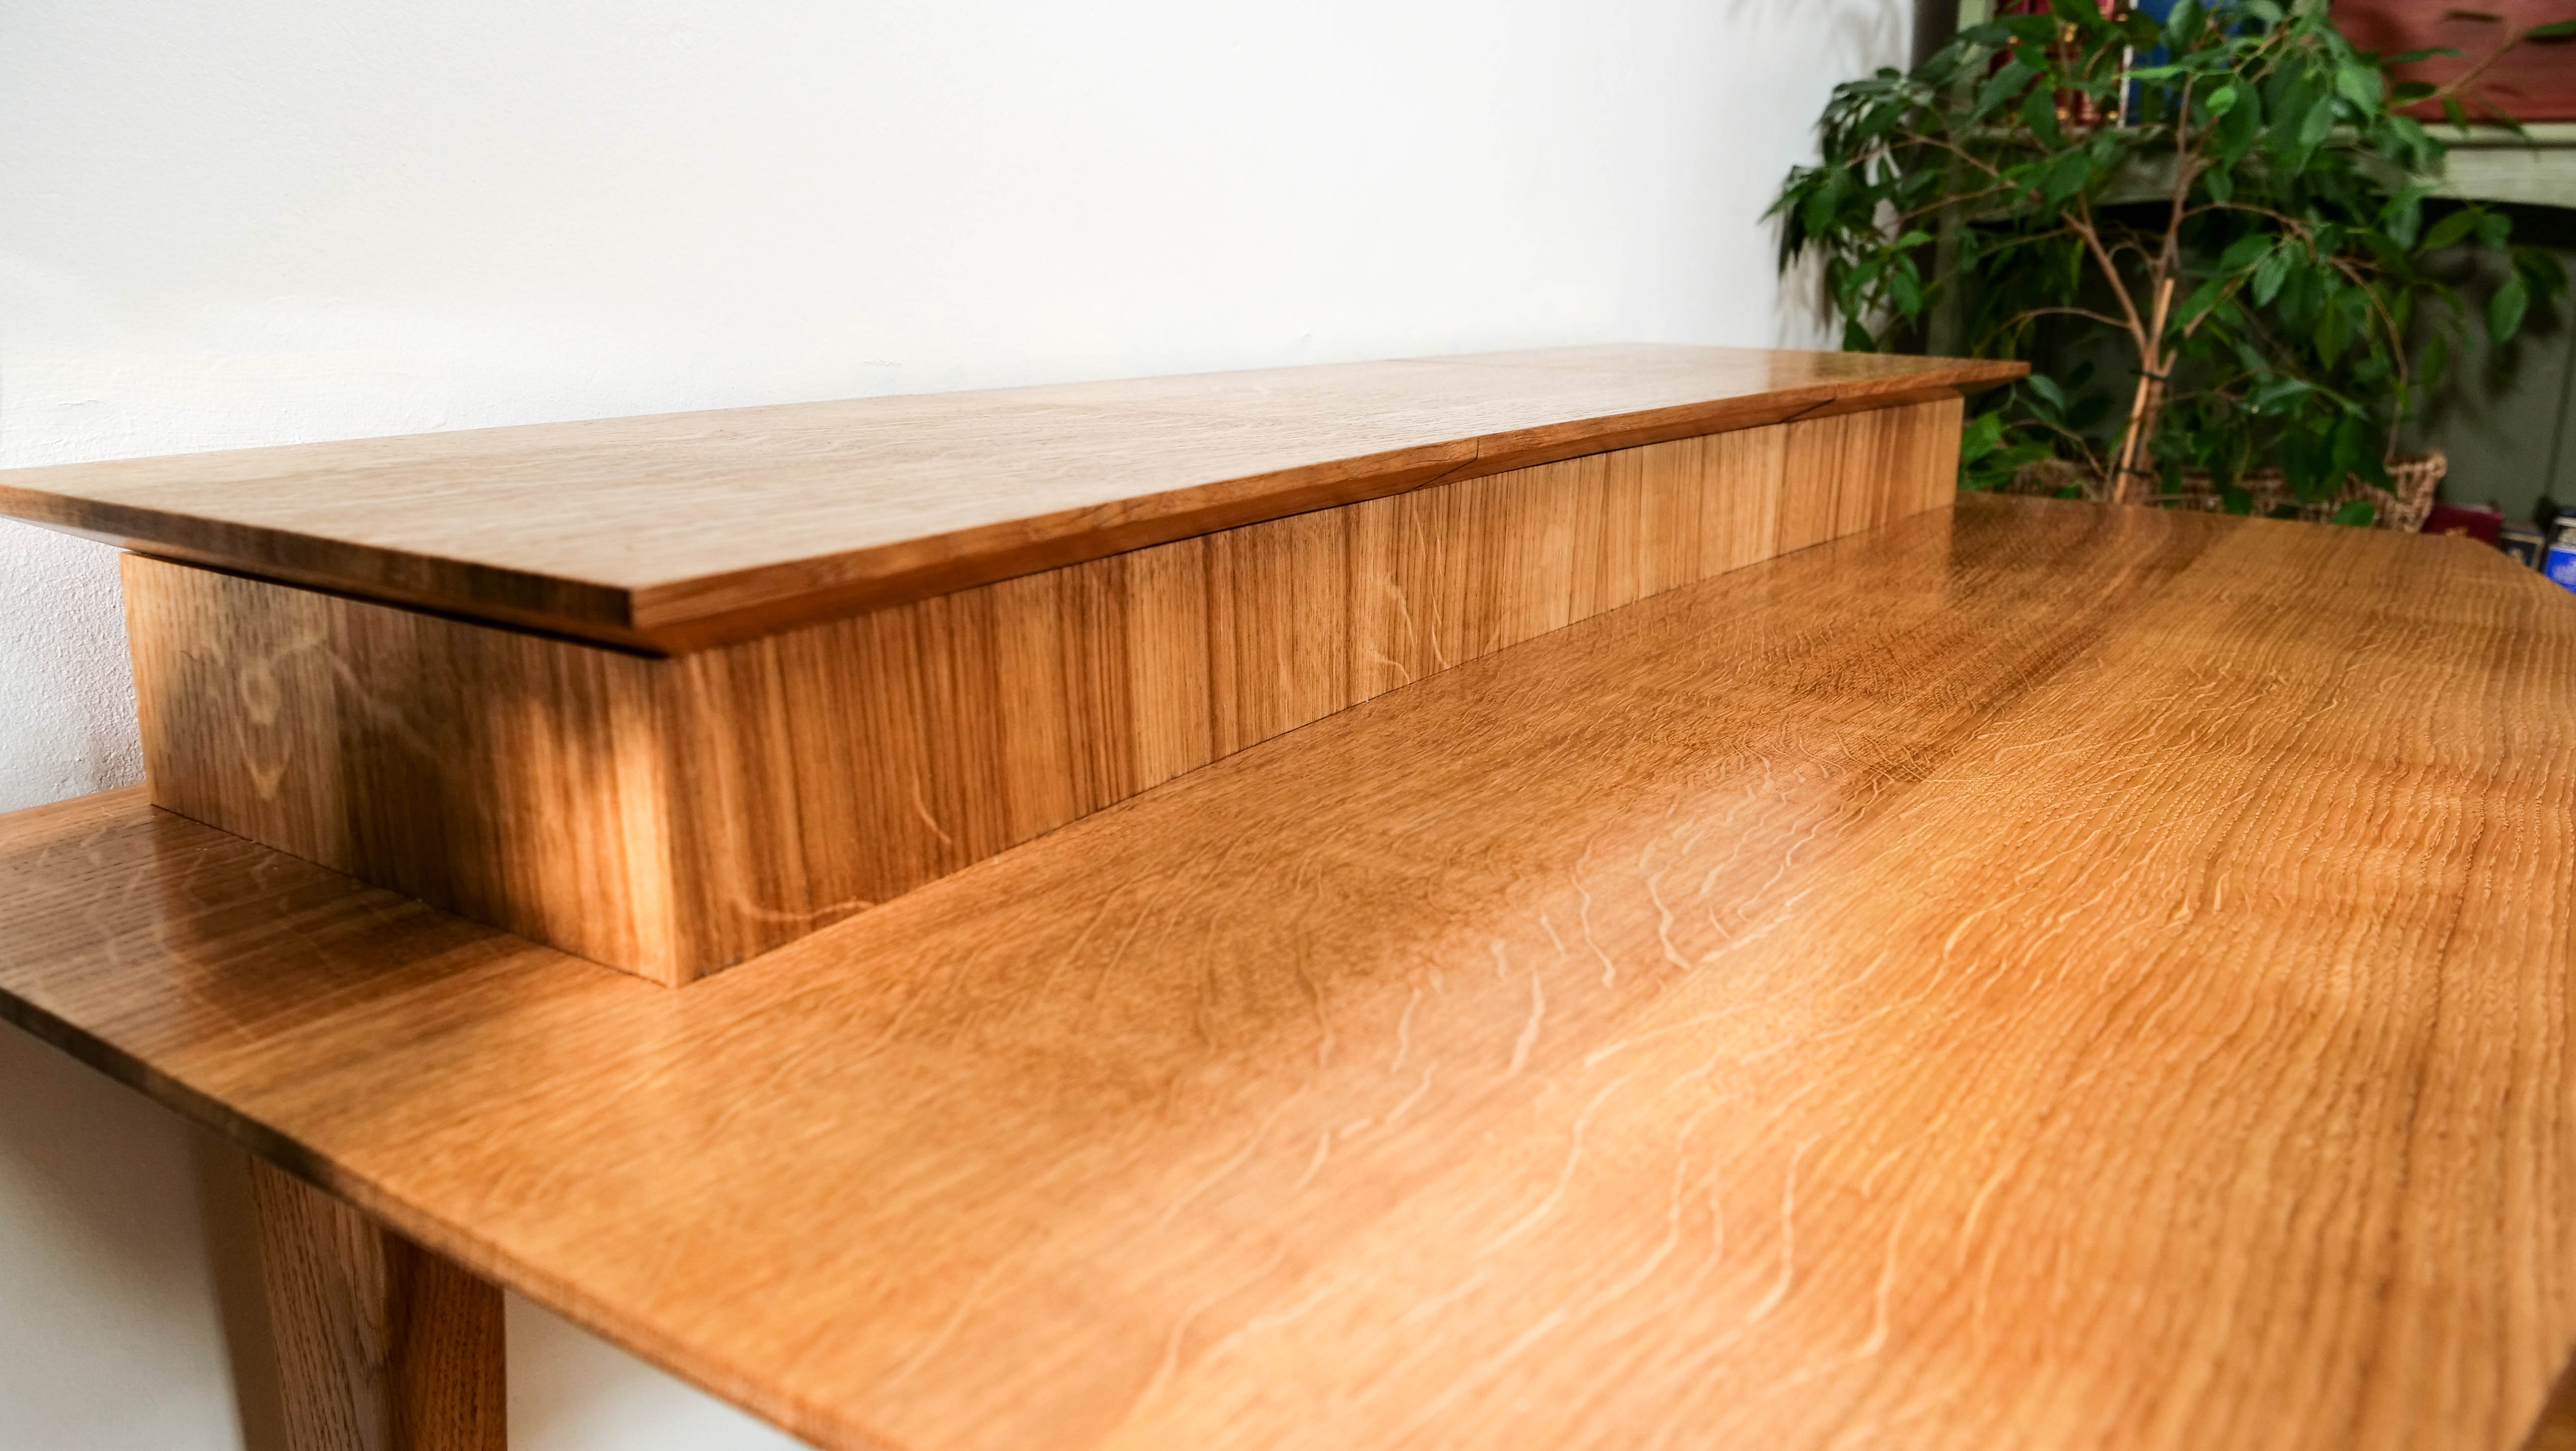
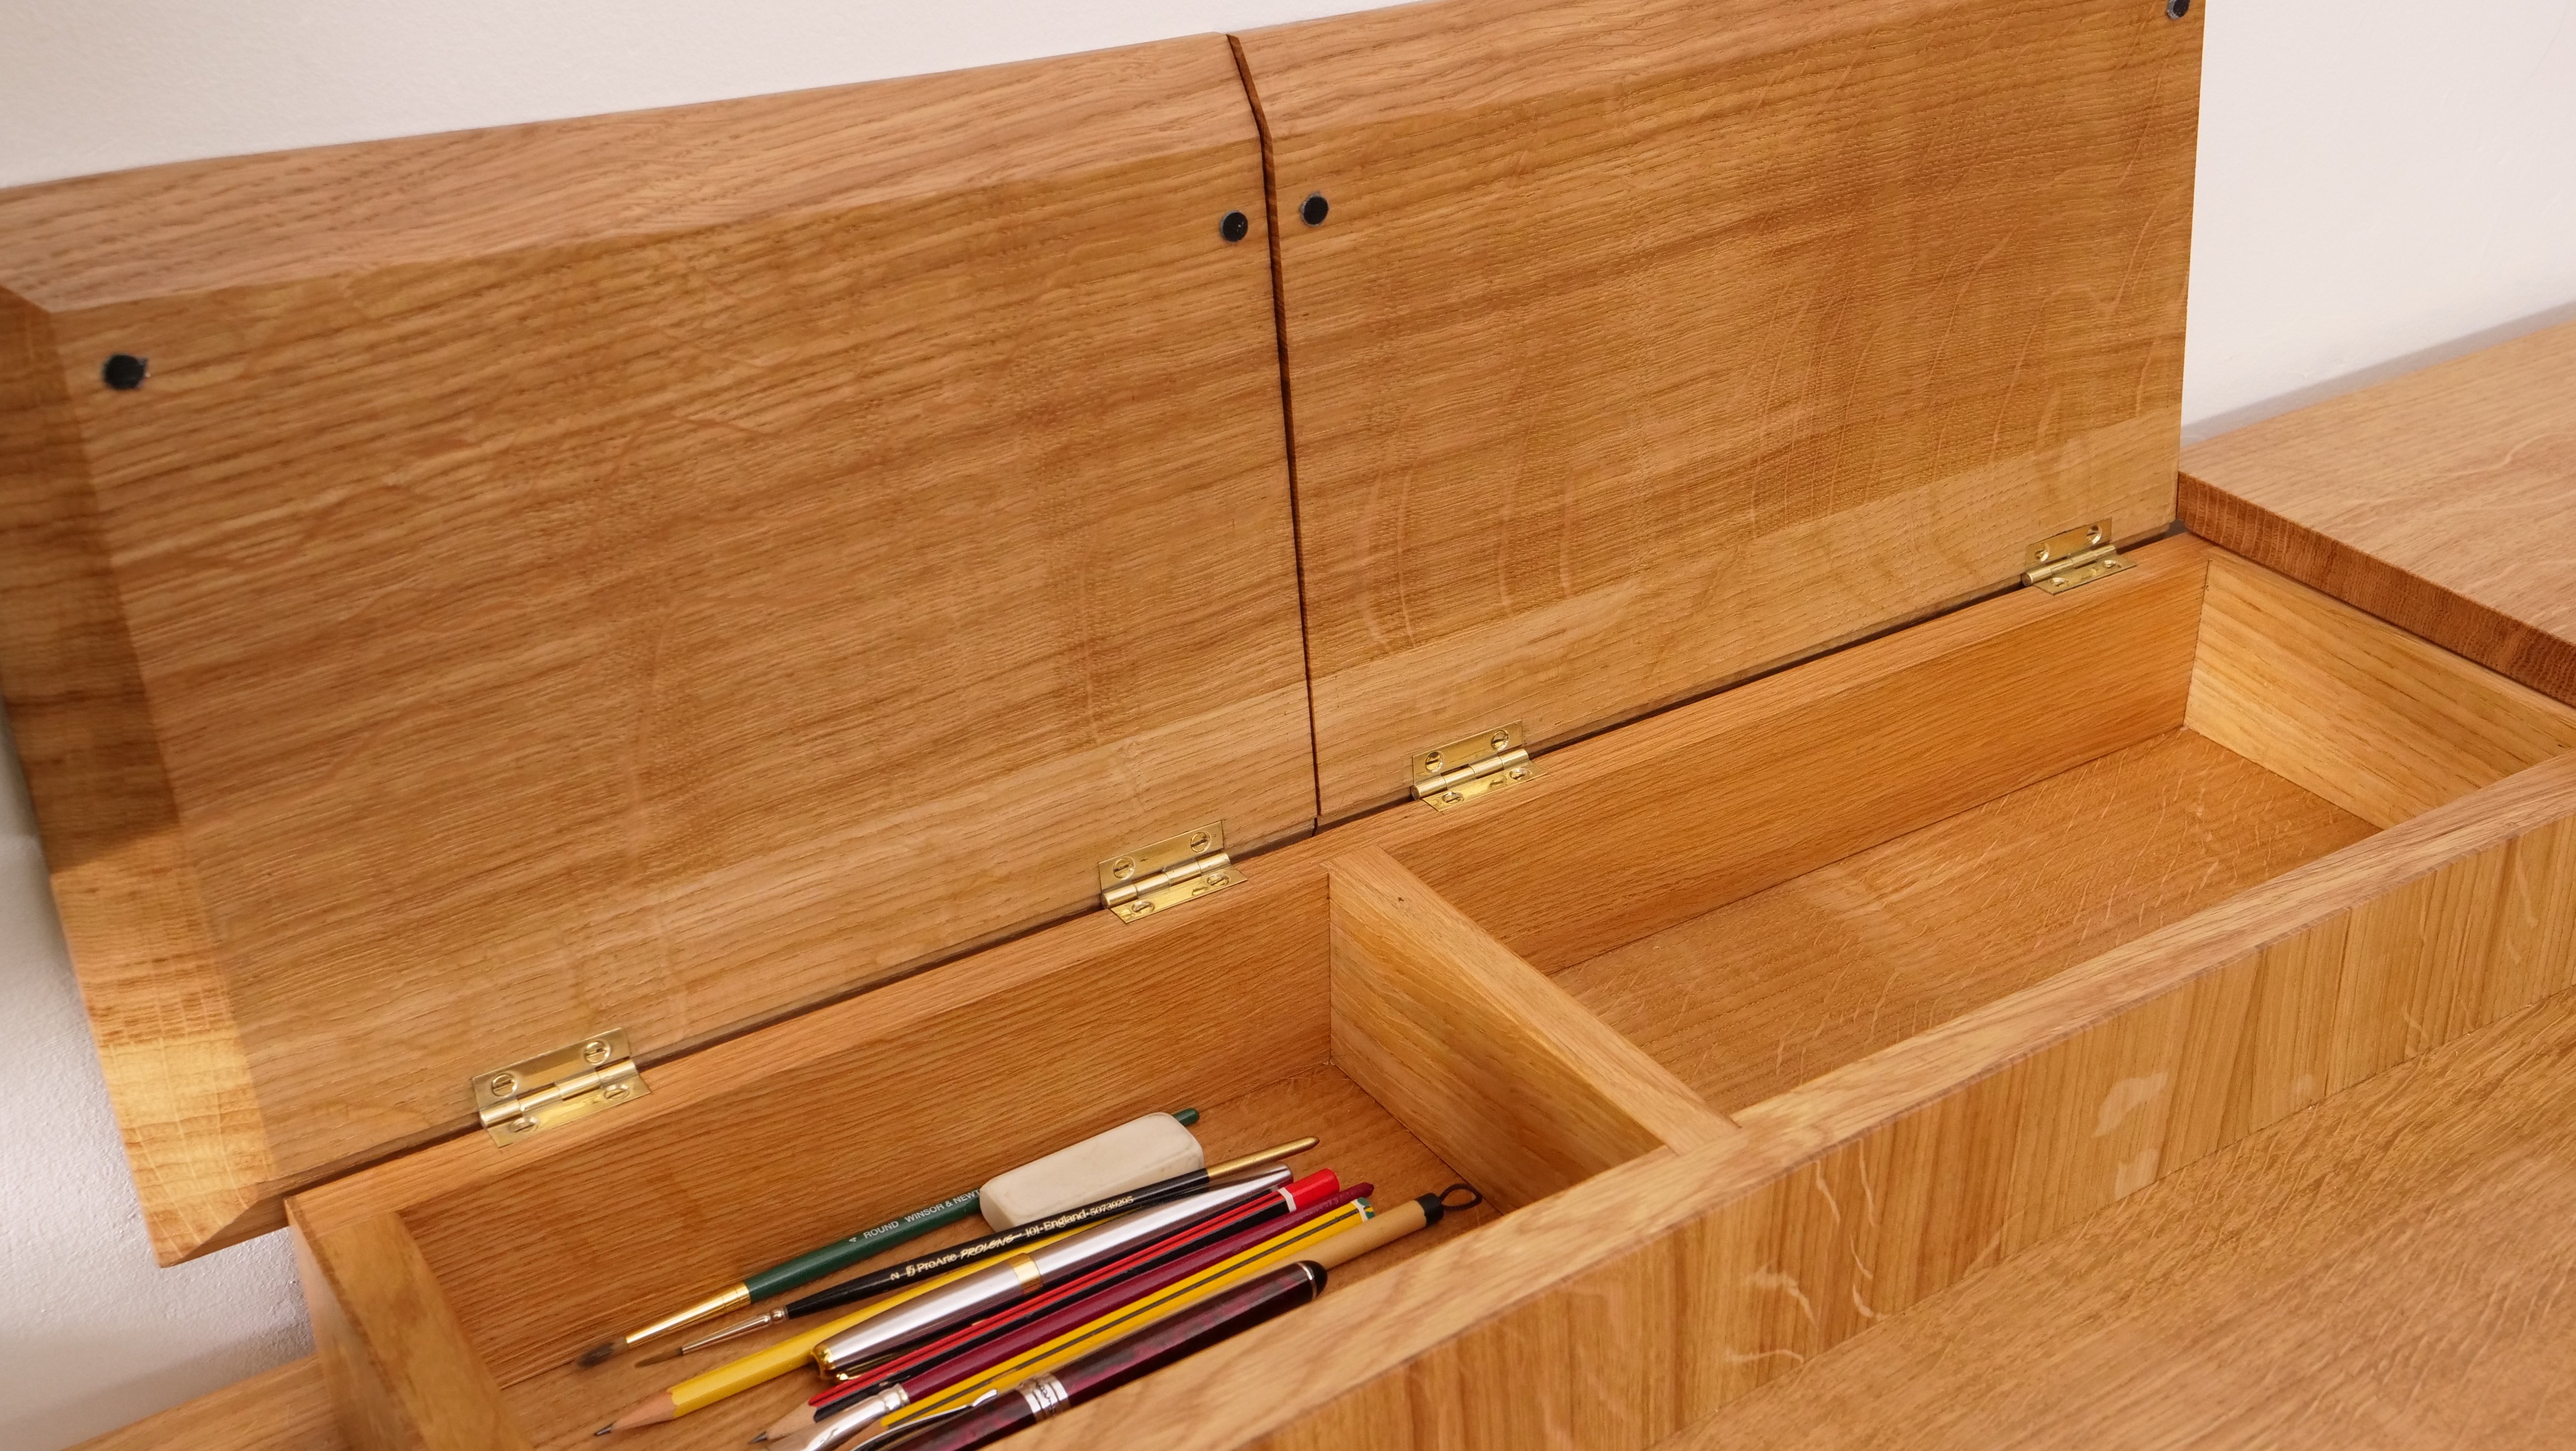
Paul’s latest design for a laptop desk combines opposing curves and rounded sections to create a new and modern look. It features shaped legs, dovetailed aprons AND desk-top bins for convenient storage with neatness. This is a great project for developing new woodworking skills and techniques including creating and using your own veneers.
The tools you will need are:
- Knife
- Square
- Combination gauge (or marking gauge and mortise gauge)
- *Cutting gauge
- Tape/Ruler (or both)
- Sliding bevel
- Dovetail template
- Mortice guide
- Winding Sticks
- Chisel hammer
- Chisels (at least 1/4″, 3/8″, 1/2″, 3/4″ and 1″)
- Hand router (see how to make a ‘Poor Man’s Router here)
- Smoothing plane (No 4)
- Jack Plane (No 5) (optional but recommended if preparing your wood
- from rough sawn)
- Spokeshave (flat bottomed)
- No 80 Cabinet Scraper
- Card scraper
- Handsaw
- Tenon saw
- Dovetail saw
- *Compass saw
- Brace & bit and hand drill or drill driver
- *Rasp
- Flat file (10”)
- Square Awl
* = optional
Joints List:
- Stopped angled mortise and tenons
- Dovetails
- Housing dadoes


Ohhh, that is beautiful!
Ohhh, and another thought…. the stool project done in oak would go nicely along side this…… ideas ideas!
Pity I’ve got a couple of saw horses, a box, a tool chest and a bench to make before I can even think about starting on one of these 😀
What a great looking project!
And also this synergism between craft- & movie-art is jaw dropping.
WWM is a source of pure happiness for me.
Thank you.
If I am reading it correctly, the cutting list refers to 3/4″ thick veneer?
The stock to make the veneer from is 3/4″. The veneer will be cut from this.
Is there a way we could see scans of Paul’s notebook? I was able to read a bit of what you showed, and it was absolutely fascinating! I didn’t realize that he also included his design philosophies along side his dimensional sketches!
I’m interested to know why you chose to use the veneer in a vertical grain orientation…what was the reason for this? Purely for contrast or some other reason?
Im also curious as to why the veneer verses just solid wood. The only thing I can think of would be for movement but using QSWO I would think that movement would be very minimum . Maybe for the joinery on the corners this way he’s using the end grain like normal instead of the side grain . ???? Ahhhh Maybe thats it. Good question though.
Chris
These are great question. Paul will be talking us through the veneering in the relevant episode.
When my wife finds this video on Facebook – and sends the link to me via chat saying “It’s a clever design. It’s functional and pretty. Can you actually build something like that?” – it’s a good day.
I don’t know if I CAN build it, but she’ll let me buy some wood and try it. Here’s to hope!
Thank you Paul. My debt to you and your team is beyond anything I can ever repay…
Love it!
Thanks for the kind words.
@ John-
With Paul and company guiding the way, I think you should be able to do it just fine.
Wow — that is a good-looking desk.
That is a beautiful design. I hope I get a chance to build this one!
I really like the design. I think I’ll be making two or three of these. 😉
Looks like another fun project.
Nice design, looking forward to understanding how the curves are made.
Looks very nice, looking forward to this project and especially the veneering.
I have a no 80 cabinet scraper from Veritas. I’ve been struggling to get it to,work well. I’m hoping Paul spends some time discuss this,tool and how,o,set it up for useage.
Paul has a video on this in tools and techniques
Watch Paul’s video on sharpening spokeshaves (https://youtu.be/B1OHQ2jkDx8). Also, you might be trying to take too much of a “bite” so back off the blade. Lastly, be sure to holds the spokeshaves so as the entire base plate is in contact with the work. Set a slight angle to the blade and shave away.
Paul’s son did a very good segment on putting a nice hook cutting adge on a scraper. I have the same tool. It doesn’t come sharp so you’ll need to do some work on it right out of the box. Good luck.
Great project as always Paul and team. I like the proportions and the integration of the vertical grain. I have never had an idea to “improve” on one of Paul’s designs… and I’m not going to start now. However I would like to “suggest” from a practical point of view that a 3/4″ – 1″ dia. hole could be drilled in the top at the toe of the storage compartments so that a power cord, network cord, etc. could seamlessly go through and not have to go over the top or around the side. That decision may be addressed in due course through the segments dealing with cabling my entire work life it can be an eyesore to an otherwise great piece of furniture. I can’t wait to get these other projects done so I can make one or two of these for my kids to do their homework on.
I’m not sure a person could “improve” on Paul’s designs however, modification to suit your needs is another thing. I hope he does address wiring later as I would want to do the same as you or even put holes into the storage spaces to put cell phone chargers in.
:-). I hate the pile of wires under my desk!
Awesome desk
I’m looking to make this. I want to get the lumber this week. What size lumber do we need to get to cut the legs out?
There is a cut list in the information above detailing the sizing of all the components.
@filadams
Thanks! I had actually realized that after I posted the question…
What are the thoughts on using a secondary wood, like poplar, on the parts that will not be exposed?
@dborn,
That should work just fine. The fact that the veneer is thin allows it to move with the wood it is attached to.
The cut list is only visible for premium members by the way. So if you are viewing this project as a free member, you won’t be able to see the cut list.
Paul, off the topf of your Header, what strukturelle morschiii would need to bei anderen to makellos th ist into a Standup desk
That was aweful, using a friends tablet with German language spell correct. Lets try the question again.
Paul, off the top of your head, what would I have to add from a structural standpoint (if anything) to make this a standup desk.
I asked Paul and he said that it should be fine structurally if you simply lengthen the legs.
I like the drawing format that you have chosen. The hand written notes and sketches give it a homey feeling. Are these actual copies of Paul’s drawings or are these Greg’s reproductions?
@sandy1man,
Glad you like them. Those are Paul’s original drawings.
Will there be details given of the finish methods used in the above example? Thanks!
@ancjr,
The finishing will be covered in the last episode of the project.
Best, Phil
Hi,
I’m looking into this project to see if I can make this desk for my parents. It would be the biggest piece of furniture I’ve made so far. I’ve got a question: a desk in oak would probably blend too much with their oak floorboards, so could I use a darker wood like Black Walnut (Juglans Nigra) for this design?
Keep up the wonderful work!
Onno
You certainly could use black walnut, or apply some form of stain. All the best with the project.
Thanks Philip! I like the smell of walnut, so we’ll probably go with that.
best,
Onno