Workbench: Episode 6
This is an episode in a free series. Want to watch it? It is free to do so, you just need to log into the site, and you can enjoy this video and many other videos we think you will love.
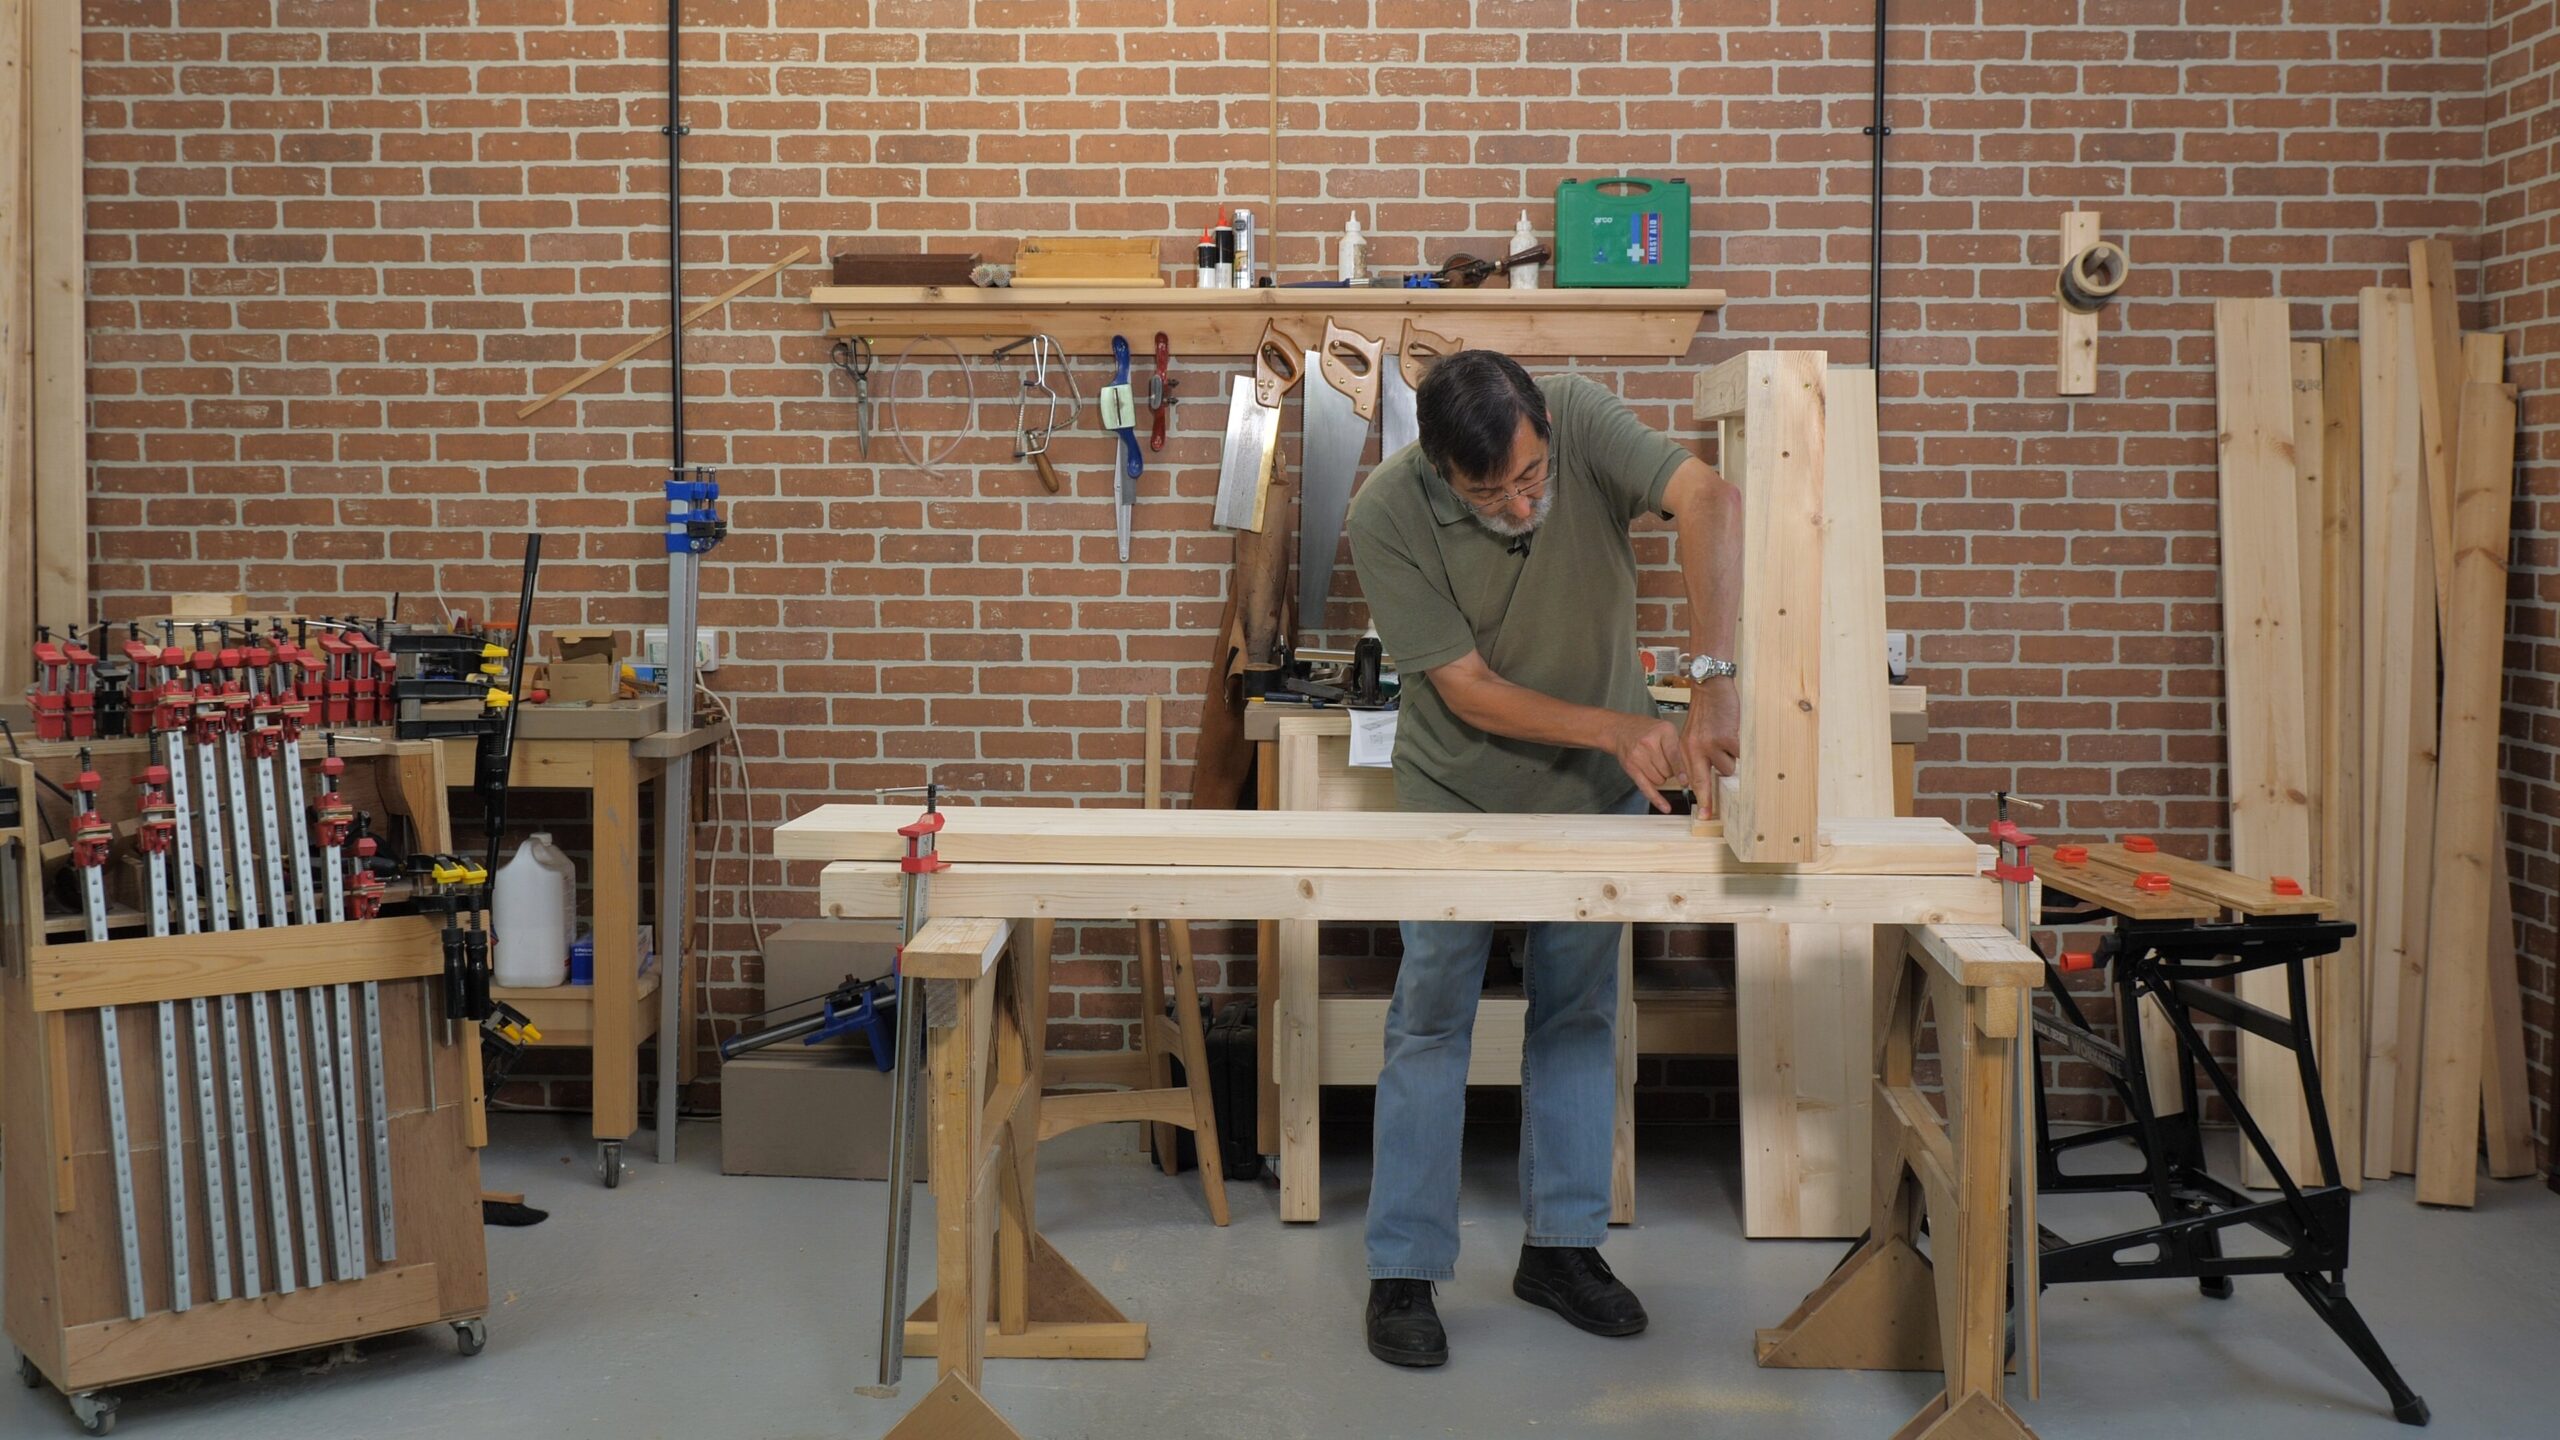
We’re ready to map out the leg recesses in the aprons. Then they are chopped with the chisel and router to an exact depth. Once chopped, the aprons can be attached.
Great stuff as always
I’ve made a version of your bench…it’s great. So solid.
Thank you.
Nothing like putting some of your own blood into your projects. Great stuff Paul.
I usually cut or scrape myself when doing anything. I just tell myself that the job is not done right unless I an bleeding.
With all respect: So if people like us are “bloody beginners”, then Mr. Sellers is the “bleeding master”? 😉
E.
A project is not really my project until it has a little of my DNA in it.
You sound a bit under the weather here Paul. I hope you have since gotten better.
Thanks as always for the amazing content.
Getting closer. Don’t quite understand concept with the wedge. Hard to see but it looked like it just slipped into the space. Why not an exact fit with a regular housing dado? Thanks as always.
Brian, with no diagonals on the legs to stop racking, and the bench being able to be disassembled, the wood will shrink and move about. As it does, you can drive the wedge down and tighten up the joint again
The wedge is awesome because every time you shake or move the table laterally it slips down further tightening the table making it more solid.
Are there plans or dimensions anywhere?
Bill, you can find the plans and cutting list on the introduction page, https://woodworkingmasterclasses.com/videos/workbench-introduction/.
Thanks!
Funny, I saw the chisel fall coming, but I would say it would serve as a lesson to woodworkers learning through your videos. Cheers Paul!
Yes, it also demonstrates the useful need for a stable rigid work surface with some mass. and a tool well too.
I see the plans call for thicker dimension of aprons. Here in the US, 1.5″ is common in pine where Paul calls for thicker material. Is the expectation to laminate boards together to make it thicker or use a more expensive hardwood like hard maple
I used 1 1/2″ doug fir stock for my aprons that ended up at 1 3/8″ after flattening everything out… worked great!
You can use 1.5″ lumber. If you used the lowest grade of SPF 2×12, the front skirt board alone could support 600 lbs with a deflection of less than a millimeter. The loss of 1/8″ won’t be noticed.
and that children is a lesson on why we have tool wells in our bench, i bet you miss the wooden floor of the castle i wouldn’t cry at a splinter either but i would cry at dropping a chisel onto a concrete floor,
“A chisel, A chisel… my kingdom for a chisel!”
wrote mr Shakes Wooden Pear once, I believe!
Great, simply great!
Happy new year to you all
I don’t feel so bad now. I was building a workbench last November and I also had a chisel fall off the temporary setup. Unfortunately mine fell on the side I was standing on. Fortunately the edge didn’t hit concrete. My shin stopped it first. Six stitches.
Ouch. Sounds like something I would do.
How do you not get splinters under your nails and in your fingers when flicking and sweeping the waste like you do?!
Sorry – should have watched it ’till the end..
When I’ve seen the chisel falling on the concrete floor and Paul saying “aaaahhh” I’ve thought inmediatly: “this is real woodworking for real woodworkers”.
My heart stopped when I saw the chisel fall coming… it looked like it landed right on the working edge, too.
Excellent work, as usual, Mr. Sellers.
Just to be clear – thank you for showing us the mistakes you make, Mr. Sellers. Not that we may gloat and point and laugh, but that we can all see that you, like us, make mistakes from time to time.
Excellent work, Mr. Sellers – for showing us that in our mistake-filled life, we can create things of beauty.
Are the advantages of the wedge:
* a tendency to self-tighten with movement and
* long grain bearing on long grain that lessens the less chance of splitting around the housing?
Hello Richard,
They do sometimes self tighten, but can also be manually tightened if there is some movement. Not sure the latter point is significant, but perhaps it has some effect.
Thanks Paul and Team!!!
Ahh. That magic moment when the aprons and the legs come together and you have that internal rush and realise “it’s a bench!”. Suddenly the project becomes a lot more real.
I’ve made two of these benches so far: one for me and another with my daughter for her. I had a really great time on both occasions. I envy all of you who are embarking on your first bench build. Treasure the time and experience.
Great stuff! Like the idea of adding the extended sole to the router. Dose anybody know where I can get blades for my Stanley router plane? Cheers
one of the obvious places to look would be ebay of course, I’ve seen quite a few offers where people were selling just blades, unfortunately they aren’t very cheap so be prepared! 🙂
Jody,
Lee Valley has a huge variety to choose from at reasonable prices.
The 1/2 inch is the most used.
Dont forget to get the sharpening holder…
.makes life a lot easier.
Best,
Craig
http://www.leevalley.com/en/wood/page.aspx?p=67484&cat=1,69174&ap=1
The blades for the Veritas router will fit, but you may need to widen the adjustment slot with a file. They come a little bit long on the Stanley routers as well – at least it did on mine – but if you’re adding a sole then it more than covers it.
Veritas makes cutters that fit in the Stanleys.
They are a little longer, so you have to reverse the adjuster nut, but otherwise they are a Drop-in fit.
It’s not difficult to make them. You need to find a bit of medium-to-high carbon steel, and have the means to heat it in order to make the bend. A gas stove-top should be good enough for this.
Though I already have a similar bench, that I love, I always enjoy watching you work sir and never fail to learn. Sorry about that chisel, pretty sure we all cringed in sympathy.
The flying chisel likes a wooden floor 😉
“The Flying Chisel” would be a great name for several things:
– a tool shop
– a woodworking event
– perhaps a pub
– and last but not least a music ensemble
😉
Woodworking doesn’t get any more real than this. Splinters, blood and a dropped chisel.
And the guitar track over the sped up section is great.
Keep up the great work, all.
Why not. countersink the bolt so one could clamp a board to the apron for edge work?
Was going to ask this question as well.
His Vise isn’t flush with the apron so it doesn’t matter. He has a system he uses for clamping in long boards in other videos. I copied him and it works great.
Gracias Mr. Sellers
Wondering if it is possible to place the wedges on the outbound side of the legs? Also, why might I not want to move the wedges outbound of the legs? I seems it might make the vise side more solid.
Hello Roy,
You could do, it should work fine. Paul prefers the inside as it applies force towards the outside.
I noticed the tape holding the bar in on your clamps, a common problem of their cheap design. i found tight fitting nuts and hammered them on each end. Solved the issue.
I’m really looking forward to making a bench like this. The tiny bench I have does work more or less, but it is far from rock solid, and much too lightweight. But first I’ll have to finish the bicycle roof for our garden.
Thank you, Paul Sellers and team, for all the knowledge you are sharing with everybody! I’ve learned so much here.
I found a Record 52 1/2 vise at a moving sale yesterday. It’s in beautiful condition, so I plan to use it on the front of my bench. The problem is I just ordered my Eclipse vise last week, and it should arrive this coming week. I can send it back, but I’ll have to pay shipping. However, I got a great deal on both, so I wouldn’t mind keeping both of them. I know the previous bench style had a modification for adding a vise to the end, but I’ve already glued up my legs, so it’s too late for that. Is there another way to add the vise? Would cutting into my rails (I used 2×6 lumber) cause problems? Moving my legs inward doesn’t seem like a good option.
I had a cheapo Pony vise that I bought when I first started. After getting a real vise and bench, I mounted the old one on the opposite side and other end. Its amazing how useful it is to have a second place to do a bit of planing or boring without taking the main piece out of my big vise. It sat gathering dust for the longest time while I rigged up clamps or what ever to do the odd bit of adjustment work. I needed to sharpen a saw once but was frustrated at having to take my board out of the vise that I had spent time adjusting to be ready for sawing. But I needed to mount the saw vise to the bench. Then I spotted the old vise gathering dust and now I have two vises on my bench.
Paul,
I built a knockdown bench and instead of using using a washer and nut (which can be lost), the designer had us use threaded rod ceiling mounts from (U.S.) McMaster-Carr to hold the sides to the leg. Part No. 11445T. They attach to the back of the leg by screws and are pretty robust. I don’t know if there’s a supplier for these in England/Europe though.
Simple solution is to pop the bolt and washer back through the leg when disassembled so they don’t get lost.
I do like that idea, but you can’t use a carriage bolt if you do.
My Stanley router plane doesn’t seem to get the depth needed with the added wooden sole (which is 1/2 inch thick). I took the wooden sole off for the workbench build, but lost some stability because of that. Is my cutter relatively short to what is standard perhaps?
The cutters probably aren’t short, it’s that your wooden sole is too thick.
My Stanley cutters provide between 1” and a little more, depending on how much they have been sharpened.
To get the 5/8”depth with the sole on, the sole needs to be 3/8 or thinner.
An Alterative is to get a Veritas cutter, which is a bit longer, or use the cutter without the adjuster nut.
Hi Larry,
thanks for your response. I checked my wooden sole again, and it’s 10 mm, which is slightly over 3/8. I get a maximum cutting depth of 9 mm, so I would have to make the sole 4 mm thin to get the required cutting depth of 15 mm for the workbench. So I don’t think that’s an option with solid wood. Plywood could work, although I fear the sole would have too much flex. Could you measure the length of your cutter, so I can compare it to mine?
“Could you measure the length of your cutter, so I can compare it to mine?”
Sure. My least worn Stanley cutter is about 2 9/16” below the notch. Overall length would depend on the cutter style. They changed over the years.
When I put it in the router (71 1/2) it projects just under 7/8” below the sole. I’ve ever actually used it that deep.
Veritas cutters are a little longer. You have to invert the adjuster to get them to retract all the way.
“thanks for your response. I checked my wooden sole again, and it’s 10 mm, which is slightly over 3/8. I get a maximum cutting depth of 9 mm, so I would have to make the sole 4 mm thin to get the required cutting depth of 15 mm for the workbench. So I don’t think that’s an option with solid wood. Plywood could work, although I fear the sole would have too much flex.”
Time to think out of the box a bit. Consider one of the plastics. Foamed pvc sheet could work, provide a slick surface, and be workable with woodworking tools.
Acetal ( delrín) would be even better, although if you did it by hand, you’d be better off with HSS drills and a hacksaw. Get a plastics shop to cut a rectangular piece to size, then drill the big clearance hole with a hole saw. The mounting holes would be pretty straightforward. An ordinary tap will make nice threads.
The only caveat is that acetal needs radiused inside corners it it may crack. Sand everything smooth, and don’t overtighten bolts.
Thanks for great teaching Paul – reminds me of my apprentice days in the 70s, in NYC carpenter’s union. Taught by many different carpenters and now you! I’ve cut down two old spruce trees and waiting for the drying process for next spring, to build my 2nd workbench – the old style way you show here. Here’s a link to my 1st, then 4 times re-purposed work bench: https://www.facebook.com/photo.php?fbid=10155461015603795&set=a.10151456232683795.1073741825.756858794&type=3&theater
I would like to watch you fix that chisel. Also, I had a question about your changes to the Aldi chisel on your blog site. I didn’t see where you got the brass ferrule that you fitted onto your Aldi chisel.
Sharpening that chisel will depend on how badly the edge is damaged. If the edge is badly nicked, it would be a grinder job, or a good while on the course stone. Then back to the normal technique from there.
Think Paul picked up the ferrules from a show, but if you google brass ferrule you can find a few tool suppliers in the UK that supply them in various sizes. Sorry not to be more specific.
Hi Paul, Just watched this episode. I know you have tried and tested methods of holding and sawing stock, but it occurred to me while you were cutting the wedges. How about making a Saw bench. It would be a great addition to the full bench for when we have large stock to break down to rough size. I already have one from the design of a Canadian Hand tool worker (Tom F), but it might be helpful for others
Hello Peter,
Thank you for the suggestion. Paul often uses saw horses for tasks like this, which is available in our video library. So we are unlikely to use a saw bench.
Best, Phil
I plan on adding a tail vice as I managed to pick up a pair of Record qr vices cheap on eBay which I’ve restored. In the previous series, Paul lowers the top rail on the leg assembly to create clearance for the vice mechanism when adding a tail vice. On this design that doesn’t seem practical as the rails appear deeper and lowering would interfere with the ability to bolt through from the apron. Would it work to just remove an appropriate size section from the rail instead of lowering given that it’s more substantial than in the previous series? Or is there a better solution for this? Thanks
Just a suggestion you could use a coach screw or some other hardware that doesn’t require you to access the other side of the leg? Threaded insert maybe?
Thanks for the suggestion, but think that if the rail was lowered then the coach screw would be going into the tenon?
I wad in the same situation when I found a record vise at an estate sale right after I ordered my Eclipse vise. I ended up selling the eclipse vise, but I had decided that since the rail was wide enough I would drill and cut the holes necessary in the rail for the bars of the vise.
That’s what I’m thinking at the moment – thanks
Just checked with Paul, and he thinks there’s plenty of strength if you cut a section out of the crossrail to fit the end vise.
Cheers Philips – appreciate that.
This is my first hand tool project, so I’ve experienced quite a learning curve. In trying to get my bench top perfectly flat after a terrible glue up, it is getting quite thin. I’ve still got a bit of twist and its just over 2 inches. How thin is too thin? I’m not opposed to redoing my bench top if needed. I don’t want to cut my apron recesses until I decide what to do.
Hello Erin, 2 inches is fine, I would continue with that.
What I like about Paul’s videos is that they are warts and all. He doesn’t edit out things that go wrong. Things that us learners would do and believe that someone like Paul would never do. For instance, leaving the chisel on his makeshift table and knocking it to the floor damaging the edge.
I do such stuff all the time. Makes me feel better that Paul can do it occasionally.
From a 68 year old ‘newbie’….
Just cut the last of the 4 apron recesses and compared how they went first-to-last. My mind went back 45 years to dental school when 40 odd students were each supplied with a 6″ dowel of dyed plaster of paris, a metal rule, Stanley knife (not sterile!) and a cutting diagram to fabricate various shapes. The ‘test’ was timed, and that was the last anyone thought of it, until 5 years later, having graduated, we were given the same test for comparison….the general consensus was that we were probably no more accurate, but a lot quicker! So how did my apron recesses go? Well happily, they did get better and went quicker, but then I had the distinct advantage of constant references available to a master of his craft. Many thanks to all the team, I am loving every day of it.
What is the thinking for the 9 inch distance for the leg placement? My bench top is 73 inches, and my legs are 5 1/4. Paul’s bench is 66 inches and his legs 4 inches.
Also, will there be instruction for (1) the drawer, and (2) adding a shelf?
Why Paul didn’t put a knife-wall on the top section where bench top goes? Just a pencil line..
Because it’s along the grain.
The knife wall prevents tear out and is more rigid so you can hit the chisel harder as it is more difficult to cut perpendicular to the grain.
I’m currently building my bench, and I try to replicate as many techniques as possible. I can’t figure out what the chisel on the floor is supposed to achieve. To me it just seems like extra work. I did do mine a bit differently, maybe that’s why.
-Is the timing important? I dropped mine while laminating the top. Should I have waited until the apron cutouts?
-What surface would be ideal? Your floor looks like concrete. I was working in my tiled driveway, but I have access to concrete floors at work, if it makes a difference.
-You mentioned it landed right on the edge. Mine hit at an angle, so only half the edge touched the ground. Should I drop it again to get the rest of the edge, or would it be better to regrind and try again at the correct angle?
-Does size matter (I’m talking about chisels here)? Mine is smaller than yours, or at least narrower. The length looks about the same (still talking about chisels).
Sorry for wasting your time…
Nikolaj: I’ve pretty much just started throwing all my tools on the floor first thing. Gets it out of the way.
Sometimes I drop them in the middle of working, just for variety’s sake. As far as size, I try to drop them only a metric distance of 3.1 meters. I find that english drops don’t achieve the same need for resharpening. PS. My floor is solid, monolithic slab concrete.
I’m left wondering about the wedges’ purpose…to enable continual tightening? Why not just a simple stopped housing dado the width of the leg?
Paul addressed the purpose of the wedges in his original large workbench build – part 11
https://paulsellers.com/2012/06/making-the-workbench-11/
Thank you for the reference!